OMNI SAMPLER
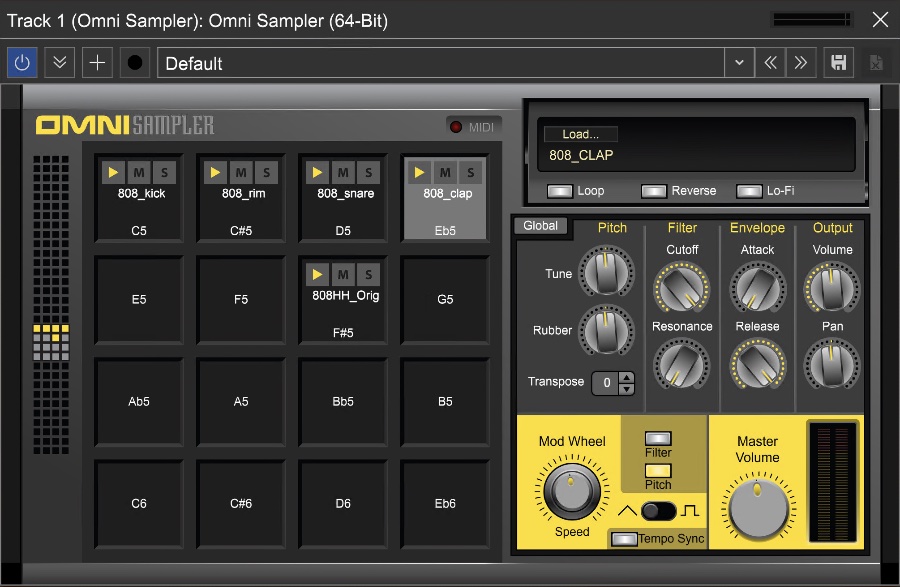
Omni Sampler expands Alpha Sampler’s simple drag-and-drop concept to a familiar 16-pad drum machine grid sampler with easily switchable “grids,” allowing up to 128 simultaneously loaded samples. Better still, Omni Sampler features independent pitch, filter, and envelope settings for each pad location. Mixcraft Pro Studio 8 also includes
Omni Sampler 8 Out, featuring up to eight individually assignable outputs for superior mixing and effects flexibility.
SAMPLE PAD GRID
Omni Sampler can have up to 128 simultaneously loaded samples, with 16 sample pads viewable at any time. The matrix grid on the left allows quick selection of which 16 sample pads are currently viewable in the 4x4 pad grid. The currently selected 4x4 pad grid is represented in the pad bank selector either by yellow squares indicating pads with samples currently loaded, or gray pads indicating visible pads with no sample currently loaded. To change which pads are currently visible in the 4x4 pad grid, click within the pad bank selector. Keep in mind that sample pads always have a one-to-one relationship with MIDI notes, and the MIDI note number of each pad is fixed, starting at C-1 for the top left pad, going up to G9 for the bottom right pad.
If you’d like to play the same sample on separate pads, simply reload the sample at a different pad location. Be aware that Mixcraft 10 automatically saves sounds loaded into Omni Sampler into the current song project folder, so you don’t need to worry about sounds getting “lost” if you move or archive the project folder.
PAD SELECTION
Pad locations can be selected for loading or deleting samples, or sound editing by clicking on them. Empty or occupied pad locations will highlight in light gray when selected. Multiple pads may be selected by clicking on them while holding the [CTRL] key, or by clicking and dragging a rectangle over the desired pads. (Be sure to initially click either outside the grid area or on one of the lines dividing the grid, not an actual pad.) You can even select pads by dragging a rectangle over sections of the pad bank selector on the left.
LOADING SOUNDS INTO OMNI SAMPLER
There are a couple of ways to load sounds in Omni Sampler:
• Method 1: Select the destination pad in the 4x4 sample grid by clicking on it. The pad will turn gray. Press the “Load Sound” button in the Sample Display window. This opens a standard dialog box which can be navigated to any sound. Select the sound, then press the Open button to load.
• Method 2: Drag and drop any audio clip from Mixcraft’s clip Library (click the Library tab at the bottom of the Track View Window to select and preview clips) or from the Track View window directly to a pad in the 4x4 grid.
• Method 3: Drag and drop any audio clip from Windows File Explorer to a pad in the 4x4 grid.
Audio clips dragged in from the Track View window will retain their start and end points as set in the Track View window, allowing easy editing of the sample’s start and end points. This is handy if you’d like to use just a portion of one of Mixcraft’s included loops or sound effects - first, drag the clip to an open audio track in the Track View window, adjust the start and end points, then drag the clip into Omni Sampler.
Samples loaded into Omni Sampler are velocity-sensitive. In other words, play the keyboard softly and samples will play quietly. Conversely, playing hard will cause samples to play loudly.
Beat Slicing Sounds from the Sound Tab with Omni Sampler
In addition to the import methods shown at left, any sound can be imported into Omni Sampler directly from the Sound Tab window. The simplest option is the use the “Copy Selection To” menu. This adds the currently selected wave region to an existing or newly created Alpha or Omni Sampler.
The far more interesting and flexible Sound Tab import method is the “Slice To…” menu. “Slice to…” automatically “cuts up” the sound by beats, measures, transients, or warp markers. Each “slice” is then automatically imported to an Omni Sampler pad location. The “Create MIDI Loop” check box will even create a MIDI clip that consecutively “plays” each slice. This is manna from heaven for cutting up and rearranging beats, and with Mixcraft’s immense beat loop collection, there’s enough material to keep beat fanatics busy for years!
PERFORMANCE CONTROLS
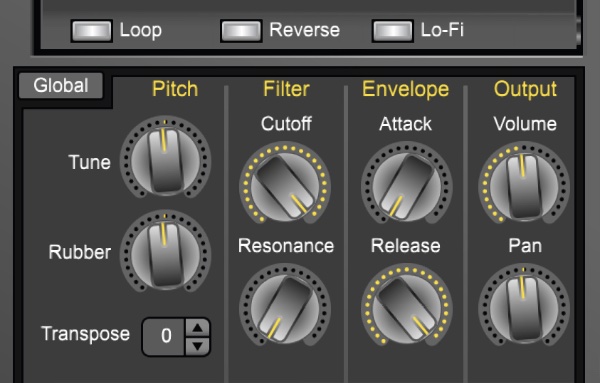
Omni Sampler’s performance controls include Pitch, Filter, Envelope, and Output settings and are set separately for each pad individually (it’s easy to remember because “pad specific” controls have a gray background).
PITCH
FINE TUNE
Allows adjustment of the sample’s pitch + or - 100 cents. You can quickly restore the Fine Tune control to zero by double-clicking the knob.
RUBBER
This is a fun and unique feature especially suited to drum loops or snippets of entire mixes. When set to the middle position, the Rubber effect is off. Turning the knob to the left of center will make the sample begin at a high speed and pitch then slow down as it plays. Turning the Rubber knob to the right of center position has the opposite effect: samples will start at a low pitch and get faster (and higher) as they play.
TRANSPOSE
Changes the pitch of samples in half-step increments with a maximum range of two octaves, up or down. Click the up/down arrows to move pitch in half-step increments, or click on the number to directly type a number value (add a “-” before the number for downward transposition). After entering a number value, click again.
FILTER
Omni Sampler’s filter is a modelled classic low pass filter.
CUTOFF
Sets the lowpass frequency of the filter. In other words, all frequencies beneath the cutoff knob setting are allowed to pass through, but frequencies above it are blocked.
RESONANCE
Emphasizes frequencies close to the cutoff frequency. The higher the setting of the Resonance knob, the greater the emphasis, resulting in the familiar “ringing” and (when the cutoff is modulated as described below), “wah-wah” sounds.
VOLUME ENVELOPE
This is a simple attack/release envelope generator affecting the sample’s volume.
ATTACK
Regulates the onset of a sound; at zero, the sound begins immediately, as the attack setting is increased, the sound takes longer to reach maximum volume.
RELEASE
Affects the volume of the sample after the key is released. Set at zero, the sample will stop as soon as the key is released. As the release setting is increased, the sample fades away gradually. Higher settings increase the length of time.
OUTPUT
VOLUME
Adjusts the level of each pad individually, letting you obtain an optimum mix. Its middle setting represents unity; Omni Sampler won’t add or subtract gain, but turning the master volume up make quiet samples louder, and dialling back will prevent super loud samples from distorting, which can be helpful when the filter’s resonance control is cranked up.
PAN
The pan control lets you set the position of each pad in the stereo field from left to right. You sooo knew that already.
Output Channel Selector (Multi-Out version only)
This control is only visible if you’ve chosen the multi-out version when opening a new instance of Omni Sampler. It allows each sample pad to route its audio to one of eight stereo child track mixer channels. For more information, see “Omni Sampler 8 Out.”
You’ll notice a few extra buttons beneath the Sample Display window as well. Like other performance parameters, these can be set individually for each sample pad.
• Loop
Makes the sample indefinitely loop back to its beginning if a key is held longer than the entire duration of the sample.
• Reverse
Plays the sample backward in case you’re doing a dope cover of The Beastie Boys’ “Paul Revere.”
• Lo-Fi
Processes samples down to an 8 kHz sample rate and eight-bit word depth for a crunchy, aggressive sound similar to classic vintage 8-bit hardware samplers and drum machines.
MASTER SECTION
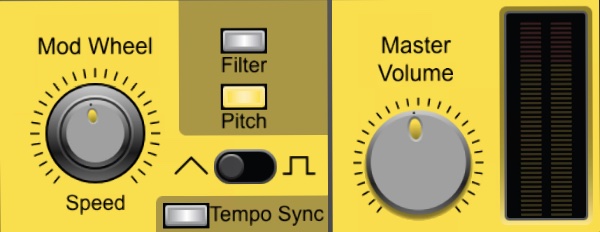
The master section’s controls affect all pads simultaneously - these controls have a yellow background.
GLOBAL

The Global button makes the Performance Controls (Pitch, Filter, Envelope, Output, Loop, Reverse, and Lo-Fi) affect all currently loaded sounds simultaneously. This is handy when multiple loops or drum sounds are playing and you want to modify everything at once (such as a filter sweep on everything). Global mode is toggled on and off by clicking the button; when global mode is active, the Performance Controls background turns yellow. When Global mode is switched off, the background returns to gray and the Performance Controls become independently settable for individual pad locations.
If you’ve already set Performance Control parameters for individual pads prior to engaging Global mode, the settings for that parameter will remain until that parameter is adjusted at which point it will affect all pads equally. For example, let’s say the filter cutoff is set to differing amounts for multiple pads, then the Global is engaged. The individual filter cutoff settings for each pad will remain until the cutoff knob is adjusted. At that point, all pads will jump to the current setting. Keep in mind that this becomes the “current” knob position - changed knob positions won’t return to their old values if the Global button is disengaged.
MODULATION
The Modulation section consists of a low-frequency oscillator (LFO) capable of controlling Omni Sampler’s pitch or filter cutoff frequency, resulting in vibrato, wah wah effects, and more. One good way to think of a modulation LFO is a “third hand” to automatically turn controls up and down. The modulation amount is controlled using your keyboard controller’s mod wheel (or any other physical controller set to transmit MIDI controller #1).
SPEED
Adjusts the rate of the LFO.
FILTER AND PITCH BUTTONS
These buttons select the modulation destination. Pressing Filter causes the LFO to modulate the cutoff frequency of the filter. Pressing Pitch causes the LFO to modulate the pitch for vibrato effects. Both can be selected simultaneously.
TRIANGLE/SQUARE WAVE SWITCH
Toggle between triangle and square LFO waves. The triangle waveform cycles up and down in a smooth and uniform fashion, making it a good choice for subtle vibrato or, at extreme settings, swooping sirens or extreme wah effects (when modulating the filter). The square waveform jumps back and forth abruptly, good for sirens with alternating pitch, or when used with the Tempo Sync switch, “synchro-sonic” type rhythmic effects.
TEMPO SYNC
When the Tempo Sync button is on, the LFO rate is synced to the tempo of the current project and, now, the speed knob snaps to musically relevant values, making the LFO modulate in lock-step with the beat. The synced note values range from a whole note to sixteenth notes.
MASTER VOLUME
Adjusts the volume level of all samples at once. Its middle setting represents unity. The digital meter indicates relative level; for optimum gain, set it so that it stays strongly in the green and doesn’t go into the red often.
MIDI

Though it’s not located in the yellow master section, you’ll see a MIDI light to the left of the Sample Display window. This indicates incoming MIDI data, and can be helpful in those inevitable, “why the heck isn’t this making any noise?” situations.
WORKING WITH SAMPLES IN OMNI SAMPLER
Sample pads can be played and recorded in Omni Sampler by playing pads or keys on a MIDI controller. Each sample pad also has three buttons across the top:
• Play Button
This is a handy way to preview a pad’s current sample. It will play the sample as long as it’s held (or until the sample runs out).
• M (Mute) Button
This toggles muting for the selected pad. It’s handy if you’ve sequenced a lot MIDI elements and would like to temporarily remove a sample.
• S (Solo) Button
Opposite of muting above; it toggles all other pads off when pressed. Multiple pads can be soloed as well. If you’re having a “why won’t this thing make any noise?!?” moment, make sure none of the solo buttons are pressed.
MOVE A SAMPLE PAD
To move a sample from one pad to another, simply click and drag it.
DUPLICATING A SAMPLE PAD
To duplicate a sample to a different pad right-click and choose Duplicate Selected. A copy of the sample will appear at the next available pad. You can also copy to another pad by option-dragging the selected sample pad.
RENAMING A SAMPLE PAD
To rename a sample pad, right-click and choose Rename. The current name will be highlighted; type a new name and hit the return key, or click anywhere outside the current pad.
DELETING A SAMPLE PAD
To delete a sample, highlight a pad, right-click and choose Delete Selected, then click Yes at the next dialog box. Don’t worry, this won’t actually erase the sample from your hard drive, it just removes it from the Omni Sampler pad location.
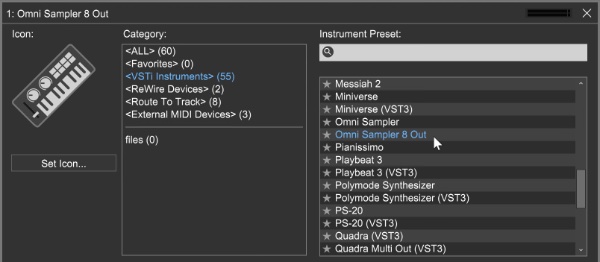
OMNI SAMPLER 8 OUT
(MIXCRAFT PRO STUDIO 10 ONLY)
When opening a new instance of Omni Sampler, you’ll see two choices: Omni Sampler - Stereo and Omni Sampler 8 Out. Like any other standard VST instrument, the stereo version mixes all audio output to one stereo fader mixer channel. Omni Sampler 8 Out is a multi-out version allowing the routing of each pad to one of eight stereo child track mixer channels.
This is particularly useful for advanced mixing and effects processing. You could accomplish the same thing by using multiple instances of Omni Sampler, but it’s often easier to have samples “all in one place,” especially if the samples are related in some way (they’re all used in one beat, for example).
To use a multi-out Omni Sampler, create a new track by clicking the +Track button, then selecting Insert Virtual Instrument Track. Click the piano keyboard icon on the track, then click <VSTi Instruments> in the left column. In the right column, scroll down and click Omni Sampler 8 Out).

A newly opened Omni Sampler 8 Out defaults to standard stereo output.
Enable additional output pairs, by clicking on the Config button in the Instrument Window.
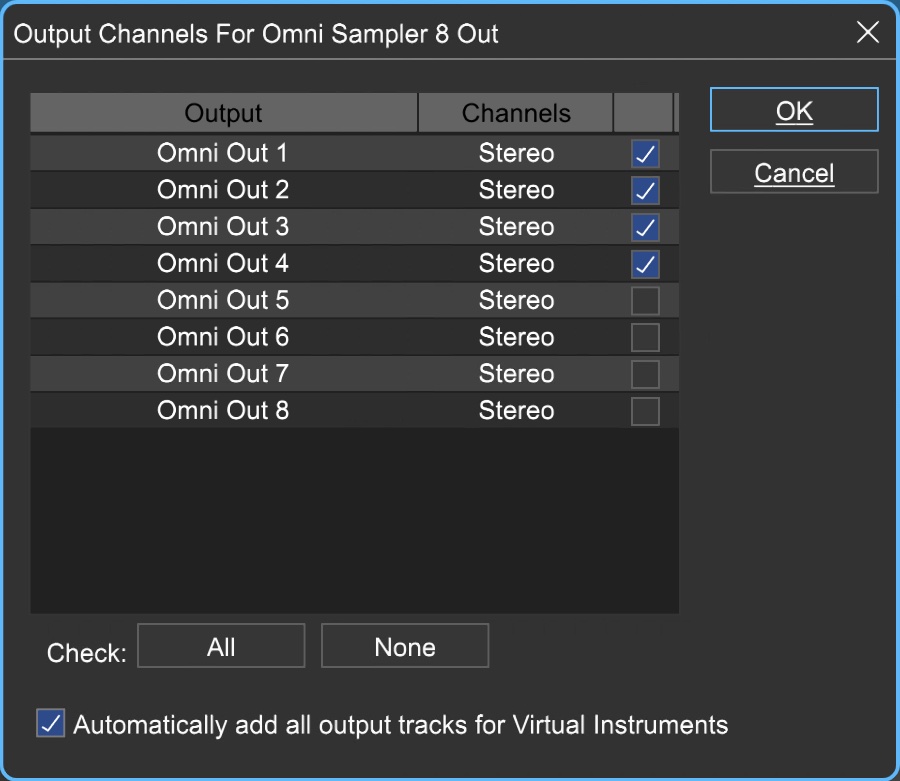
This opens the Output Config window. Here you can enable additional output pairs by clicking the checkboxes on the right. The All and None buttons will enable or disable all additional outputs, respectively. Automatically add all instrument output tracks for Virtual Instruments does just that... it enables all outputs for newly added multi-out capable instruments. If you’re only using a few separate outs, child channels can be disabled to save screen real estate.

Click the Show button in the Instruments area next to Omni Sampler 8 Out to open its controls. You can close Mixcraft’s instrument window by clicking the X in the upper-right corner.

You’ll find the Output selector increment buttons beneath the Pan control in the Output section in Omni Sampler’s controls. This lets you choose from eight separate stereo “child” mixer channels for each pad. Nifty, eh? To see these channels in the main arrange window, click the + sign directly to the right of the instrument’s track icon. To hide child channels, click again on the - sign (that’s a dash).
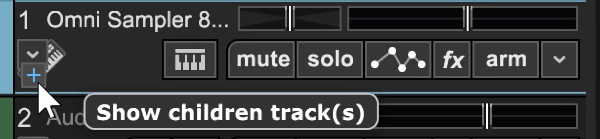
To see the multi-out child channels in the track list, click the + sign in the track.
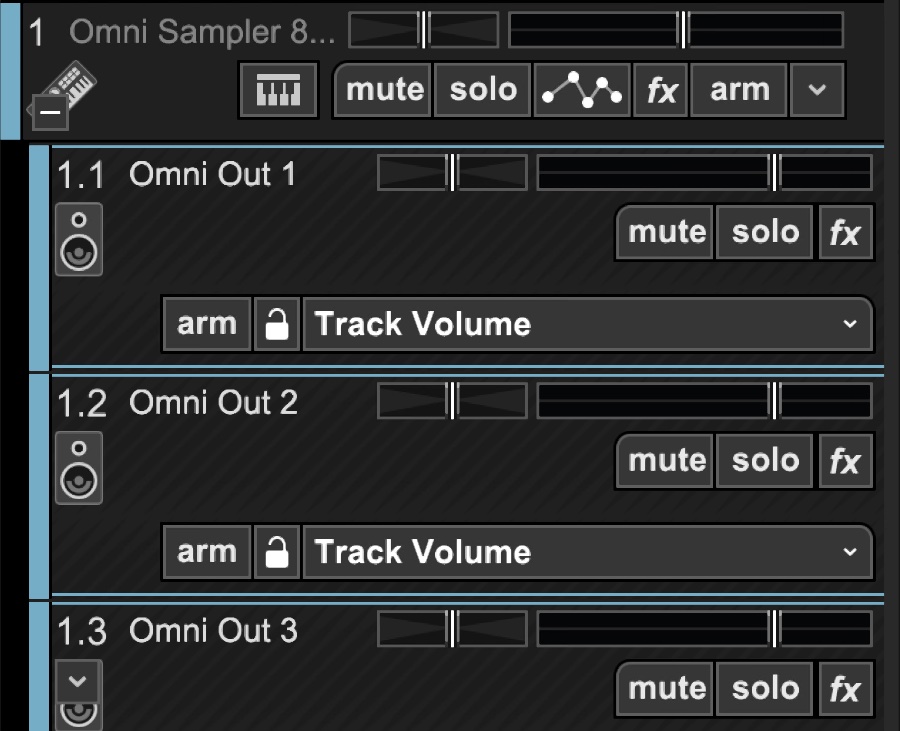
Separate outs will be visible in the track as list as child tracks.
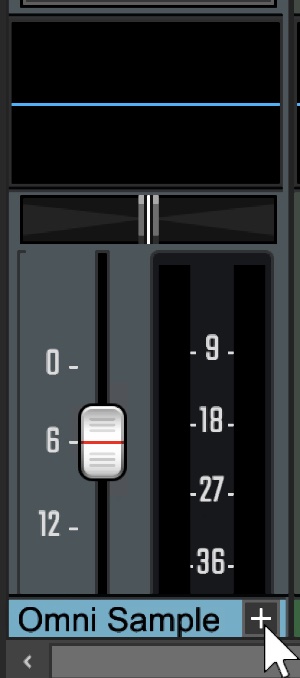
The Mixer Tab shows Omni Samplers multiple outs in a similar fashion:
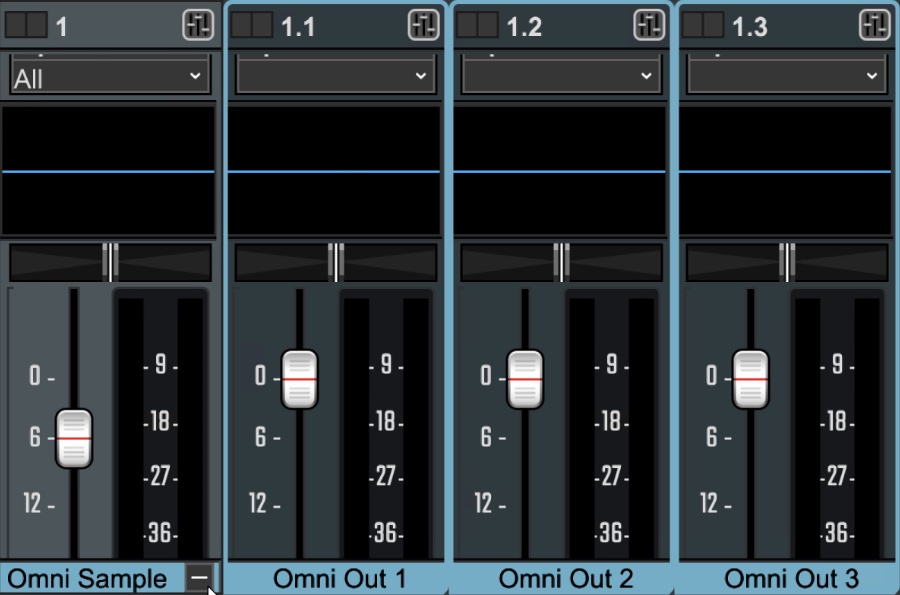
The separate out child tracks are hidden by default in the mixer but can be viewed by clicking the + sign in the main Omni Sampler channel. Click the - (minus) sign in the main Omni Sampler channel to hide the mixer child tracks from view.