An eager user launches Mixcraft for the first time and loads in some previously recorded audio. Now what? Without any knowledge of the interfaces of the program, it would be difficult to know where to begin – even finding the magic “play” button would be uncertain! This chapter, which will help educators learn to navigate Mixcraft’s visual interface, begins with a look at the workspace. The Workspace is then deconstructed into individual components. The chapter concludes with a description of these individual Workspace components. For easier learning, the most important and necessary functions of Mixcraft have been highlighted. For specific walkthroughs on how to use audio, MIDI, or video with Mixcraft refer to Chapters 3, 4, or 5 (respectively). If educators should have further questions, multiple technical references and Mixcraft’s built-in Help Menu are available.
MIXCRAFT’S INTERFACE
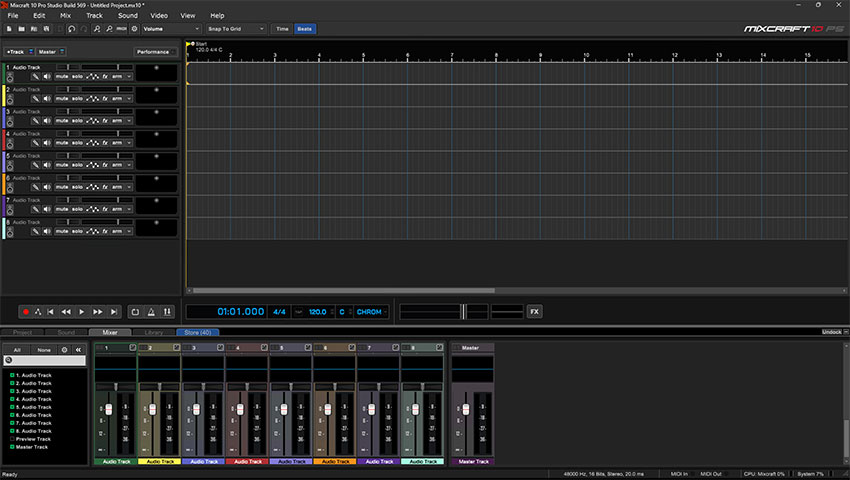
Mixcraft’s workspace with eight audio tracks.
Perhaps the most important piece of Mixcraft’s interface, the Workspace allows users to manage their session by adding or deleting tracks, starting or stopping playback, editing and arranging audio, and controlling the master volume. This is where the magic happens. The left column displays all in-use tracks. These tracks are used to mix and record audio or to use Mixcraft’s virtual instruments (shown in the above screen shot are eight audio tracks earmarked by the speaker clip art). The white open space to the right, with a grid-like backdrop, is Mixcraft’s Timeline. This space allows users to arrange, edit, and visualize their sessions. The top area contains the menu and toolbar, while at the bottom is the master bar (there is that magic play button!). The record button and the master volume slider are located on the master bar.
Below is a deconstruction of the Workspace. We recommend reviewing these essential features before beginning the lesson plans:
TIMELINE
The Timeline is a linear organization of all audio tracks, virtual instrument tracks, video tracks, send tracks (tracks that apply effects over multiple tracks) and submixing tracks (tracks that contain other tracks). Here, users will see audio recordings represented as “audio regions” that are illustrated with audio waveforms. Virtual instrument tracks use MIDI and thus are shown as “MIDI regions” that display MIDI graphics. There are several important functions relative to the Timeline that educators should become acquainted with:
The Playback Cursor: The Playback Cursor, denoted by a green marker, acts like a vertical cursor on the Timeline. Click anywhere on the Timeline to set the cursor. Playback begins from the cursor’s location. The cursor can also be used to highlight or select regions on the Timeline.
Markers: Adding markers is a handy way to narrate a Mixcraft session because it enables a user to label specific parts of a song (verse, chorus, bridge) on the Timeline. Located at the top of the Timeline are numbers that refer to measures and beats. Simply right click on a beat number to add a marker.
Snap Setting: Though technically part of the Toolbar, the snap setting influences how regions on the Timeline behave. When editing audio and MIDI regions, activating the snap settings automatically “snaps” the regions to the Timeline’s grid. Users can easily rearrange or edit regions and ensure that they remain aligned with the rest of the session.
Audio and MIDI Regions: Both audio and MIDI information appears on the Timeline in the form of “regions.”
Audio Regions are editable chunks of audio that can be dragged, cropped/extended, or cut to be arranged on the Timeline. Regions illustrate the waveforms of either imported or recorded audio. Users will notice that for percussion sounds or instruments with a quick attack, the audio region will display peaks in the waveforms that refer to these transients (the quick percussive attack of a sound).

An example of how audio appears on Mixcraft’s Timeline.
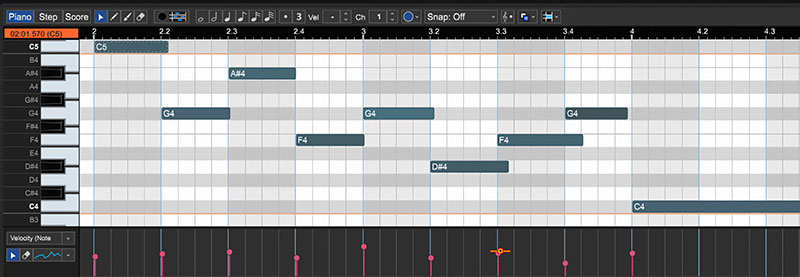
MIDI Regions illustrate MIDI notes and MIDI data. Horizontal lines within the region refer to the duration of a note (how long the note will be sustained) while the vertical position of a line refers to pitch (higher lines have a higher relative pitch to lower lines)

A virtual piano instrument realized as MIDI on Mixcraft’s Timeline.
MASTER BAR
The Master Bar, located at the bottom of the Workspace, allows users to play (click the green arrow icon or hit space bar), stop play (click the green arrow or hit space bar again), or record (click the red circle or hit “R”) during your Mixcraft session. Simply hover the cursor over each icon to learn its relative function. Remember, play back or recording begins from the position of the playback cursor. Mixcraft also has rewind and fast forward functions.

The master bar controls: recording (red dot), play (green arrow), and fast forward and rewind icons.
Three additional toolbar icons, located to the right of the master play button on the master bar, activate loop mode, the metronome, and punch in/out recording. The green screen interface to the right refers to the play position or time, the tempo of the session (calculated in BPM), and the session’s master meter and key. To adjust the tempo or key, simply click the interface and change the parameters.
Tempo and time screen: Users can double-click or hover over the interface to edit certain parameters, such as key and meter.
Master volume slider: A master volume slider controls the level of Mixcraft’s overall audio output. Select the slider with your cursor and move it left or right to adjust the master volume Moving it to the right increases the volume. Moving it to the left decreases the volume.
Metronome: The metronome function enables a metronome that will sound along with the music during playback or recording. By having the accompaniment of the underlying beat, students playing along can (hopefully!) achieve cleaner performance takes. Additionally, recording to a metronome ensures that the audio tracks are aligned to Mixcraft’s Timeline, which makes recordings easier to edit. The metronome has three settings: playback, recording, and count-in measures. Users should become acquainted with the recording and recording count-in measures because these settings are commonly employed. The latter setting activates a count off before Mixcraft starts recording and is useful for recording groups of students.
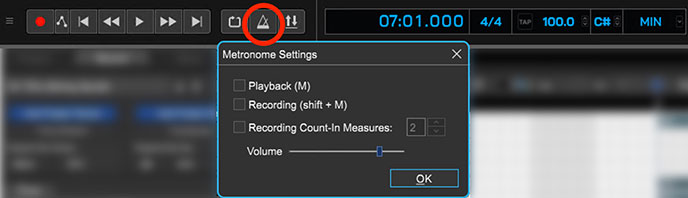
The metronome icon and settings
PERFORMANCE PANEL
The performance panel is a powerful performance-orientated tool that allows students to remix, compose, improvise, and perform music in real-time with Mixcraft. Consisting of a grid-like interface, students can drag and drop Mixcraft loops, audio recordings, and even MIDI regions into unoccupied panels and use these panels to then cue, play back, and create a song from the ground up with audio and MIDI loops. For student projects, the performance panel makes it easy to experiment with different arrangements when performing or improvising live music. External MIDI controllers can also be used to control the performance panel.
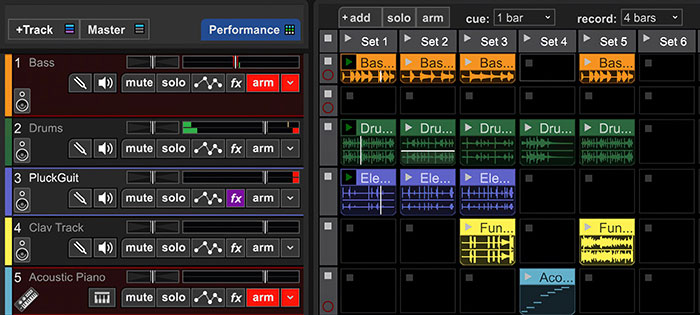
The performance panel, located on the right, is a massive grid that students can use to launch audio and MIDI regions and loops to create a song from the ground up.
TAB AREA: PROJECT, SOUND, MIXER & LIBRARY
The Tab Area (lower left of Workspace) is a group of windows organized into four “tabs” (Project, Sound, Mixer, and Library). For student projects, the most important tabs will be the Library and Mixer areas. Both teachers and students should become familiar with the search and browsing features of the Library and the layout of the Mixer.
Project Tab: Here, users will find the metadata (e.g. song title, author, album title, music genre, etc.) and project notes pertaining to the Mixcraft session. Students can use this area to jot down notes or ideas about the project. These fields can be edited by clicking and entering text.
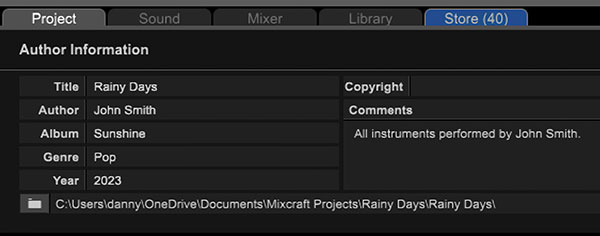
Here, the Project Tab displays the session information for the song “Rapunzel” by Ben Hale.
Sound Tab: The Sound Tab displays a graphic representation of a selected audio region on the Timeline and specific parameters that can change the tempo, key, pitch, or length of the audio region. Users can also edit longer audio regions into short loops by dragging the Loop Start and Loop End markers (as shown in the figure above). Try importing some audio samples and notice how Mixcraft represents these files visually. Transients, or the quick percussive attack of a sound, are often illustrated as peaks and are used as a reference when editing audio and creating loops.
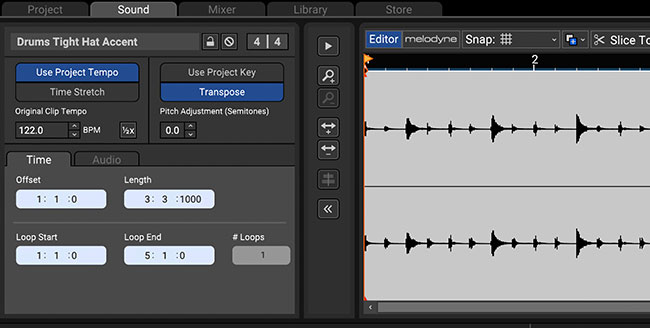
Waveform of an audio file imported into Mixcraft.
Mixer Tab: The Mixer is modeled upon old analog mixing consoles. Mixing consoles control the level and panning of individual tracks, allowing audio engineers to “mix” or mold each individual track into one master track (for example, a song). For students, the most important component of the mixer is the volume slider: each track has a corresponding slider that raises or lowers its volume (the sliders are orientated vertically). Pan sliders allow users to move tracks, or “pan” them, to the left, right, or center area of the listening environment (they run horizontally and are located at the top of the volume sliders). Try experimenting with different volume and pan settings during student projects.
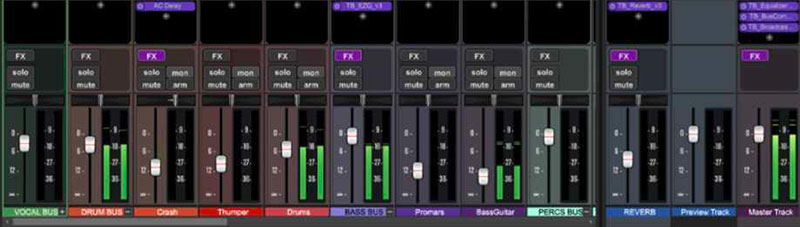
Mixcraft’s mixer is modeled after classic analog mixing consoles. Here students can adjust the volume and panning of each track.
Library Area: Mixcraft likes loops. And as an educator you will learn quickly, so too do students. The Library Tab allows students to search, preview, and ultimately use loops in Mixcraft. Students can browse the library categories on the left by instrument, key, tempo, style, etc. to easily find a sample that might compliment a lesson. For music-intensive projects, the library is an accessible and incredible resource for finding high quality audio loops that allow students with no formal music training or background to begin producing music.
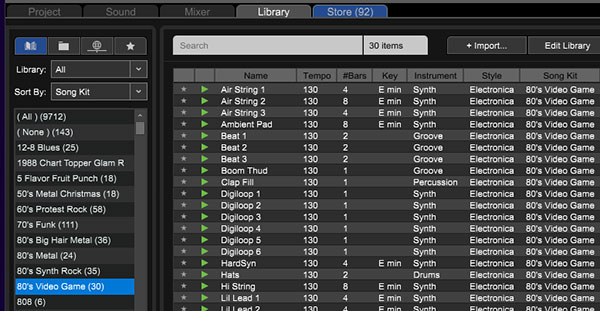
The loop library is an organized collection of Mixcraft’s loops. Users can browse the loops or search with a specific loop in mind.
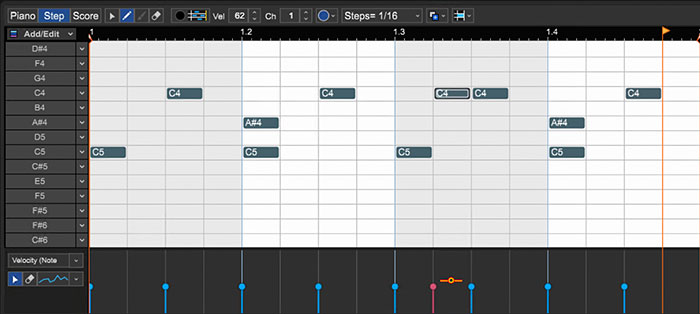
THE PIANO ROLL
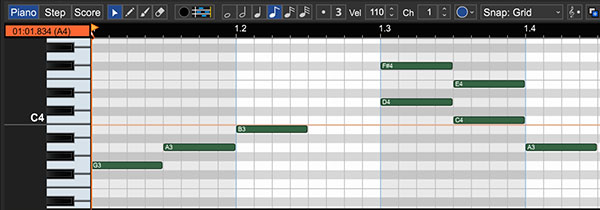
The Piano Roll enables users to edit MIDI notes and other MIDI parameters. The Piano Roll consists of a small, horizontal time line and vertical keyboard spread. Using the pencil icon in the upper left hand corner, users can draw notes onto the Piano Roll. The notes appear as horizontal lines. Users can trim, highlight, and arrange these lines on the Piano Roll’s time line. Underneath each note, a vertical line appears that determines the “note velocity.” Increasing the velocity increases the loudness of and accents a note. Additionally, users can record MIDI insttrument performances and use the Piano Roll for precise edits such as quantizing and transposition.
Example of a bass line performance notated on the Piano Roll.
NOTATION
An additional function found in the Piano Roll enables Mixcraft to create notation either from MIDI data or by free-hand drawing. The notation window can be accessed under the Sound Tab, by clicking the Notation button in the upper left-hand corner of the Piano Roll. By toggling between Piano Roll and Notation, Mixcraft displays a MIDI arrangement either as MIDI data on the Piano Roll or as Notation.
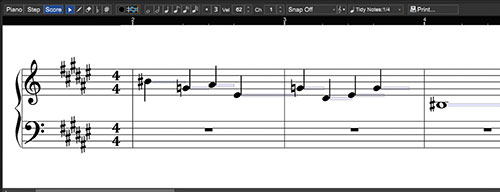
Example of notation view of MIDI notes.
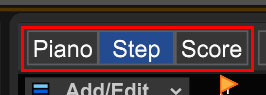
Mixcraft can effortlessly switch between Piano, Step , and Score display modes. Changes made in any of these editors are instantly and automatically updated in the others.
A MIDI performance in the Piano Roll prior to conversion to notation.

The MIDI performance from above converted into notation.
STEP SEQUENCER
Mixcraft also as a step sequencer, a useful tool for programming drum beats and short melodies. The step sequencer is broken up into steps with user-determined note lengths (e.g. the duration of the steps can be set to quarter, eight, sixteenth notes, etc.) Step sequencers are commonly integrated into music hardware such as drum machines and bass synthesizers, and allow musicians and producers to quickly program drum beats, bass lines, motives, and more. Students will find the step sequencer to be an intuitive compositional tool that can be incorporated into many of the lesson plans.
Step sequencers present a fun and easy interface for composing of pattern-based drum beats, bass lines, and melodies.
TOOLBAR
The Toolbar, located at the top of the Workspace, is a collection of shortcuts relative to specific actions in Mixcraft. There are icons for opening and saving sessions, mixing down audio, and even burning audio to CD. To become familiar with the toolbar, highlight the icons the cursor. The most important functions for students to learn are the zooming and snap-to-measure features:

Zooming In and Out: The two magnifying glass icons allow users to either zoom in (+) or out (-) of the Timeline. This feature is incredibly helpful when either editing audio and video or arranging regions on the Timeline.
Snap To Measure: As mentioned in the Timeline section, the snap to measure function aligns regions to the Timeline grid. This feature is useful for editing audio or MIDI regions or for using Mixcraft’s loops. The drop down menu changes the snap to grid settings to different note sizes. Generally, the 1/8th or 1/16th note is a good setting to start with.
OPENING A NEW SONG
Once Mixcraft is launched, the New Project window will display on the screen. This useful prompt makes it easy for students and teachers to configure Mixcraft for lesson plans.
The New Project window helps students set up Mixcraft for any kind of project: recording a student or a band, creating loop-based or beat-matched music, or using virtual instruments. Using the prompt, students and teachers can specify the number of audio tracks, virtual instrument tracks, tempo, key, and other settings that make it easy to get started. All of the student projects in this book utilize the New Project window, so it is recommended to spend some time learning it. To create your own template, simply close the New Project window.
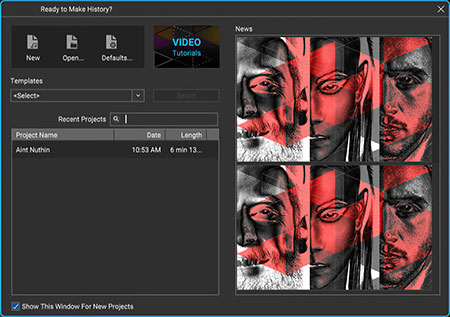
The opening Mixcraft screen lets users quickly and easily set up Mixcraft sessions.
TIP: Educators can save custom templates by going to: Menu › Save As… › Save As Mixcraft Template.
SAVING/EXPORTING SONGS
Saving: Users can save any Mixcraft session to a computer hard drive for later use. Simply go to the Menu > File > Save As…
All recordings, Timeline arrangements, plugin effects and parameter settings will be saved in the session file and an accompanying folder stored on the main computer hard drive.
Exporting: Mixcraft supports several file formats for mixing down audio. Educators and students should begin by mixing down sessions in either .MP3 or .WAV file formats.
To mix down a session go to the Menu > Mix Down To > File format.
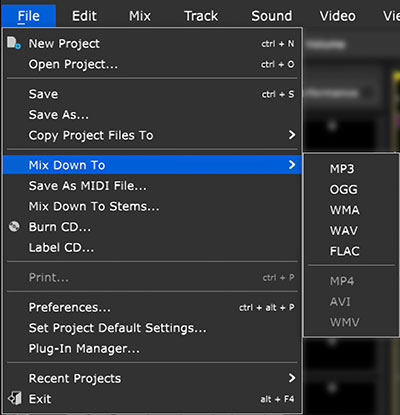
Mixing down a session in Mixcraft.
Before mixing down, it is important to check the peak volume on the master fader. As is the case with audio tracks, peaking into the red zone can add artifacts (unwanted or accidental sounds) or distort the final mixdown. After mixing down the session, the audio file can then be played through computer software, uploaded to a social media site, added to a phone, or burned to a CD.