STUDENT’S GUIDE |
LIVE LOOP IMPROVISATION PROJECT |
NAME: |
CLASS TIME: |
PERIOD: |
TEACHER: |
CLASS: |
REQUIRED MATERIALS
Computer with Mixcraft
Headphones or Monitors
Mixcraft Loops
Copies of Live Loop Improvisation Student Guide (Download Folder)
SUGGESTED MATERIALS
Internet Connection
MIDI Performance Panel Controller
Further Reading Materials
MIDI keyboard
ACTIVITY
Launch Mixcraft and open File>Set Project Default Settings. Set the New Project window Audio Tracks to 8, check the Performance Panel box and its Sets to 8, then click OK. Now click File>New Project.
 Once the New Project window has loaded, remove any instrument tracks, and set the audio tracks field to eight. Next, check the performance-panel box field and configure the performance panel to have eight sets.
The performance panel is a powerful feature in Mixcraft that students can use to trigger audio loops and MIDI clips for real-time remixing, composing, and performing. To set up the performance panel, start by opening Mixcraft’s loop library and finding a drum loop that will be the basis of your improvisation.
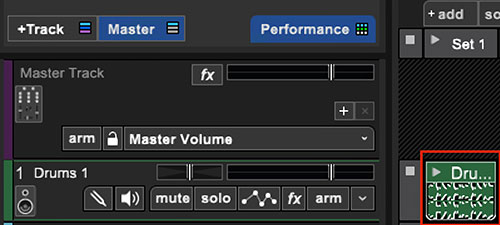
 Here, a hip-hop loop called Drum 1 is selected to be our main beat for the improvisation. Users can drag and drop any loop directly from the library onto the performance panel.
Drag and drop the selected drum loop directly into an available slot on the performance panel. An audio region of the loop will appear.
Next, preview and select other audio loops from the loop library (e.g. bass, piano, strings, guitar loops) that sound good together. Drag these loops to different grid squares in the performance panel.

Here, the performance panel now has five different audio clips: a drum loop, harp melody, bass line, and two choir loops. Try filling your performance panel with different loops.
Try playing loops from the performance panel. Clicking the play button on any of the occupied panels cues its loop for playback. Mixcraft is smart about syncing different loops together: when you press play, Mixcraft will wait to play the loop at the beginning of the downbeat on the next measure. This makes it easy for to perform without having to worry about playing loops precisely in time.
 The Drums 1 hip-hop beat is currently cued for playing on the performance panel.
Students can also cue and play multiple clips with the click of a single play button.The performance panel’s grid is organized by “sets,” a column of panels that can be controlled by clicking the play button next to a set. Click the play button next to a set to hear the effect.
 Clicking the play button next to Set 2 will cue and play all the loops in the Set 2 column.
It’s important to recognize that each audio track can only play one loop at a time from the performance panel. Thus, it’s best to place different instruments on different tracks and similar instruments, say two drum loops using the same kit, on a single track. Above, two choir loops were placed on a single audio track to make it easy to switch between the loops. (Playing one choir loop mutes the other.)
Try experimenting with different loops, queuing panels, and launching sets to improvise and create a song using just the performance pad.
Loops can be also dragged onto the Timeline for editing. For instance, students can trim, cut, and merge audio regions to create a new loop on the Timeline, and then drag it back on to the performance panel. Try editing a few loops and then loading them into the performance panel.
If students wish to compose their own melodies or program their own beats for their improvisation, the performance panel also supports MIDI data from the Timeline. Simply, add a virtual instrument track, create a MIDI performance on the Timeline, and then drag and drop the MIDI region onto the performance panel. Playing a MIDI loop is the same as playing an audio loop.
When ready to record an improvisation, arm the performance panel by clicking the “arm” button in the upper left-corner. Press record on the master bar and begin performing!
 Arm the performance panel for recording by selecting the “arm” button. When Mixcraft starts recording, loops played from the performance panel will be recorded to the Timeline.
Your performance will then be recorded to the Timeline. When the improvisation is finished, mix down the performance to a file on the computer. Go to the Menu and select File > Mix down to… > .MP3. Name and save your performance to the desktop!
 A recording of the performance appears on the Timeline that can be mixed down into a digital music file.