STUDENT’S GUIDE | |
NEURAL SYMPHONY PROJECT | |
NAME: | |
CLASS TIME: | |
PERIOD: | |
TEACHER: | |
CLASS: |
REQUIRED MATERIALS
Computer with Mixcraft
Headphones or Monitors
Neural Symphony Project File [Download Folder]
SUGGESTED MATERIALS
MIDI keyboard
Further Reading Materials
ACTIVITY
Creating Neuromusic
Ready to make your first piece of “neuromusic?” To prepare, ask your teacher if your computer, audio hardware, and Mixcraft software are set up properly:
Turn on any speakers or monitors. If you are using headphones instead, make sure they are connected to your computer or your audio/computer interface.
If you are using a MIDI controller make sure it is connected to your computer your audio/computer interface or to your computer.
In this project, you will make music with sounds recorded from a real human brain. First, ask your teacher if the Mixcraft project and additional files have been loaded on to your computer. Then, open “NS_Template.mx10” file with Mixcraftt. This project contains a single virtual instrument track loaded with the Omni Sampler. Additionally, the neural sonifications have already been loaded into the Omni Sampler. Each sonification has been mapped to the appropriate note on the piano keyboard.
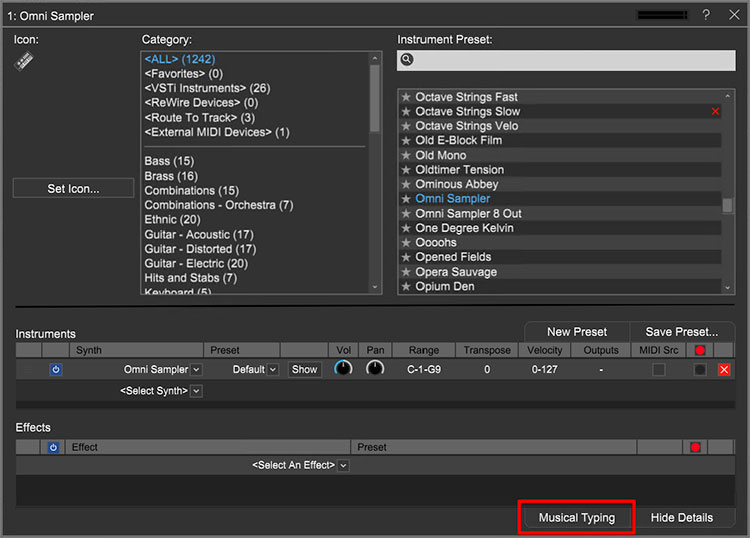
Audio processing. First, let’s learn how to edit the sonifications in Mixcraft using the NS Template.mx10 session. With the session already open with Mixcraft, launch Omni Sampler by right-clicking the musical instrument icon on the “Omni Sampler”virtual instrument track.

 This is the interface of the Omni Sampler, a virtual instrument that allows users to make music using pre-recorded sounds. In this project, the neural sonifications have already been loaded into the sampler, as shown in the center grid area. Clicking the triangle-shaped play button on any of the spaces in the center grid will preview the sample that has been loaded into that space. On the far left is a column that shows all of the available grid spaces. Clicking on the column will change which samples are shown on the center grid. This lesson will focus on manipulating the sound of the neural sonifications to make them more musical by using three key sections of the Omni Sampler: the loop section (in red), the filter section (in blue), and the envelope section (in green).
Enable global mode. Omni Sampler allows changes to be made to an individual sample or to all the samples at once (global mode). Since we will want our changes to affect every sample, enable global mode by clicking “global,” right under the “loop” button. Clicking “global” will change the background color of filer and envelope sections to yellow.
The filter: The brain is always producing unwanted electrical activity that can make recordings of the brain seem very noisy. Listen carefully to some of the neural sonifications by clicking the triangle-shaped play button on the center grid; you may notice that the sonifications sound noisy, almost like radio static. To help reduce this noise, we can use Omni Sampler’s filter to draw out the “notes” in our brain recordings while reducing some of the noise. In the filter section, try turning down the “cut off ” dial to ~75. Now, preview a sonification again. Do you notice how the sample sounds less harsh? Feel free to explore various settings on the cut-off dial.
The envelope. Next, try changing the “attack” knob in the envelope section to make the neural sounds swell up, like a violin string. Try a setting between 10 – 15 and notice how the onset of the sonifications are less punchy and immediate. You can also change the “release” knob to make the sonifications shorter in duration.
Looping the sound. These neural sonifications are very short in duration, which might make it difficult to play longer, sustained notes. Omni Sampler’s “loop” function allows samples to be looped to create a sustained effect. First, ensure that global mode is enabled. (The background of the filter and envelope sections should be yellow.) Next, select “loop” to turn on the loop option for all the neural sonifications. Now, if you click and hold down the triangle-shaped play button on any of the sonifications, the sample will repeat and create a loop. This is useful for playing longer, sustained notes when using shorter samples, like the sonifications included in this project.
Making music with neural sonifications.
Recording a MIDI performance with Musical Typing: To record music with the neural sonifications, use either Mixcraft’s Musical Typing or a MIDI Controller. Musical Typing allows you to use your computer keyboard to control Omni Sampler. Click the Musical Typing icon on the bottom of the Omni Sampler edit window.
The Musical Typing window illustrates how your computer keyboard functions as a music keyboard: the letter keys correspond to different notes. Try tapping the “D” and “F” letter keys on your keyboard. You should hear the neural sonifications.
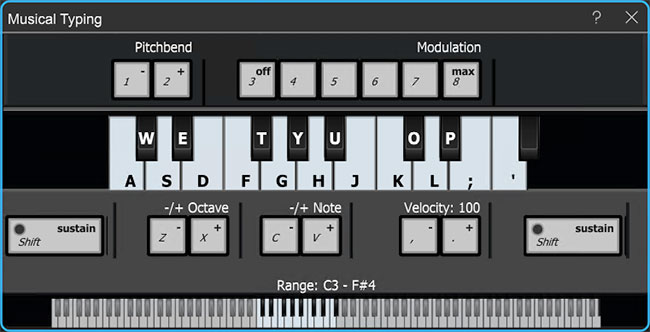 Mixcraft’s Musical Typing interface.
Recording Your NeuroMusic: First, enable the metronome. Click the metronome icon (outlined in red) and select the recording (Shift + M) box.
Enable the metronome during recording. The metronome will keep the beat and make it easier to record in time.
Before recording, hit the “rewind” icon (outlined in blue in the screenshot below) to rewind the cursor to the beginning of the timeline.
Arm the virtual instrument track for recording by clicking the “arm” icon.
Start recording by clicking either the master record button (outlined in red) or “R” on the keyboard. Begin playing a song on your keyboard. The cursor will begin moving down the timeline and the MIDI graphics of your melody will appear. To edit, or re-record your melody, stop the recording by hitting “R” or the space bar. Select the area that needs to be re-recorded with your cursor and hit the master record button.
 The red dot begins master recording. The left-facing arrow (in blue) rewinds the Timeline to beginning.
After you have finished recording, disarm your virtual instrument track and play back your song from the beginning. The song may not sound perfectly in time. Listen closely for parts that you may want to edit, rearrange, split or remove.
 An example of a MIDI region after a performance using the neural sonifications.
Programming Your NeuroMusic: With Mixcraft’s MIDI capabilities, you can also program melodies with the pencil tool and the Piano Roll.
First, on the Timeline, double click on the MIDI regions created from recording with Musical Typing (or simply double click on an area of the virtual instrument track that is blank). This will launch the Sound Tab and Piano Roll window. The list of piano notes runs down the left side of the Piano Roll. The small, horizontal lines/dashes in the tracks correspond to the MIDI data of each part.
Select the pencil tool in the left hand corner of the Piano Roll.

Now you can “draw” MIDI notes on the Piano Roll. Let’s try programming a melody using the pencil tool.
To start, navigate the Piano Roll to display the lower notes (~C2). With the pencil tool draw a pattern for a bassline (see the below image for an example). Note: when drawing, the lines might not align with the Piano Roll grid. In the next section we will learn how to edit our programmed or recorded melody.
 A programmed bassline using the neural sonifications.
Editing MIDI: After recording or programming a melody, it may be necessary to tidy up and edit the MIDI data. Here are several common edits:
To tidy up the MIDI programming and recording, highlight all of the MIDI notes (Ctrl + A, or by dragging your cursor over the notes) and right click > MIDI Editing > Quantize. Make sure the Note Type is set to 1/8th notes. Click “ok.” Notice that the MIDI notes are now perfectly aligned to the Piano Roll Grid.
Trimming and deleting MIDI regions: To trim or extend MIDI regions, move the cursor to the end of a region – a double-sided arrow appears. Simply click, and drag left or right to trim the MIDI region to a desired length. To delete MIDI regions, you can highlight (drag + select regions) or split MIDI regions into parts and hit delete.
Finally, loop your melody to a desired length. On the timeline, click the loop button on the MIDI region (the half circle with a “+” sign) to finalize your song! Try looping your melody four times.
To mix down your first piece of “neuromusic” to a file on your computer, go to the Menu and select File > Mix down to… > .MP3. Name and save your song on the desktop, and then show your teacher!