STUDENT’S GUIDE | |
SOUND COLLAGE PROJECT | |
NAME: | |
CLASS TIME: | |
PERIOD: | |
TEACHER: | |
CLASS: |
REQUIRED MATERIALS:
Computer with Mixcraft
Headphones or Monitors
Sound Collage Student Guide (“Additional Materials Download”)
SUGGESTED MATERIALS:
Microphone/ Microphone cable
Audio/Computer Interface
Headphones/ Monitors
Further Reading Materials
Example Sound Collage (“Additional Materials Download”)
ACTIVITY
Launch Mixcraft and open File>Set Project Default Settings. Set the New Project window Audio Tracks to 8 and click OK. Now click File>New Project.
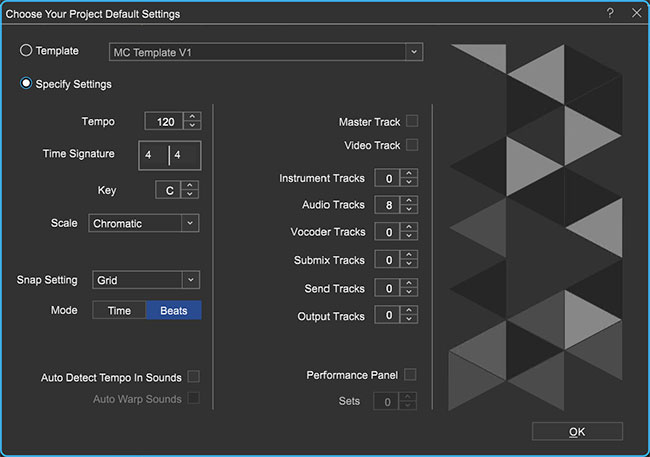 Once the New Project window has loaded, remove any instrument tracks, and set the Audio Tracks field to 8.
Ask your teacher to see whether you will be recording your own sounds or downloading sounds for your collage.
Downloading Samples. To import samples from the freesound.org website, click the Library tab at the bottom right of Mixcraft interface and select the "world" icon sub tab. Search in the field at the top and audition sounds by clicking the green play icon.
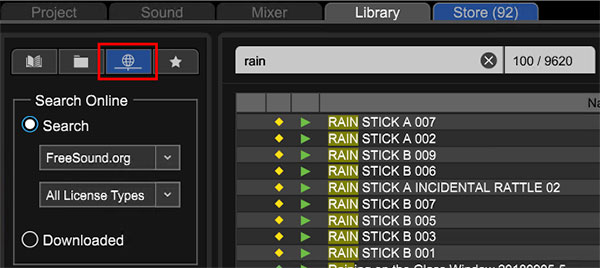 Click the Library tab followed by the blue "world" sub tab to access the freesound.org online audio library.
If recording: You can record your own samples and noises for your sound collage. This is a great way to learn audio recording and microphone placement techniques. For the recordings, bring objects from home or gathered them from the school environment. Brainstorm which objects you would like to record. Be creative when selecting things – some objects might produce a more percussive sound (a hammer and trash can lid), while others might produce a sustained sound (wet air from a pinched balloon).
When the desired sound is located, drag and drop the files onto empty areas on an audio track in Mixcraft. Alternatively, users can import audio files directly through the menu: Sound > Add Sound file > Select the sound file. Import any samples you will be using to create the sound collage. Use different sounds for each track and fill all the tracks. From here, skip the steps that pertain to recording (steps 4-7) and start at step 8.
Recording Audio. Before recording your sounds, ensure that the microphone and audio/computer interface are set up properly. Ask your teacher for help if need be. Equipment setup review:
First, to prevent feedback, turn off any speakers or monitors. Record with headphones, because you can hear what you are recording without creating a feedback loop. Connect headphones to the headphone jack on your audio/computer interface, or on your computer.
Next, connect the microphone to the audio/computer interface with a microphone cable. To make sure Mixcraft is monitoring the audio/computer interface, check the File > Preferences > Sound Device tab and check to confirm that the interface is selected.
Now that the equipment is set up, it is time to record some sounds!
Arm the first audio track in the workspace by clicking “arm.” The downward arrow next to the arm button will enable you to select the source of the “incoming audio signal” (often a microphone). Make sure the correct interface is selected.
To check the configuration, try speaking into the microphone – the volume meter should jump. Also confirm that the headphones are working.
For clean recordings users will want to monitor the incoming audio on the audio track’s volume meter. Record in the “yellow” zone. In this zone, recordings will be audible but not so loud that added artifacts (unwanted, accidental sounds) will “dirty” the recording.
 An example of the yellow or “safe” zone to record in.
If the meter is reaching the “red” area, try dialing back the gain on the audio/computer interface or move the object farther away from the microphone. Careful! Recording in the “red” zone could be harmful to your equipment or ears and could distort the recorded audio!
 An example of the “red” or “unsafe” zone. This area could damage your ears and recordings.
On the first audio track, record a few seconds of noise created from a mundane object. Try dropping, rubbing, or tapping various objects together to produce sounds. A few ideas are listed below:
Record a straw being drawn through a plastic cup lid.
Record the shaking of a plastic bag filled with seas shells, rice, or bottle caps.
Record the sound of scissors cutting paper.
Recording the sound of someone biting an apple.
Proceed to record sounds on each of the available blank audio tracks. Remember, recording a variety of different sounds will add novelty to the sound collage.
Creating loops. A loop can be created from several seconds of any sound recording. If necessary, trim the ends of the recorded segment as shown in the screenshot below, where the left and right ends of a recording were each trimmed back (perhaps to get rid of silence or an unwanted cough). To do this, first place the cursor at one end of the region. This activates the double arrow icon. Now drag the line back to the desired area of the sound profile. Repeat with the other side. To cut from the middle, use the split function of Mixcraft.
Drag back to eliminate the unwanted parts, set the two segments side-by-side and then “select” both and “merge” them back into one. When the segment is satisfactory and complete, right-click the audio region and select “Set Loop To Crop.” The new “loop” segment can now be looped, copy and pasted or drag/lengthened for arrangement on the Timeline. Make loops of all the recordings created for the lesson.
 Trimming an audio region to create a loop.
Arranging a sound collage. The sound collage is a collective arrangement of seemingly unrelated noises. Creating a dynamic and cinematic arrangement is crucial for captivating the listener. First, from the top of the screen, turn off Mixcraft’s snap function. Setting the snap function to “off” unlocks audio regions from the Timeline grid and allows users to move audio regions freely on the Timeline to create a free-metered composition.
 Mixcraft’s snap function is now disabled.
Begin arranging the recordings or samples on Mixcraft’s Timeline by dragging and moving audio regions. It is typical to assign individual samples or recordings to their own audio track. In the example arrangement below, each audio track has been relabeled to describe its contents. This is done by “double clicking” the track name (the default name for an audio track is “audio track) and then typing in the new label.
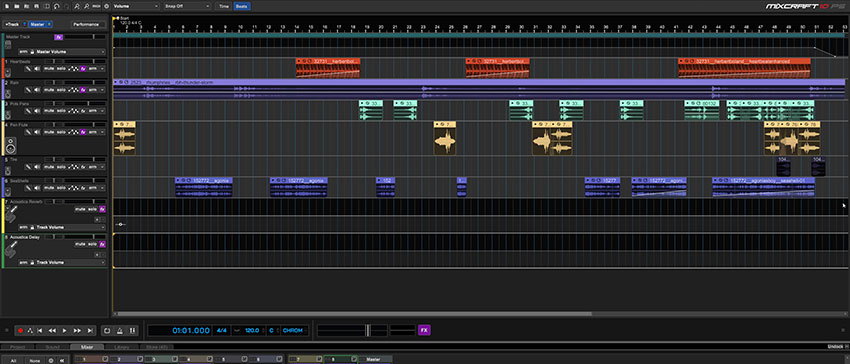 An example arrangement of a sound collage. Multiple audio tracks are in use, each designated to a specific sample or field recording.
Mixing the collage. Once the sound collage is arranged, brainstorm ways to modify and experiment with the mix. Try lowering or raising the volume of certain tracks on the mixer, dialing in pan settings, or instantiating plugin effects. Click the “Mixer” tab in the Tab Area to get started.