MIDI use is an integral part of the creative process for composers, music producers, and engineers. If audio is the father of the Mixcraft family then certainly MIDI (Musical Instrument Digital Interface) is the mother. The marriage of Mixcraft’s audio and MIDI functions creates a powerful tool not just for music production but also for teaching. Starting with a definition of MIDI, Chapter 4 moves on to cover MIDI terminology, how MIDI is used in Mixcraft and, of course, applications for the classroom. A look at Mixcraft’s virtual instrument tracks is coupled with a brief tutorial on how to record, program, and edit MIDI data. Finally, educators will learn how to mix down MIDI productions into a finished master track.
WHAT IS MIDI?
MIDI, or Musical Instrumental Digital Interface, is a communication protocol that connects and/or synchronizes audio hardware to computer software. MIDI is often conceptualized as a “language” that facilitates communication between these two separate modalities. Schematically, MIDI is comprised of specific parameters or values that contain music-related information. This information includes the pitch of a note, duration of a note, and on/off messages that define when a note is released or held. In Mixcraft, educators and students can edit and automate these parameters. MIDI is normally used in the classroom either to synchronize external audio devices (such as a keyboard MIDI controller) with Mixcraft or to compose performances solely within a computer environment. Below are several teaching scenarios in which MIDI is commonly engaged:
What is MIDI used for?
Creating a performance that never occurred: Using MIDI programming, students will be able to compose music without needing to actually perform with instruments.
Experimenting with various transpositions of a song or part: MIDI data can be transposed on the fly, enabling students to experiment with different music keys. For educators,this function might be useful in demonstrating what a music key is.
Precisely editing a melody or rhythmic part, such as quantizing: One of the banes of recording audio is the likelihood that performers may mess up and play out of time during recording. With MIDI this is not an issue: MIDI data can be time-locked or quantized to specific rhythmic values, for creating perfectly in time music. In other words, once quantized, MIDI notes are moved to align with the beats (e.g. beat 1, beat 2) or fractions of beats (e.g. quarter notes, eighth notes, and sixteenth notes).
Opportunities for MIDI-related applications arise quite often while working with Mixcraft and appear in several of the lesson plans in this book (notably the MIDI Instrument Survey and the MIDI Beats projects). Though certainly MIDI has more to offer, understanding these three applications of MIDI first will provide a beginning foundation to build upon later.
ON VIRTUAL INSTRUMENT TRACKS
Mixcraft’s virtual instrument tracks are pieces of software specialized for software instruments and MIDI-based music. Many of the virtual instrument track functions are analogous to audio track operations. The tool bars are the same and there is no limit to the number of virtual instrument tracks users can add to a session. Just as audio information is displayed as audio regions on Mixcraft’s audio track Timeline, so too does MIDI information appear as MIDI regions on the virtual instrument Timeline. Both audio and MIDI timelines display graphic representations of each note’s pitch and duration. However, unlike an audio track, a virtual instrument track also contains a Piano Roll, which is a keyboard interface that allows a wide range of nuanced MIDI programming.
COMPONENTS OF MIXCRAFT’S VIRTUAL INSTRUMENT TRACK
Similar to audio tracks, virtual instrument tracks are an amalgamation of individual components. Here is the virtual instrument track deconstructed:
Mixcraft’s Virtual Instrumental Track.
Mute/Solo: The mute and solo buttons control the playing or recording of virtual instrument tracks. A track is silenced completely with the mute button. Muting may be useful when choosing arrangements or when comparing different virtual instrument track recordings. The solo button allows only the selected track to play or record, while the remaining tracks are muted. Soloing is useful when users only want to monitor one track. Remember, however, that tracks can be either muted or soloed in any combination. Two examples: With eight tracks, two could be soloed which would mute the other six; or two tracks could be muted which would allow the other six to play or be recorded.
Automation Toggle: Automation is an advanced technique which makes it possible to program changes for particular parameters (pan and volume) in Mixcraft that automatically adjust over time. Users can use this function on Mixcraft’s virtual instrument tracks. For example, users can program volume (volume shifts of Acoustica’s drum kit snare) and pan (placement of the snare sound in the listening environment) with changes that will then automate during playback/recording. Another common example might be automating filters on a software synthesizer to create an evolving, animated sound.
To toggle the automation interface, select the icon with three dots and two lines. A subtrack will appear below the audio track. To change the values of volume or of panning, left click and hold on the line running across the middle of the subtrack, then drag the point created up or down. Each click on the line will create a point which can be moved up or down for multiple volume or pan changes to the track.

Here, the filter cutoff frequency to the Alien 303 Bass Synthesizer virtual instrument is being automated. As the automation contour ascends, the cutoff frequency is raised. As the contour descends, the cutoff frequency is lowered. This results in a bass instrument whose sound continuously evolves over time.
Change Instrument. The small keyboard icon launches the change instrument window. Here users can load any of Mixcraft’s bundled virtual instruments, VST effect plugins or use third-party instruments. The change instrument window can also launch keyboard typing, allowing students to control a virtual instrument with their computer keyboard.
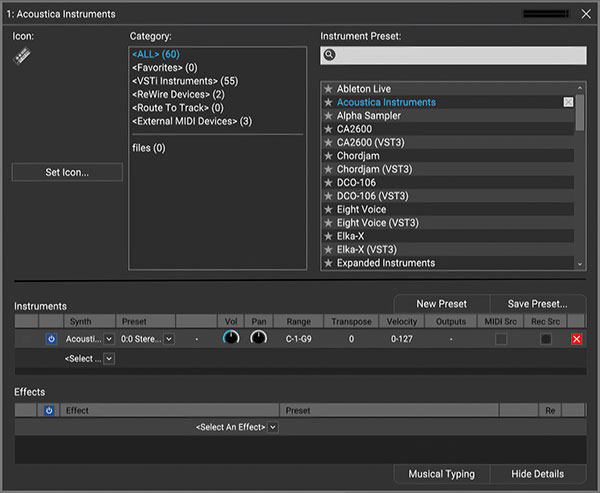
Mixcraft’s Change Instrument window that allows users to load virtual instruments.
Pan: Panning places the virtual instrument to the left, right, or center of the listening environment. The pan slider, located alongside the volume meter, controls this parameter. The default placement is in the center: moving the slider left or right pushes the virtual instrument to its respective area in the listening environment.
FX: The FX icon launches the FX window in which users can select and apply audio effects to the virtual instrument track. These effects range from emulations of recording environments and ambiences (such as reverb and delay) to practical mixing tools (such as equalization and compression). It should be noted that some software instruments come bundled with built-in, on- board effects. An overview of Mixcraft’s built-in effects is covered in Chapter 6.
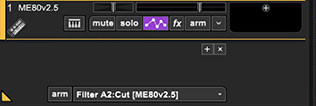
Arm for recording: The Arm icon activates the virtual instrument track for recording. Once armed, the virtual instrument track will turn red and users can then control the instrument with either musical typing or with a MIDI controller. When notes are played on the virtual instrument, the volume meter will display the output volume of the instrument. To start recording on the Timeline, click the master record button or press Ctrl+R on the computer keyboard.
TUTORIAL
RECORDING MIDI WITH MIXCRAFT
This tutorial covers the use of MIDI with Mixcraft. Educators will learn how to set up Mixcraft and MIDI hardware for recording, a workflow for recording MIDI data, and finally, techniques for editing MIDI data.
SETTING UP FOR MIDI RECORDING:
There are three methods by which students can use MIDI to record or program a music performance with Mixcraft: 1) MIDI hardware, 2) Musical Typing, and 3) Drawing MIDI notes:
MIDI Hardware: MIDI controllers, such as a MIDI keyboard, can be used with Mixcraft to record a music performance in MIDI format. External MIDI controllers are ideal for student projects. They work efficiently with Mixcraft and offer a playability that is not possible with either music typing or MIDI programming.
Musical Typing: Mixcraft has a built-in software keyboard called Musical Typing. This piece of software transforms the computer keyboard into a piano keyboard. Though a bit clunky to play, it makes a great substitution for an external hardware MIDI controller.
Drawing MIDI Notes: MIDI data can also be manually programmed. Users can use the pencil tool and draw MIDI notes onto the Piano Roll. Programming is highly useful when composing with virtual drum instruments.
Before recording, it is important to properly set up and configure all audio hardware and Mixcraft. External MIDI controllers can be hooked directly through USB or firewire ports, while other external keyboards might require the use of MIDI in/out cables and an audio/computer interface. Referring to the documentation of the hardware will assist in proper set up:
To begin setting up, turn on monitors: Don’t worry about creating a feedback loop when recording with MIDI (unless of course, there is an active microphone elsewhere in the recording area!). Use monitors or headphones to follow the level of the MIDI-controlled virtual instrument or listen to a MIDI performance in real time.
Next, connect the MIDI controller to the audio/computer interface or directly to the computer. Mixcraft will display a notification that it has detected a change in its MIDI configuration.
RECORDING MIDI: A WORK FLOW
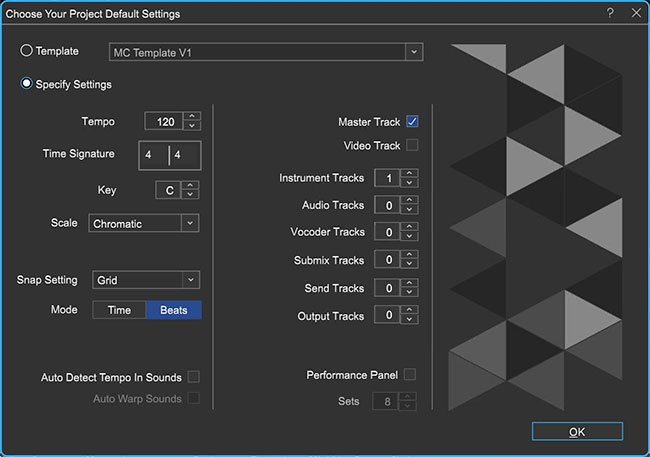
Begin by setting the Project Default settings - select File>Set Project Default Settings...
Remove any audio or video tracks, and set the Instrument Tracks field to 1.
Select File>New Project.
Select a virtual instrument by clicking the keyboard icon on the virtual instrument track. This keyboard icon prompts the virtual instrument window. Select Combo Model F from the list at the right side. (Type in the Instrument Preset search field above to rapidly locate it.)

Select Combo Model F from the list at the right side. (Type in the Instrument Preset search field above to rapidly locate it.)

Next, enable musical typing by clicking the “musical typing” keyboard button at the bottom right of the Instrument Preset window. Click the red X in at the upper-right to close the Instrument Preset window.
 Clicking the music typing icon will launch Mixcraft’s virtual piano keyboard.
Play a few notes on the virtual organ by pressing keys on the computer keyboard. DIf MIDI controllers are not available during the lesson, students may use the musical typing feature to record a MIDI performance.
It is time to record! Educators should learn to record MIDI with a MIDI controller and with musical typing. Try recording using both methods:
First, arm the virtual instrument track in the workspace by clicking “arm.” The downward arrow next to the arm button will enable users to select the source of an incoming MIDI signal. The default setting is generally fine, but intricate MIDI setups might require specifying a MIDI device. To check the configuration, play a few notes on a MIDI controller or on the musical typing interface: the volume meter should jump and the organ should play.
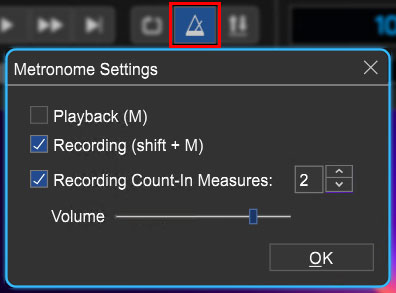
Enable the metronome when recording with MIDI. First, click the metronome icon to bring up the metronome settings window. Choose both “recording” and “recording count-in measures” for metronome play. Click “OK.”
Before recording, rewind the cursor to the beginning of the timeline by selecting the rewind button (outlined in blue) on the master bar.

Start recording by either selecting either the master record button (outlined in red) or by pressing the “R” key on the computer keyboard. The cursor will begin moving down the timeline and regions of the recorded MIDI will appear.
Once the recording is completed, disarm the virtual instrument track and play back the performance from the beginning.
An alternative to “performing” with either a MIDI controller or with musical typing is to program (write/compose) a MIDI part directly from scratch. Programming offers greater control over MIDI parameters and can circumvent the human errors that arise during performance.
To start programming a MIDI part, create a new virtual instrument track by selecting one from the menu: Track > Add Track > Add Virtual Instrument track.
Double click on the Timeline area that corresponds to the new virtual instrument track. A blank MIDI region should appear and the Piano Roll window should expand from the bottom of the screen.
Selecting the pencil tool in the Piano Roll allows users to “draw” MIDI notes onto the Piano Roll. Notes drawn on the Piano Roll will then appear in the MIDI region on the Timeline.
 The Piano Roll Toolbar consists of the pointer arrow, the pencil tool, the paint brush tool and the eraser tool.
Draw a basic melody using the notes C – D – E – F of the C Major Scale.
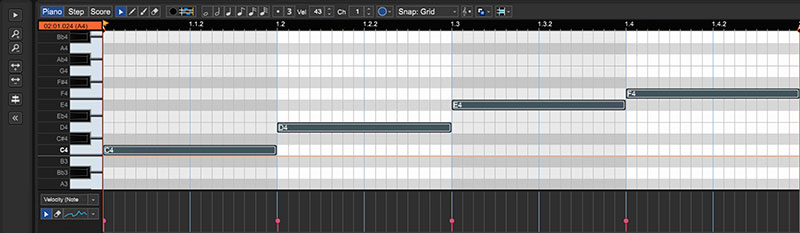 A simple melody in C Major drawn in with Mixcraft’s Pencil tool in the Piano Roll.
Next, quantize the MIDI notes by selecting the MIDI Editing menu on the Piano Roll. Quantizing time-locks each MIDI note onto the Piano Roll’s grid. Quantizing can also be used to control the duration of each note. In this example, the notes were quantized to an “8th note” with the “note ends” option selected.
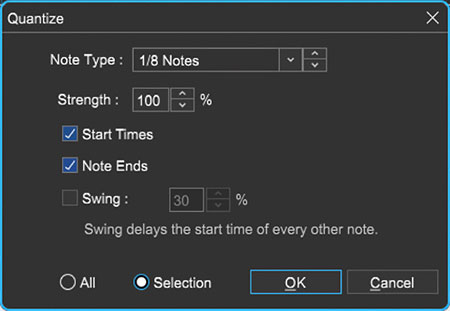 Sample quantize settings.
Next, create a loop out of the MIDI region on the timeline. You can trim the MIDI region to expand or shorten the area you’d like to loop by moving the pointer to the region’s end. (A double-arrow cursor will appear.) Click and drag the region to trim or extend it, and then select the loop function (the circle with a plus icon) on the MIDI region.
 Our programmed MIDI melody now appears in the MIDI region on Mixcraft’s Timeline.
 Selecting the loop function adds a duplicate MIDI region of the melody.
EDITING MIDI WITH MIXCRAFT
Once a MIDI part is recorded or programmed, the MIDI data can be edited any number of times. With a few simple clicks composers can experiment with different instrumental arrangements, time-lock MIDI notes to certain rhythmic values on a grid, or transpose a part into different keys.

The MIDI Editing menu offers users a variety of methods to quickly organize and arrange MIDI notes.
QUANTIZING
A MIDI editor’s best friend, quantizing, time-locks MIDI notes on the Piano Roll’s grid to a specified note value. For instance, if a quantization is set to “8th notes,” MIDI notes that are not locked to an 8th note will be moved to the nearest 8th note position on the Piano Roll’s grid. Additionally, if there are discrepancies in note durations, quantizing can be used to equalize these durations. Quantizing is primarily used to fix errors in human performance, errors in MIDI programming, or errors that result from latency.
TIP: Although quantizing is effective in fixing human errors, the changes can often result in parts feeling “mechanical” or “machine-like.” To counter this, it may be advantageous to leave a few notes un-quantized or to use the “humanize” function under the MIDI Editing menu.
TRANSPOSING
The transposing feature (Top Menu/sound > MIDI editing > transpose) is somewhat self-evident – it transposes a selected MIDI section to a new key. For students unfamiliar with key signatures, transposing is the act of preserving the relative relationships between the notes of a melody but assigning a new set of notes, or a “key,” to the melody. This feature is useful when creating arrangements for large student ensembles, for experimenting with different note registers, or when writing parts for different instrument families.
EDITING MIDI REGIONS ON THE TIMELINE
As discussed, users can employ a variety of techniques to edit MIDI in Mixcraft. With the Piano Roll an array of MIDI parameters can be meticulously controlled. MIDI parts can also be edited effectively on Mixcraft’s Timeline where MIDI data is represented as MIDI regions virtually identical to audio regions. Like audio regions, they can be split, merged, looped, snapped to the Timeline, and will also display any programmed automation.
Splitting/Merging MIDI Regions
Splitting and merging MIDI regions is useful when crafting an arrangement on the Timeline. The split feature chops a MIDI region into separate units which can be arranged, deleted, or looped. The merge feature compiles separate regions into a single unit, creating a seamless block of MIDI information.

A complete MIDI region containing an example melody.

The MIDI region has now been split into two separate regions.
To split regions, right click on the region and select the “split” edit. To merge regions, highlight all the relevant MIDI regions and right click to find the “merge” feature. Users can also use a keyboard shortcut to split (Ctrl + T) or to merge (Ctrl + W).
LOOPING MIDI REGIONS
As shown in the MIDI tutorial above, MIDI regions can be looped on the Timeline to quickly flesh- out an arrangement and to build larger music structures. The next big hit may find its beginning in a MIDI performance composition that tentatively starts with a four bar melody that is repeated with the looping function.
To loop a region, select the “loop” icon (a circle with a plus sign) displayed in the upper left hand corner. A notification displaying “+ 1 Loop” will appear.
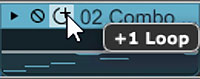
The loop icon, conveniently displayed on a MIDI region.
MIXING DOWN MIDI
When a MIDI production is completed, all of the virtual instrument tracks can bev mixed down to one master audio track. Mixcraft supports several audio file formats including .WAV and .MP3. Before mixing down, play the production through and monitor the master volume meter. Notice if the master volume peaks or hits the red zone. If necessary, dial back the master volume a few decibels. To mix down, select from the top menu File > Mix Down To… > and select the desired file format.
TIP: Often, users may want to loop a particular section of a larger MIDI region. To loop a specific selection, the region needs to be trimmed and then set as its own loop. Once the region is trimmed, right click the region and select “set loop to crop.” Now this region can be looped.