STUDENT’S GUIDE | |
REMIX PROJECT | |
NAME: | |
CLASS TIME: | |
PERIOD: | |
TEACHER: | |
CLASS: |
REQUIRED MATERIALS:
Computer with Mixcraft
Headphones or Monitors
Mixcraft Loops
REMIX stems (“Additional Materials Download”)
Remix Student Guides (“Additional Materials Download”]
SUGGESTED MATERIALS:
MIDI keyboard
Internet Connection
ACTIVITY
Hello remixer! In this lesson, you will learn to craft your own remix from either Ben Hale’s song “Rapunzel” or a song supplied by your teacher. Ask your teacher about setting up the “Remix_Template.mx9 file from the “Additional Materials Download” to your desktop. Open the Mixcraft project:
 The Workspace of the Remix Template project.
The project is already divided into sections marked with colored flags and contains only the vocal track. To hear the original instrumentation, visit this link youtu.be/ILPOnHcnvkM. Notice “Rapunzel” follows a strict Intro-AABAB (verse- verse-chorus-verse-chorus) structure. As you work through your mix, it will be important to keep this structure in mind.
NOTE: If you are remixing another song, here are some helpful steps to import.
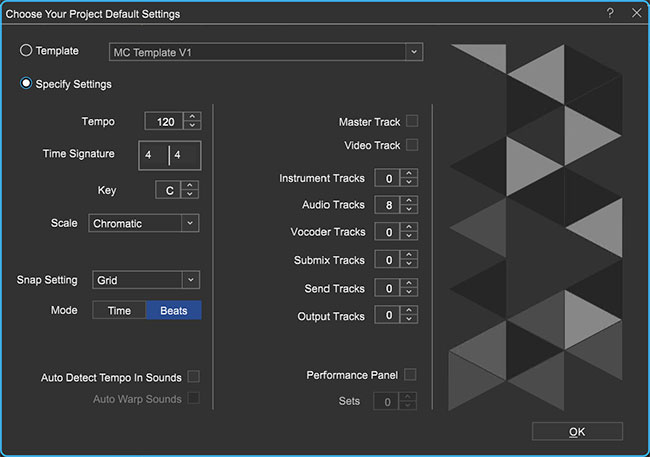
Launch Mixcraft and open File>Set Project Default Settings. Set the New Project window Audio Tracks to 8 and click OK. Now click File>New Project.
Import the stems (submix tracks). Make sure the tracks are aligned with the beginning of the timeline window.
Adjust the key and Mixcraft’s master tempo to your remix tracks. Usually this information is provided with the song’s stems. Under the Project Tab, Mixcraft will show the key and master tempo of the song. For individual track information on tempo and key open the Sound Tab. Detected key information will be noted next to the “key” window; while tempo information will be provided under the “Adjust To Project Tempo” window.
BEGINNING TO REMIX
Starting your remix: creating a beat. For the song’s introduction, you will want to introduce a beat. First, create a new Audio Track (Ctrl + G) and rename it “Kick Drum.” In the Tabs Area, select the “Library” tab, then: Then: Sort By > Instrument > Drums. Search through the drum categories for interesting loops. If you are connected to the internet, you can preview and download each loop by clicking the green play button next to the file name. Try the Kick Clap 3 loop.
 Using the Library Tab to find a drum loop.
TIP: Don’t worry about only selecting loops that match the key of our song. Mixcraft will automatically transpose any loop to our session’s master key
Arranging a beat. When you have decided on a drum loop, simply highlight the file and drag it onto your “Kick Drum” audio track on the Timeline. You may want your drum loop to repeat throughout the entire remix. There are many ways to do this:
Select the audio segment, hold down Alt key, slide right and drop. Repeat as necessary.
Copy and paste audio segments.
Use the “loop” icon on an audio region to repeat loops along the Timeline. Repeat as necessary.
Place cursor at the end of the loop to activate the double arrow symbol, left click and drag the loop to extend as far as necessary.
 Copies of our Kick Clap 3 Loop.
Developing your beat. Depending on the drum loop, you may want to expand upon your beat. For instance, does your loop include a hi-hat part? A snare drum? Or a clap? Search for other loops that will thicken your beat.
Adding Harmony. Next, let’s add harmony. Browse your favorite instrument categories and look for loops that include chord progressions. Again, keep the structure of your mix in mind. For the verses, you might want to use a different loop than the one used with the choruses. Try importing the Rhodes 2 loop for the verses. If offers a laid back, jazzy feel to the mix: Library > Sort By Instrument > E.Piano > Rhodes 2.
The Rhodes 2 loop adds some jazzy and rich harmony to the verses.=
Adding Bass. After arranging the harmony, browse the bass loops. The bass will be the foundation of your mix, so pay particular attention to how it sounds with the harmony. After previewing several bass loops, try arranging a loop on the Timeline. For an attention- grabbing effect, bring in the bass right as the vocals enter. Again, keep in mind how the structure of the verse and chorus differs.
This Bass loop sounds great against the Rhodes 2 chords.
Building on the Harmony. Now is the time to really explore with the rest of Mixcraft’s loops. With the foundation in place (bass, drum, and chord loops) try adding other instruments and melodies to accompany the rest of the mix. Remember the “style” of remix when selecting through loops. For instance, a metal guitar loop might sound a bit harsh against a soft piano ballad loop (unless, of course, you want to act outside the box by mixing and matching different styles of loops).
Creating Movement and Tension. Remixes can get a bit boring, predictable, and repetitious with just the basic instrumentation. Adding sound effects loops can liven up a mix! Try this one: In the Library tab, click “FX” in the instrument column, then select the WhiteWoosh SFX loop .Add this loop right before a verse or chorus. Notice the movement and transitional effect as the mix shifts between the verse and chorus. Please note that these are “loop” sound effects not “plugin effects.” Do not confuse this with either the functions of the “fx” plugin button on the audio track or the “fx” button at the top of the mixer panel.
Try using the WhiteWoosh SFX from Mixcraft’s library to add movement to a mix.
Fitting it all together. Once a solid remix arrangement is established, it is time to mix your remix! Mixing is the processing of molding together your arrangement.
Open the Mixer tab in the bottom left part of the Workspace. Here, your audio and instrumental tracks will be displayed in vertical panels. To raise or lower the volume of an instrument, move the vertical slider, the volume slider, up or down. The pan slider, located above the volume slider, moves horizontally and pushes an instrument to the left or right of the listening field. Try dialing in different volume and pan settings in the mix.
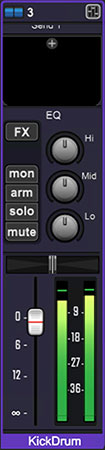 The volume (vertical) and pan (horizontal) sliders on a kick drum track.
Mixing Down. When the remix is finished, the final step is mixing down the track. Go the top menu File > Mixing Down To…>.MP3. Click and mix down the remix to the computer’s desktop.