For video-based student projects the following equipment is recommended:
REQUIRED EQUIPMENT
Video Camera (Digital or Analog)
PC Computer
Mixcraft
SUGGESTED EQUIPMENT
Digital Video Camera
SD Card
Tripod
Film Software
Music or Audio Samples
If educators intend to use video or pictures for a lesson plan, great news – Mixcraft supports video and image files! Chapter 5 is a tutorial on how to use Mixcraft to import and edit videos and still images to create custom movies and slide shows. Additionally, Mixcraft can be used to add sound (music or sound effects) and text to video or image files. Common applications and examples of these features might include creating soundtracks for videos or adding text to end-of-the year slide show presentations. The skills acquired in this tutorial are also relevant to several lesson plans in this manual including the Commercial projects and the Film Project. The chapter begins with an overview of essential video equipment. A short tutorial then demonstrates how Mixcraft can be used to add music or text to both images and videos. The chapter concludes by showing how to mix down a video or slide show for viewing.
VIDEO EQUIPMENT
There are many types of video cameras on the market. Modern digital camcorders record directly onto a SD card, making it easy to transfer and rip videos to a computer. Older cameras that record onto analog tape need a converter (usually a USB device) to rip videos from the tape to a computer. Collaborating with a film class to shoot videos and then launching Mixcraft to do post-production is an ideal workflow.
VIDEO TUTORIAL
Setup: Before beginning the video tutorial, you will need to retrieve several files from the “Additional Materials Download. Find the Video Tutorials directory. From here, drag and drop the “Alaska Animals” and “Sample Movie” folders onto the desktop.
Open Mixcraft and use the New Project window to load a template with one video track.
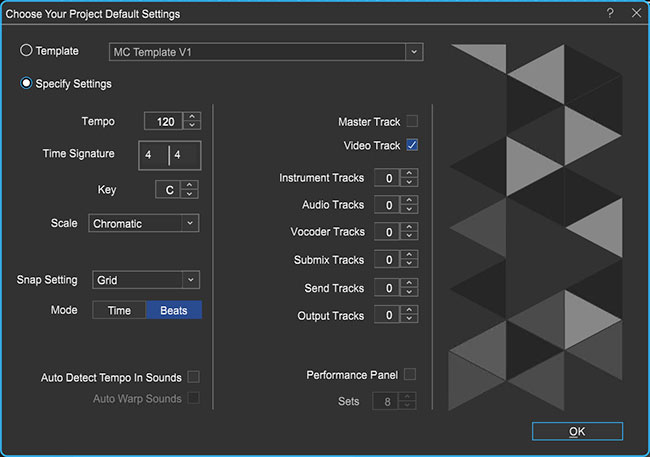 Once the New Project window has loaded, remove any audio or instrument tracks, and check the video track box.
There are two ways to import a video or movie file into the Workspace: 1) Drag and drop the video file straight onto the video track or 2) simply select the file through the directory on the top Menu > Video > Insert Video.
Find and load the Newport Art Museum.wmv from the “Additional Materials Download” folder into Mixcraft. If you have a video of your own, you can load that into Mixcraft instead.
Mixcraft automatically imports any audio that may accompany a video and places it on an audio track that is linked to the video track.
Play through the video in Mixcraft and watch for areas that may need to be edited. First, double-click on the video region to open the video preview window. Initiated play back by clicking the master play button on the master bar.
Editing videos in Mixcraft is analogous to editing audio or MIDI regions. Screen shots from a video file appear as moveable regions on a video track and users can trim or arrange these regions:
Splitting video sections: To rearrange segments of a video, first “split” or cut a movie into smaller, editable chunks. To split a video region, right click on the desired area and select “Split” (Ctrl + T).
Trimming video clips: To trim video regions, move the cursor near the ends of the video region until a double-sided arrow appears. Simply click, and drag left or right to trim the region to the desired length.
Deleting video: To edit out parts of a movie select and highlight a video region and hitting delete. Additionally, the unwanted section can be split into an independent video region and then deleted.
Try a few of these editing techniques on the Samplemovie.avi and watch the video. For instance, try splitting the video into smaller video regions and rearranging them on the Timeline. Note how the edits modified the video.
Beyond Video. Mixcraft can also add audio and text to a video.
Adding Audio: If the original video file has audio, Mixcraft will automatically import it as a separate audio track. This audio track is “linked” to the video track to ensure the audio remains aligned with the video images.
First, “unlink” the audio by clicking the “unlink” button on the audio track. The unlink button on an audio track.
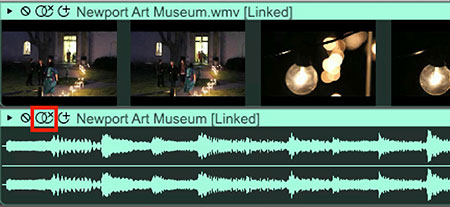 The unlink button on an audio track.
Next, delete the current audio regions from this audio track. Now record narration, import a song, or add sound effects to the video and really bring it to life! Additionally, the original audio can be kept and built upon by adding new audio tracks. This is important for videos that have recorded dialogue.
TIP: To remove or edit the audio imported from the video file, click the “unlink” button (the icon with overlapping circles and an “x”).Add new sounds to the video by dragging or importing them onto the audio track. For this tutorial, try adding several of Mixcraft’s loops. Preview the video.
TIP: To add loops, open Mixcraft’s Loop Library in the Tab Area located on the lower left hand area of the Workspace. Simply select a loop and drag and drop it on to the audio track.
Adding Text: There are two categories of text one can add to a movie with Mixcraft: stagnant or scrolling.
Stagnant Text: Stagnant Text does not support text animation and remains stationary in one location on the screen. Often, this text is used to add a title such as the name of a movie or the author of a video.
To add stagnant text to the sample movie, go to the top menu and select Video > Add Text…
The “Edit Text” Window and “Text Track” will appear. Try typing in some text and changing the font color and position of the text on the screen:
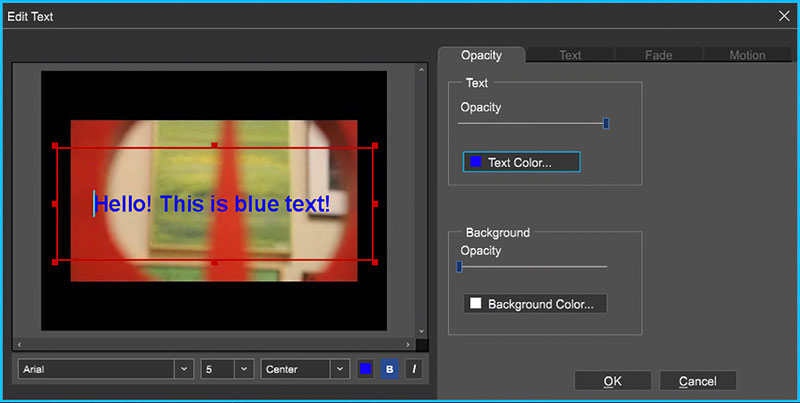 Example of adding stagnant text to a movie.
(roman num IV) The text should now appear as a region on the Text track. Just like with audio and video regions, users can arrange, trim, split, or delete text regions.Try moving the text region to different places on the Timeline.
Scrolling Text: Scrolling Text contains text animation that “scrolls” text across the screen. It is possible to control the fade in and fade out of text.
To add Scrolling Text go to the Menu and select Video > Add Scrolling Text…
For this tutorial, add a title screen with the stagnant text and a scrolling credit screen with the scrolling text.
USING STILL IMAGES & PHOTOGRAPHS WITH MIXCRAFT
Mixcraft can also create video presentations from still images (JPEG, PNG, etc.). Again, users can drag and drop individual images on to the video track or select multiple files through the video directory: Menu > Video > Add Still Images. Try dragging the “Alaska Animals” folder from the “Additional Material Download” file onto the video track. The photographs should automatically become editable regions.
 Multiple still images on a video track in Mixcraft.
Editing still images in Mixcraft is identical to editing videos in Mixcraft. Screen shots of the still images appear as moveable regions on a video track. Users can trim or arrange these regions. For review:
Splitting still images: To rearrange still images, it is often best to split up larger image regions into smaller regions. To split an image region, right click on the desired area and select “Split” (Ctrl + T).
 Splitting still image regions on the Timeline.2.
Trimming still images: To trim still image regions, move the cursor near the ends of a region until you see a double-sided arrow. Simply click, and drag left or right to trim the region to the desired length.
Deleting images: To remove image regions from the Timeline, highlight (drag + select regions) and hit delete.
Edit and arrange the “Alaska Animals” still images to create most effective and entertaining slide show. Preview the slide show by double-clicking on an image region and starting playback.
Final Touches. Mixcraft allows users to add a song or additional audio to any slide show presentation. First, insert an audio track (Ctrl + T) and drag and drop a song file to add a musical background to the slideshow. Edit if need be.
TIP: Try dragging one image region over another. Notice that they overlap. This technique will create a neat fade-in effect during playback.
MIXING DOWN A MOVIE OR SLIDESHOW
The final and perhaps, most exciting step in creating a movie or slideshow in Mixcraft – mixing it down! Mixcraft supports two movie files, AVI or WMV. For student projects, either format will suffice. To export the session into a playable file, go to the top menu and select File > Mix Down To… > WMV or AVI. The video or slide show can now be be played by a computer media player, uploaded to a social media site, or burned to a DVD.