STUDENT’S GUIDE | |
LYRICAL SONGWRITING PROJECT | |
NAME: | |
CLASS TIME: | |
PERIOD: | |
TEACHER: | |
CLASS: |
REQUIRED MATERIALS:
Computer with Mixcraft
Headphones or Monitors
Microphone/USB Microphone
Mixcraft Loops
Copies of the Lyrical Songwriting Student Guide (Additional Materials)
SUGGESTED MATERIALS:
Audio/Computer Interface
Internet Connection
MIDI Controller
Acoustic Instruments
Further Reading Materials
ACTIVITY
Writing Lyrics
With the help of your teacher, research several popular music songs and analyze the lyrics. Note how songwriters use lyrics to convey ideas, themes, or images.
Brainstorm to come up with a song topic of your own. Below are a few ideas:
YOUNGER STUDENTS | OLDER STUDENTS |
Favorite Animal | A story of a historical event |
Favorite Food | A fictional story that includes themselves as protagonists |
About a family member | A story about dreams and aspirations |
About a holiday | A story about something that is bothering them |
Field trip | |
A Vacation |
Write lyrics in an ABAB form. Write lyrics for a verse (A), followed by a chorus (B), then a verse again (A) and finally a chorus (B). The terms “verse” or “chorus” in relation to lyrics are defined as:
Verse: A unique section of lyrics that is not repeated. A song may have any number of verses, all different. Verses tell the story of the song.
Chorus: A phrase of lyrics (like a verse) that is repeated several times in a song with only slight, if any, alteration. The chorus is also known for carrying “the hook,” or the infectious, sing-along part of the song.
Here are two examples of lyrics that follow an ABAB structure (Verse-Chorus-Verse-Chorus):
YOUNGER STUDENT LYRICS | OLDER STUDENT LYRICS |
“My Pets” | “Homesick” |
A (Verse): B (Chorus): A (Verse 2) B (Chorus): | A (Verse): B (Chorus):
|
Brainstorm the music. With the lyrics complete, but before producing music in Mixcraft, students must select a:
Meter: A simple meter like 4/4 will work with most songs. However, a waltz or some other form might use a 3/4 time. The different meter will have to be re-configured within Mixcraft. (Project tab > Meter)
Tempo: Is the song slow or fast? Decide on the tempo of song. Tempo is measured in BPM in Mixcraft. A BPM between 80 and 90 is considered slow, while a BPM of 130 – 140 is considered moderately fast. (Project tab > Tempo)
Mood: Is your song sad or happy? Students can use certain scales or keys to covey particular moods: try a minor scale or key for a sad song. Use a major scale or key for a happier song. (Project Tab > Key)
Arrangement: How many instruments will be used? Do you want a drum track? Guitars? Orchestral sounds? With Mixcraft loops, it is easy to add all of these instruments. Decide on your arrangement beforehand.
WRITING A SONG IN MIXCRAFT
Once the lyrics are finalized and a rough idea for the music has been formed, it is time to actually create and shape the music and set your lyrics to the music!
Launch Mixcraft and open File>Set Project Default Settings. Set the New Project window Audio Tracks to 8 and click OK. Now click File>New Project.
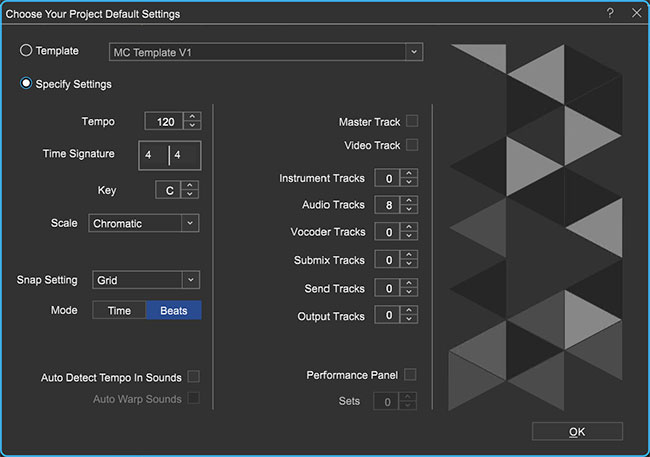 Once the New Project window has loaded, remove any instrument tracks, and set the Audio Tracks field to 8.
If necessary, change the tempo, meter, or key of the song by clicking on the master bar’s display (can also be done under the “Project” tab).
 Clicking this display on the master bar will allow users to change the tempo, meter, or key.
Setting markers. Markers are an easy way to note where specific parts of the song begin and end on Mixcraft’s Timeline. Measure numbers run along the top of the Timeline. We will be setting markers on certain measures for the ABAB structure:
At measure 1 on the Timeline, double-click on the blue flag that says “Start.”
Change the marker title to “Introduction.”
Next, add a marker at measure 9 by right-clicking just next to the number on the Timeline (Or double click 9). Select “Add marker…” Label the marker “Verse 1.”
 Right-click next to measure 9 on the timeline to add a marker. Label the marker “Verse 1”
Next, add a marker at measure 25 and label it “Chorus 1.”
Finish adding markers and renaming them: at measure 41 (“Verse 2”); measure 57 (“Chorus 2”); and measure 73 (“Outro”).
These markers will help you compose music for your introduction, verse, chorus, and outro (concluding) sections. You can start playback at any of the markers by right-clicking the marker and selecting “Play from marker…”
Verse music. This lesson will use the song form ABAB to demonstrate one approach to creating a song in Mixcraft. Although the exercise calls for the use of Mixcraft’s loops for the music, students can always choose to record themselves playing instruments. Remind students that they will be singing their lyrics over the section of each verse that has been reserved for lyrics on the timeline. This might influence which Mixcraft loops they choose.
Verse drums. Select the “Library” tab in the Tab Area (located in the lower left hand corner). This will display Mixcraft’s loop library. To review drums: Sort By > Instruments > Drums. A long list will appear in the large selection area of the window. Browsing some of the available loops. To preview a loop, simply click the green play arrow located next to it. Remember, an internet connection is required to download loops currently not stored on the computer hard drive.
 To find Acoustica’s drum loops: Library > All > Sort By > Instrument > Drums.
When you have found a loop you like, drag and drop the loop onto the first audio track on measure 9. Mixcraft will ask if you want to change the master tempo to the tempo of the loop – select “No.”
The drum loop should be played through the entire verse (verse 1). To extend the loop, students can either “copy and paste” the loop, or select the loop option (icon with “circle” and “+”) above the audio region of the drum loop.
 A drum loop dragged onto measure 9 of the first audio track. Clicking the circle with a “+” sign on the audio region will loop the track.
Harmony. Next, find a keyboard, piano, or synthesizer loop for the verse. Use the Mixcraft loop library to browse and preview. Pay particular attention to the key of the loop. If the key does not match Mixcraft’s master key, Mixcraft will automatically transpose the key. The key will also say whether the loop is in major or minor. Use this information to convey the mood of the song. Repeat the above steps and loop the keyboard all the way through the verse (verse 1). play
Finish the verse by adding one or two more instruments. A bass part is generally needed, but not required. Try previewing the bass loops or other instruments. Drag any new loops onto a blank audio track at measure 9. Each instrument should have its own track.
Arrange the verse. Try alternating between loops throughout the verse. For example, the bass could play on measures 9 -12 and rest on 13. A new loop could start playing on measure 13 in place of the bass. Try different patterns with your arrangement. Below is a sample arrangement for verse one:
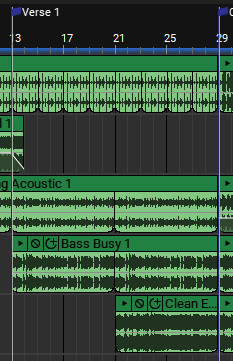 In this arrangement, the drum, a synthesizer bass loop, and an ambient synthesizer pad throughout the verse. The trumpet and lead solo loops alternate measures.
Once verse one is completed, highlight and copy all the loops of the verse 1 Timeline segment (measures 9-25) and paste them onto measure 41 (which is the beginning of verse 2). The music for these verses will now be identical.
Creating the chorus. The Timeline from measure 25 to measure 41 will still be blank. This is where the chorus will be created. Starting at the measure 25 flag use the same drum loop selected for verse 1. Now, however, is the opportunity to use different instrumental loops on the other tracks! These new loops will alert the listener to the shift from verse to chorus. Try finding loops in the same key as the verse (two different keys may sound “off” to the listener).
Once the instrumentation of chorus one is completed, copy and paste the chorus one segment (measures 25-41) onto measure 57 (or chorus two). Now the music for both the verses and choruses should be completed.
Finally, create an intro and outro (introduction and ending section). An introduction is usually an instrumental part of the song that leads up to the first verse. Create an introduction starting at measure one by using the same loops from verse one (“copy and paste” or “drag”). The outro, or ending to the song, can easily be created by expanding the loops of the chorus along the timeline. To review; Intro, measures 1-9; Verse 1, measures 9-25; Chorus 1, measures 25-41; Verse 2, measures 41-57;
Chorus 2, measures 57-73; and Outro, 73-----.
With the music completed, save your Mixcraft session. The final step of songwriting involves putting the cherry on top – recording the lyrics!
Prior to recording, have students practice humming or singing the lyrics over the music. Hopefully a usable melody will emerge from this initial rehearsal. If there are students who are uncomfortable singing alone, ask a less shy fellow student to help by singing along.
You may find that the lyrics you initially wrote do not exactly match your music. Experiment with the lyrics and adjust them to fit the music.
To record the lyrics, make sure you are in a quiet area. Try to record in a room in which there is not a lot of background noise.
RECORDING THE LYRICS IN MIXCRAFT
Recording Audio. Set up. Ask your teacher for help if needed:
First, to prevent feedback, turn off any speakers or monitors. Record with headphones because this will allow you to hear what you are recording without creating a feedback loop. Connect headphones to the headphone jack on your audio/computer interface, or on your computer.
Next, connect the microphone to the audio/computer interface with a microphone cord. To make sure Mixcraft is monitoring the audio/computer interface, check the File > Preferences > Sound Device tab and confirm that the interface is selected.
If using a microphone pop filter, place the filter in front of the microphone. This will help create clean vocal recordings.
Testing the audio signal chain:
Arm a blank audio track in the workspace by clicking “arm.” Click the downward arrow next to the arm button and select the source of the recorded audio (the microphone). Make sure your interface is selected. To check the configuration, speak into the microphone – the volume meter should jump. Also check “Monitor Incoming Audio” to activate the headphones.
Remember, for clean recordings, monitor the incoming audio on the audio track’s volume meter. Record in the “yellow” zone. In this zone, the recordings will be audible, but not so loud that the recording will be distorted.
 An example of recording in the “yellow zone.”
If the meter is reaching the “red” area, try dialing back the gain on the audio/computer interface or move the performer/performers farther away from the microphone.
 An example of recording in the “red zone.” Careful! Recording in the “red” zone could be harmful to your equipment or ears and could distort the recorded audio!
With Mixcraft and the recording equipment configured, help students record their lyrics.
To start recording, press the master record button on the Master Bar or press “R” on the keyboard. Students will sing their lyrics at the proper places by watching the flow of the piece on the timeline – they will sing the verses in the appropriate areas of the verse segments and the chorus in the chorus segments. Prompt if necessary. Make any edits that may be required.
 The master record button located on the Master Bar.
Once the recording is finished, mix the song using the “Mixer” tab in the Tab Area. Adjust
the volume or pan settings. When mixing, try to keep the vocals audible and clear, but not
so loud that they drown the rest of the instruments. Likewise don’t let the instruments
overwhelm the singer.5. When the mix is satisfactory, mix down the song into a .WAV or .MP3 file. Go to top file
and select File > Mix Down To…> and select the file type. Enjoy.