STUDENT’S GUIDE | |
VOCAL FX PROJECT | |
NAME: | |
CLASS TIME: | |
PERIOD: | |
TEACHER: | |
CLASS: |
REQUIRED MATERIALS:
Audio Files (Pre-recorded or Recorded in the classroom)
Computer with Mixcraft
Mixcraft’s Built In Audio FXs
SUGGESTED MATERIALS:
Text to record (poem, story, or improvised speech)
Headphones
Microphone
Microphone Cable
Microphone Pop Filter
Audio/Computer Interface
Further Reading Materials
ACTIVITY
Recording Vocals
Ask your teacher what you will be recording during this project. If your teacher does not have a required text, try recording a short poem, speech, or perhaps a conversation between you and another student. The objective of this project is to create a clean, vocal recording.
Launch Mixcraft and open File>Set Project Default Settings. Set the New Project window Audio Tracks to 1 and click OK. Now click File>New Project.
 Once the New Project window has loaded, remove any instrument tracks, and set the Audio Tracks field to one.
Once the New Project window has loaded, remove any instrument tracks, and set the audio tracks field to one.
Setting Up Your Recording Workstation. Before recording, ask your teacher if your computer, audio hardware, and Mixcraft are set up properly:
Turn off any speakers or monitors. If possible, use headphones while recording. If you have a pair, connect them to the headphone jack either on your computer or on your audio/computer interface.
Next, connect your microphone with your microphone cable to your audio/computer interface (or to your computer) and set up your microphone pop filter if you have one. Ask your teacher for help if you are unsure.
Ready to record!
Arm the audio track in the Workspace by clicking “arm.” The downward arrow next to the arm button will allow you to select the device capturing and delivering the sound signal (a microphone in this case). Make sure your device (microphone) is selected. Check your configuration by speaking into the microphone. You should see the volume meter jump as it registers your voice.
If you have them, remember to activate the headphones. When “armed” the track workspace menu will display a microphone (see screenshot below). Clicking turns this button “green.” This is an alternate way to turn on the Monitor Incoming Audio function.
For clean recordings you will want to monitor the incoming audio on the audio track volume meter. If possible, record in the “yellow” zone. In this zone, your recordings will be audible, but not so loud that the recording will distort.
 Clean Audio.
If the meter is reaching the “red” area, try dialing back the gain on your audio/computer interface or moving away from the microphone.
 Distorted Audio.
Disarm the metronome. Click the metronome icon (outlined in red) and uncheck all of the boxes.
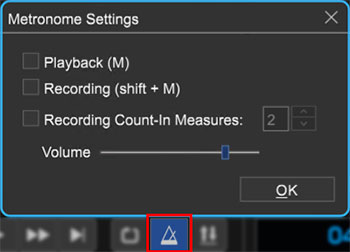 You will not need to use the metronome when creating your recording. Here, all the boxes are unchecked.
Rewind the cursor to the beginning of the timeline before recording by hitting the “rewind” icon (outlined in blue in the image below).
Start recording by either clicking the master record button (outlined in red in the image below) or by hitting the R key on your keyboard. The cursor will begin moving down the Timeline and waveforms of your recorded speech will appear. To edit, or re-record audio, stop the recording by hitting either “R” or the space bar. Select the area that needs to be re-recorded with your cursor and hit the master record button. Don’t forget to wear headphones to hear what is being recorded!
 Selecting the master record button (outline in red) begins the recording. The rewind icon is outlined in blue.
After you finish recording, disarm the audio track, rewind and the play back the recording from the beginning. Listen closely for parts that you may want to rearrange, split or remove.
Editing Audio. After recording or importing pre-recorded audio, you can turn to editing the audio if necessary. Here are three edits that are used often:
Arranging audio: To arrange audio regions on the Timeline, cut a large audio region into smaller segments. Right click an area on your waveform that you would like to rearrange and select “split” (Ctrl + T). The audio region will now be cut into two pieces. Cut as many sections as you need. Grab and move the regions on your workspace to rearrange the recording. Try rearranging the words or sentences of your recording.
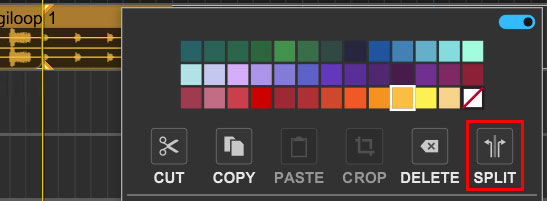 Selecting the “split” option splices the audio region into two audio regions.
These separate audio segments can be merged into one segment. Simply highlight the relative segments (Shift + Click with a sweep over the segments) and right click to find the option “merge” (Ctrl +W).
Trimming audio: To trim, shorten, or extend audio regions move your cursor near the ends of your waveform until you see a double-sided arrow. Simply click, and drag left or right to trim your audio region to the desired length. This edit is useful for quickly cropping out sections of audio that are undesired. If there are parts of the audio recording you want to remove, try splitting and then trimming the regions.
Deleting audio: To remove audio, you can highlight (drag + select regions) then delete; or split your waveform into parts, highlight unwanted segments and then hit delete. Make a mistake? The “undo” button (curved arrow icon) can be found on the top left menu bar next to the “floppy disk – Save” icon.
TIP: Remember, you can zoom in and out of the workspace using the “+” and “-“ keys. Zoom in for more precise edits.
EFFECT PLUGINS
After your recording has been edited to completion, it is time to consider adding effect plugins. Effects plug-ins are small software programs, each of which is designed individually to create a specific audio effect. The character of a recorded piece can be shaped and changed significantly by the use of one or more of these effects.
Adding effects: To start, click the “FX” button on the audio track of your recording. This will launch the Effects List window. From here, you select an individual effect with the “Select An Effect” menu.
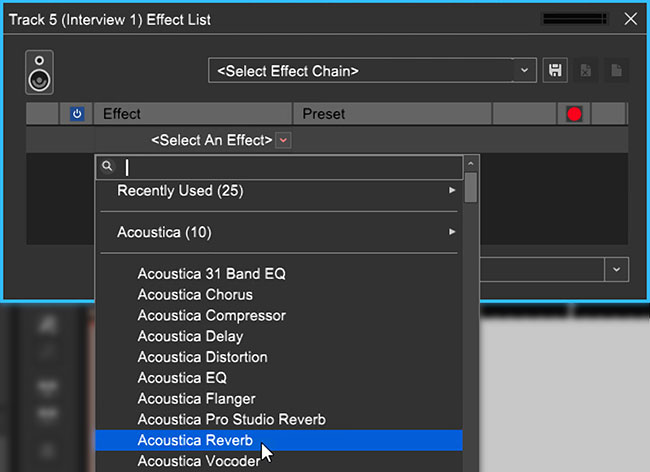 The Effect Window.
Let’s take a look at some common effects you can add to your vocal track:
Reverb: How can you make your recording sound like it comes from a different place than the classroom? The answer, of course, is “reverb.”
Adding Reverb: To add reverb to a vocal track, click the “FX” button on the audio track. The Effects List window will appear. Select from the drop down menu “Acoustica Reverb.”
Reverb Presets. Predetermined reverb settings, or “presets,” are accessed on the drop down menu. Feel free to preview a few of these to see how they influence your recording. Try comparing bigger, more spacious presets like “Train Station” to small sound reverbs like “Lite Verb.” For more control, click the “edit” button to tweak the individual parameters of the reverb.
ASSIGNMENT
How would you make your recording sound like its coming from a large stadium?
How would you make your recording sound like its coming from a small closet or a bathroom?
 Example of using both Reverb and Delay FXs.
ASSIGNMENT
How would you make your recording sound like it’s echoing in a cave or valley?
How would you make your recording sound metallic or robotic?
Delay: Delay produces an “echo” effect that adds a distinct atmosphere to recordings. Let’s add some delay to our vocal track!
Adding Delay: To add delay to our vocal track, click the “FX” button on the audio track. The Effects List window will appear. Select “Acoustica Delay” from the drop down menu.
Delay Presets. Choose delay presets from the drop down menu. Try “Long Repeater” and then “Slap Back Echo” to sample different delay effects. For more control, click the “edit” button to tweak the individual parameters of the Acoustica Delay presets. Try adjusting the “feedback” parameter for a cool effect.
TIP: Experiment by coupling a reverb and a delay effect! First, dial in a reverb preset and then add a delay after it. Try mixing and matching different reverb and delay presets. Listen closely to what happens to your recording.
ASSIGNMENT
How would you correct an out-of-tune instrumental performance or an off-key singer?
How would you make your recording sound like the singer of a hit song from a Hip Hop or a Top 40 Track?
Gsnap Pitch Correction: Gsnap creates a unique effect on vocal recordings – they sound robotic.
Selecting Gsnap Pitch Correction: To add pitch correction to our vocal track, click the “FX” button on the audio track. The Effects List window will appear. Select from the drop down menu “Gsnap Pitch Correction.”
Gsnap Presets. The presets for Gsnap vary from subtle pitch correction to drastic pitch glides.
Sample a few and listen to how the contour of our speech changes with each choice. The “Tea-Pane” presets offer a great start for achieving that popular robotic sound.
Adjust Pitch By (Pitch Shifting): This feature, which changes or adjusts the pitch by semitone increments, is commonly called “pitch shifting.” Pitch shifting is a built-in feature of Mixcraft rather than an actual plug-in effect. It is included here, however, because it is another way to influence the pitch of a recording. Here is a common question: How can we lower or raise the pitch of our recording, without having to re-record our vocal track? The answer, of course, is through Pitch Shifting.
Creative Ideas. To access pitch shifting, select an audio segment on your timeline and click the “Sound” tab on the Tab Menu (below middle-left) or double click the timeline track. Select Adjust Pitch By in the pull-down menu. Alter the semitone setting, then playback to hear the change to your recording. Repeat with another setting.![]() Audio adjusted by 5 semitones.
Audio adjusted by 5 semitones.
ASSIGNMENT
How would you make your recording sound muffled?
How would you add sparkle and presence to your recording?
Mixing Down. After you have added an effect to your recording, mix down the recording into an audio file. By the end of the project, you will have several variations of your original recording! To mix down your work at any point go to the top menu > Mix Down To…> and select either .MP3 or .WAV format. Labeled the first file “Vocal_Recording_A” then the next “Vocal_Recording_B,” etc.
Playing them back. After you have finished adding each effect to your recording and have mixed them down, notify your teacher. Play back through each recording and see if you can remember which effect was added.
ASSIGNMENT
How would you make your recording sound like a "Chip 'n' Dale" rendition?
How would you make your recording sound deep, like a monster’s voice?
Acoustica EQ Effect: Acoustic EQ has many presets. One of the more popular is the “Telephonic” preset which produces what is widely known as a “phone-filter” effect. With this preset the recording sounds like it is coming from a telephone. Feel free to get creative with all of these presets. Try replicating sound environments that you might encounter every day.
Selecting Acoustica EQ: To start, add Acoustica’s EQ to your vocal recording. Click the “fx” button on the audio track, and select “Acoustica EQ” from the Effects List window.
EQ Presets. Next, try the presets “Telephonic,” “AM Radio,” and “1 K Notch.” Notice how they shape the tone of your recording. Try editing the parameters of the EQ to create your own tones. Try Dialing in your own EQ settings.