TEACHER’S GUIDE | |
LYRICAL SONGWRITING PROJECT | |
NSME: | 1, 2, 3, 4, 6 |
GRADE SCHOOL | GRADE SCHOOL – HIGH SCHOOL |
CLASS TIME | 4-6 ONE-HOUR PERIODS |
REQUIRED MATERIALS:
Computer with Mixcraft
Microphone
Headphones or Monitors
Copies of the Lyrical Songwriting Student Guide (Additional Materials Download)
SUGGESTED MATERIALS:
Internet Connection
MIDI Controller
Acoustic Instruments
Audio/Computer Interface
Further Reading Materials
SKILLS GAINED
Songwriting (both music and lyrics)
Using Mixcraft Loops
OVERVIEW: A song is a relatively short voice composition that is set to music and is performed by at least one singer with or without instrument accompaniment. Song compositions sung simultaneously by multiple voices are called “choruses” and songs written for voice only, without instrument accompaniment, are referred to as “a cappella.” Educators please note that “chorus” can also refer to a stanza in a song that is preserved and repeated over the course of the song (often following each verse or after several verses). Much of popular music is dominated by a particular type of song which is termed “strophic.” Strophic songs often contain well-known song structures or sections, such as the “verse” and “chorus,” that are referred back to at various points in the song. By contrast, “thoroughly-composed” songs lack this repeated structure and are composed straight through with no repeated sections.
The art of songwriting certainly has a rich and complex history. Songs have always been intertwined with and representative of cultural identity and political ideology. Many famous songwriters have had the dubious honor of being placed on government “watch” lists of those considered potential threats to domestic security. For educators interested in the art of songwriting as viewed through an anthropological, political or historical lens, this lesson offers the opportunity to explore such topics.
LESSON: This lesson is designed to be a collaboration between an English/writing class and a music class. First, students will analyze several popular song lyrics supplied by the educator. Students will then write their own lyrics or short pieces of poetry and set their word creations to music using Mixcraft’s loops. The topic of the lyrics/poetry can be determined by the student or educator. Though not required, it is recommended that students have some familiarity with Mixcraft before undertaking this holistic project. If the class is a mixture of English and music students, perhaps the music students could help with the Mixcraft part of the lesson.
This lesson organizes the text and music in an ABAB format or a Verse-Chorus-Verse-Chorus structure (though educators can certainly modify this song structure to extend the lesson plan). For grade school students, simple songs can be written and sung by the entire class. If students are unable to produce music in Mixcraft, rhythmic accompaniment, such as clapping or drumming, will suffice as the musical setting for the lyrics. This will also generate group participation without the need for a more technical setup. Middle and high school students will be directly engaged with basic music production and will learn to write more complex lyrics and music. As a prelude to the songwriting part, older students might enjoy discussing the evolution of song by analyzing various song genres (art songs, folk songs, current popular songs). There is always, of course, the unresolved philosophical query: What comes first, the lyrics or the musical composition – or can
both evolve together? This question could even be incorporated into the lesson plan and might help inspire a student discussion on strategies for writing lyrics and music. Finally, the lesson can be altered to teach audio recording and music performance techniques: using Mixcraft’s loops instead of actually recording live instruments will certainly satisfy students looking for a demanding and challenging project. Student voice imitations of instruments could also be used in the creation of loops.
ACTIVITY
Writing Lyrics
Research several popular music songs and analyze the lyrics with students. In this lesson plan, we will be using the song structure ABAB (verse-chorus-verse-chorus). There are, of course, other strophic forms (song forms that use repetition of verses and choruses – like ABAB above), that educators could use as a potential lesson plan extension.
Have students brainstorm for a topic to write about. If possible, collaborate with an English class during the writing process. Students could compose lyrics about a historical, mathematical, or scientific event. Younger students might write about simple events, family relations, pets, friendships, games or objects; or they could use the type of “counting” song that involves letters and numbers. Perhaps describing a school fieldtrip or their favorite type of food would excite grade school children. Have older students tell a story using more complex lyrics. They might even use songwriting as a coping mechanism – to write about something that is troubling them. Below are a few ideas for topics:
YOUNGER STUDENTS | OLDER STUDENTS |
Favorite Animal | A story of a historical event |
Favorite Food | A fictional story that includes themselves as protagonists |
About a family member | A story about dreams and aspirations |
About a holiday | A story about something that is bothering them |
Field trip | |
A Vacation |
Write lyrics in an ABAB form. Students will write a verse, followed by a chorus, then a verse and finally a chorus – ABAB. Rhyming is a strategy songwriters employ to give a special texture or rhythm to the sound of the lyrics and to enhance memorization by the listener. For younger students, writing several simple rhymes can suffice for their project. Older students should work on telling a story and use each verse to continue the narrative (much like “chapters” in a book). The terms “verse” or “chorus” with regard to lyrics are defined as:
Verse: A unique section of lyrics that is not repeated. A song may have any number of verses, all different. Verses tell the story of the song.
Chorus: A phrase of lyrics (like a verse) that is repeated without alteration several times in a song. Usually the repeated chorus has identical lyrics or lyrics slight variations. The chorus is also known for carrying “the hook,” or the infectious, sing-along part of the song.
Here are two examples of lyrics that follow an ABAB structure (Verse-Chorus-Verse-Chorus):
YOUNGER STUDENT LYRICS | OLDER STUDENT LYRICS |
“My Pets” | “Homesick” |
A (Verse): B (Chorus): A (Verse 2) B (Chorus): | A (Verse): B (Chorus):
|
In the younger student song, the author is writing about his or her favorite pets. Each verse provides the listener with information about the animal including the pet’s name and behavioral habits. The chorus is a simple repetition, almost a chant, of one line “these are my pets/these are my pets” – certainly an affirmation of the song’s playful topic.
In the older student song, the author describes being homesick. Verse one describes a feeling of isolation even while wandering down a street with well lit houses. The first chorus refers to dim lights and thin leafs, perhaps it is autumn or winter, to place the listener in a seasonal context. The lyrics in the second verse appear hopeful on the surface with depictions of warmth and a heightened sense of familiarity (“they [the roads] begin to feel less cold, less old”). Also there is, perhaps, even a reference to a motherly figure or lost lover, “the sun is rising and her warmth seems near/a jealous breeze pushes her here.” Finally, the narrative comes full circle in the second chorus when the seasons described are now spring and summer.
Brainstorm the music. After the students have written their lyrics, they have a couple of important decisions to make before producing music for their lyrics in Mixcraft:
Meter: A simple meter like 4/4 will work with most songs. However if students write a waltz or in another form that uses 3/4 time, this will have to be configured within Mixcraft.
Tempo: Is the song slow or fast? Decide on the tempo of the song. Tempo is measured in BPM (beats per minute) in Mixcraft. A BPM between 80 and 90 is considered slow, while a BPM of 130 – 140 is considered moderately fast.
Mood: Is your song sad or happy? Students can use certain scales or keys to covey particular moods: try a minor scale or key for a sad song. Try a major scale or key for a happy song.
Arrangement: How many instruments will be used? Do you want a drum track? Guitars? Orchestral sounds? With Mixcraft loops, it is easy to add all of these instruments. Decide on your arrangement beforehand.
WRITING A SONG IN MIXCRAFT
Once the lyrics are finalized and a rough idea for the music has been formed, it is time to actually create music and set the lyrics to music.
Launch Mixcraft and open File>Set Project Default Settings. Set the New Project window Audio Tracks to 8 and click OK. Now click File>New Project.
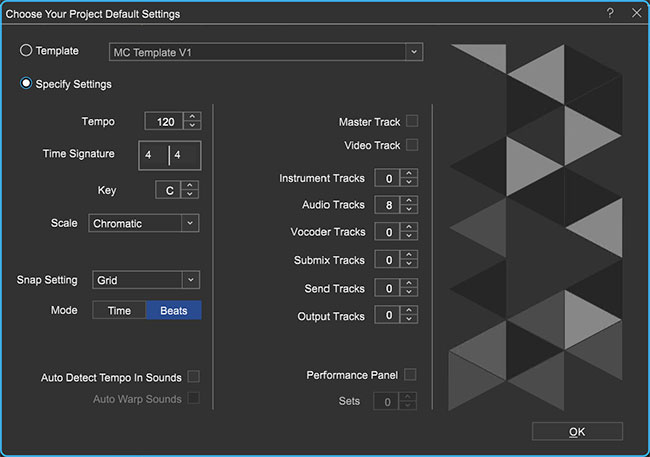 Once the New Project window has loaded, remove any instrument tracks, and set the Audio Tracks field to 8.
Change the tempo, meter, or key of the song by clicking on the master bar’s display.
 Clicking this display on the master bar will allow users to change the tempo, meter, or key.
Setting markers. Markers are an easy way to note where specific parts of the song begin and end on Mixcraft’s Timeline. Measure numbers run along the top of the Timeline. We will be setting markers on certain measures for the ABAB structure:
At measure 1 on the Timeline, double-click on the blue flag that says “Start.”
Change the marker title to “Introduction.”
Next, add a marker at measure 9 by right-clicking just next to the number on the Timeline (Or double click 9). Select “Add marker…” Label the marker “Verse 1.”
 Right-click next to measure 9 on the timeline to add a marker. Label the marker “Verse 1”
Next, add a marker at measure 25 and label it “Chorus 1.”
Finish adding markers and renaming them: at measure 41 (“Verse 2”); measure 57 (“Chorus 2”); and measure 73 (“Outro”).
These markers will help you compose music for your introduction, verse, chorus, and outro (concluding) sections. You can start playback at any of the markers by right-clicking the marker and selecting “Play from marker…”
Verse music. This lesson will use the song form ABAB to demonstrate one approach to creating a song in Mixcraft. Although the exercise calls for the use of Mixcraft’s loops for the music, students can always choose to record themselves playing instruments. Remind students that they will be singing their lyrics over the section of each verse that has been reserved for lyrics on the timeline. This might influence which Mixcraft loops they choose.
Verse drums. Select the “Library” tab in the Tab Area (located in the lower left hand corner). This will display Mixcraft’s loop library. To review drums: Sort By > Instruments > Drums. A long list will appear in the large selection area of the window. Browsing some of the available loops. To preview a loop, simply click the green play arrow located next to it. Remember, an internet connection is required to download loops currently not stored on the computer hard drive.
 To find Acoustica’s drum loops: Library > All > Sort By > Instrument > Drums.
When you have found a loop you like, drag and drop the loop onto the first audio track on measure 9. Mixcraft will ask if you want to change the master tempo to the tempo of the loop – select “No.”
The drum loop should be played through the entire verse (verse 1). To extend the loop, students can either “copy and paste” the loop, or select the loop option (icon with “circle” and “+”) above the audio region of the drum loop.
 A drum loop dragged onto measure 9 of the first audio track. Clicking the circle with a “+” sign on the audio region will loop the track.
Harmony. Next, find a keyboard, piano, or synthesizer loop for the verse. Use the Mixcraft loop library to browse and preview. Pay particular attention to the key of the loop. If the key does not match Mixcraft’s master key, Mixcraft will automatically transpose the key. The key will also say whether the loop is in major or minor. Use this information to convey the mood of the song. Repeat the above steps and loop the keyboard all the way through the verse (verse 1). play
Finish the verse by adding one or two more instruments. A bass part is generally needed, but not required. Try previewing the bass loops or other instruments. Drag any new loops onto a blank audio track at measure 9. Each instrument should have its own track.
Arrange the verse. Try alternating between loops throughout the verse. For example, the bass could play on measures 9 -12 and rest on 13. A new loop could start playing on measure 13 in place of the bass. Try different patterns with your arrangement. Below is a sample arrangement for verse one:
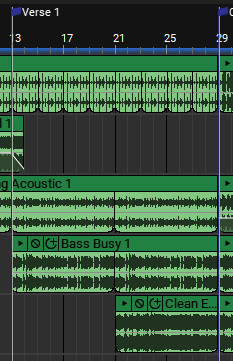 In this arrangement, the drum, a synthesizer bass loop, and an ambient synthesizer pad throughout the verse. The trumpet and lead solo loops alternate measures.
Once verse one is completed, highlight and copy all the loops of the verse 1 Timeline segment (measures 9-25) and paste them onto measure 41 (which is the beginning of verse 2). The music for these verses will now be identical.
Creating the chorus. The Timeline from measure 25 to measure 41 will still be blank. This is where the chorus will be created. Starting at the measure 25 flag use the same drum loop selected for verse 1. Now, however, is the opportunity to use different instrumental loops on the other tracks! These new loops will alert the listener to the shift from verse to chorus. Try finding loops in the same key as the verse (two different keys may sound “off” to the listener).
Once the instrumentation of chorus one is completed, copy and paste the chorus one segment (measures 25-41) onto measure 57 (or chorus two). Now the music for both the verses and choruses should be completed.
Finally, create an intro and outro (introduction and ending section). An introduction is usually an instrumental part of the song that leads up to the first verse. Create an introduction starting at measure one by using the same loops from verse one (“copy and paste” or “drag”). The outro, or ending to the song, can easily be created by expanding the loops of the chorus along the timeline. To review; Intro, measures 1-9; Verse 1, measures 9-25; Chorus 1, measures 25-41; Verse 2, measures 41-57;
Chorus 2, measures 57-73; and Outro, 73-----.
With the music completed, save your Mixcraft session. The final step of songwriting involves putting the cherry on top – recording the lyrics!
Prior to recording, have students practice humming or singing the lyrics over the music. Hopefully a usable melody will emerge from this initial rehearsal. If there are students who are uncomfortable singing alone, ask a less shy fellow student to help by singing along.
Students may need to adjust their lyrics to fit the music. Allow them time to experiment and rehearse with different vocal melodies, delivery tempos and lyrical arrangements.
To avoid noise interference and distraction, make sure the students are in a quiet environment for the recording. Try to find a time of day that will not be disruptive to other classes.
RECORDING THE LYRICS IN MIXCRAFT
Recording Audio. Set up:
First, to prevent feedback, turn off any speakers or monitors. Record with headphones because this will allow students to hear what they are recording without creating a feedback loop. Connect headphones to the headphone jack on your audio/computer interface, or on your computer.
Next, connect the microphone to the audio/computer interface with a microphone cord. To make sure Mixcraft is monitoring the audio/computer interface, check the File > Preferences > Sound Device tab and confirm that the interface is selected. If using a microphone pop filter, place the filter in front of the microphone. This will help create clean vocal recordings.
Testing the audio signal chain:
Arm a blank audio track in the workspace by clicking “arm.” Click the downward arrow next to the arm button and select the source of the recorded audio (the microphone). Make sure your interface is selected. To check the configuration, speak into the microphone – the volume meter should jump. Also check “Monitor Incoming Audio” to activate the headphones.
Remember, for clean recordings, monitor the incoming audio on the audio track’s volume meter. Record in the “yellow” zone. In this zone, the recordings will be audible, but not so loud that the recording will be distorted.
 An example of recording in the “yellow zone.”
If the meter is reaching the “red” area, try dialing back the gain on the audio/computer interface or move the performer/performers farther away from the microphone.
 An example of recording in the “red zone.” Careful! Recording in the “red” zone could be harmful to your equipment or ears and could distort the recorded audio!
With Mixcraft and the recording equipment configured, help students record their lyrics.
To start recording, press the master record button on the Master Bar or press “R” on the keyboard. Students will sing their lyrics at the proper places by watching the flow of the piece on the timeline – they will sing the verses in the appropriate areas of the verse segments and the chorus in the chorus segments. Prompt if necessary. Make any edits that may be required.
 The master record button located on the Master Bar.
Once the recording is finished, mix the song using the “Mixer” tab in the Tab Area.
Adjust the volume or pan settings as necessary. When mixing, try to keep the vocals audible and clear, but not so loud that they drown out the instruments. Likewise don’t let the instruments overwhelm the singer.
When the mix is satisfactory, mix down the song into a .WAV or .MP3 file. Go to top file and select File > Mix Down To…> and select the file type.
ADDITIONAL LESSON PLANS
Thoroughly-composed song: For older students, breaking away from the constraints of traditional songwriting structure (i.e. verse/chorus variations such as ABAB) can provide an
opportunity to flex their creative muscle with undefined, abstract forms. A thoroughly-composed song structure is described as “free form” – it requires no structure (or planning). Create a lesson plan in which students write a thoroughly-composed song about a particular topic. Remember, no lyrics or words should be explicitly repeated. In a similar fashion, the instrumental part should also not follow the verse/chorus structure.
Lieder: Lieder (also called art-songs) are vocal compositions of poems set to music. Design a project in which students set a target poem to music. Younger students will enjoy using popular children’s poems (e.g. Shel Silverstein’s poems); while older students could choose more intricate works (e.g. Edgar Allan Poe).
FURTHER READING
Pattison, P. Writing Better Lyrics
Zollo, P. Songwriters on Songwriting.