STUDENT’S GUIDE | |
MIDI INSTRUMENT SURVEY PROJECT | |
NAME: | |
CLASS TIME: | |
PERIOD: | |
TEACHER: | |
CLASS: |
REQUIRED MATERIALS:
Computer with Mixcraft
Headphones or Monitors
MIDI Versions of Children’s Songs (Additional Material Download Area)
Copies of the MIDI Instrument Survey Student Guide (Additional Material Download)
SUGGESTED MATERIALS:
MIDI keyboard
Sheet Music to Transcribe (For Older Students)
Further Reading Materials
ACTIVITY
Before starting the lesson, ask your teacher if you will be using MIDI files from the
“Additional Materials Download” or whether you will be composing/transcribing your own.
To begin the lesson, launch Mixcraft and open File>Set Project Default Settings. Set the New Project window Instrument Tracks to 1 and click OK. Now click File>New Project.
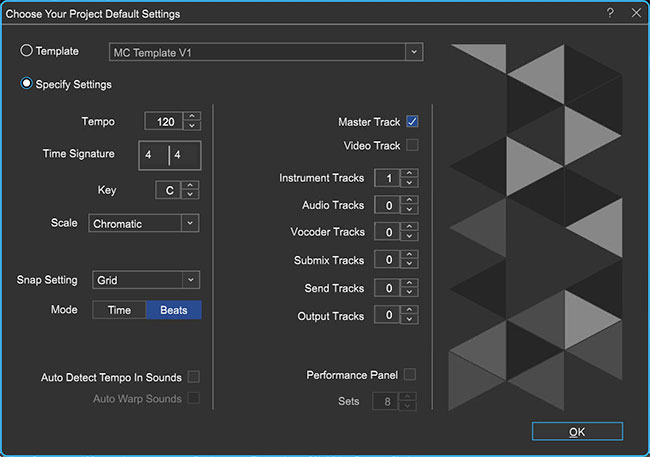 Once the New Project window has loaded, remove any audio tracks, and set the Instrument Tracks field to 1.
Importing MIDI files. If you are importing a MIDI file from the “Additional Materials Download” into Mixcraft, simply drag and drop the file onto Mixcraft’s Timeline or onto the virtual instrument track. A Mixcraft prompt window will give you the option to change the master tempo to the tempo in the MIDI file. Select “Yes” for now.
 Users will be prompted with the option to change the master tempo. Select “Yes” for now.
A MIDI region of the song will now appear on a virtual instrument track. Lines on the region refer to note duration and pitch: higher lines on a vertical axis have higher pitch while longer notes on the horizontal axis represent duration.
 A MIDI representation of “Eency Weency Spider.”
Before playing back the newly imported song, assign a virtual instrument to the virtual instrument track. Click the “keyboard” icon on the virtual instrument track. A new window will appear.
 Click the keyboard icon on the virtual instrument track to assign virtual instruments.
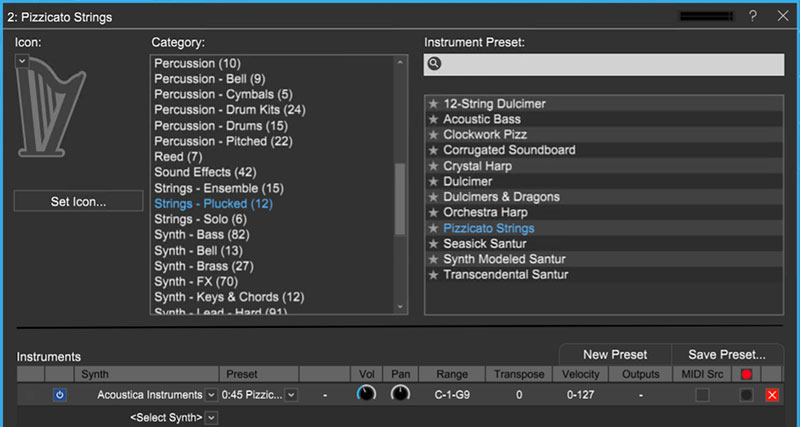
Browse Mixcraft’s virtual instruments by instrumental category. Brass, guitar, wind, and keyboard sounds are readily available – simply double-click on a sound to assign it to the virtual instrument track.
 Mixcraft’s instrumental categories.
Play back (hit the master play button or space bar) the melody and notice how the selected virtual instrument is now “playing” the MIDI song.
With this basic setup, educators can construct multiple lesson plans that emphasize different attributes of instruments and their respective instrumental families. Here are some simple lesson plans for students:
Describe a particular instrument family (say the “brass family”) and ask students to find a brass sound.
Assign different instruments to the same melody, one at a time, and ask students to describe the timbre (“tone” or “color”) of each instrument.
Browse through Mixcraft’s synthesized sounds and compare these digital emulations to their acoustic counterparts.
Duplicate the MIDI melody and assign different instruments to it. Combine and mix down timbres for more complex and rich tone colors.
Assigning a pizzicato string sound to the Eency Weency Spider melody.
 Mixcraft’s instrumental categories.
Older students can compose original melodies or transcribe sheet music into MIDI format by using Mixcraft’s Piano Roll:
First, create a new virtual instrument track by selecting one from the menu:
Track > Add Track > Add Virtual Instrument track.
Double click on the Timeline area that corresponds to the new virtual instrument track. A blank MIDI region should appear and the Piano Roll window should expand from the bottom of the screen.
Select the Pencil tool in the Piano Roll. This tool allows users to “draw” MIDI notes onto the Piano Roll. Notes drawn on the Piano Roll will then appear in the MIDI region on the Timeline as well.
 The Piano Roll Toolbar consists of the pointer arrow, the pencil tool, the paint brush tool, and the eraser tool.
Users can draw basic melodies or transcribe sheet music onto the Piano Roll.
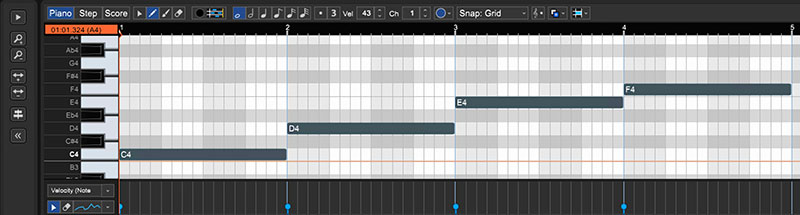 A sample melody in C Major programmed using Mixcraft’s Pencil tool and the Piano Roll.
To tidy up the MIDI notes, quantize them. Quantizing locks each MIDI note to the Piano Roll grid and can also be used to control the duration of each note. To do this, select “Quantize” from the MIDI Editing menu at the top of the Piano Roll window.
In the example above, the notes were then quantized to an “8th note” with the “note endings” option selected.
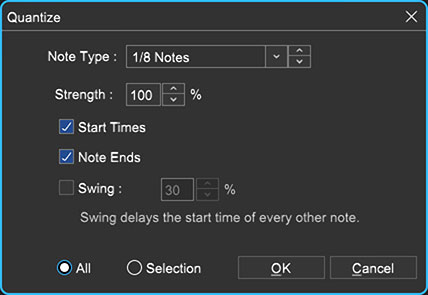 Example settings in the “Quantize” window.
If available, provide sheet music for students to transcribe or allow students to freely compose a short melody using Mixcraft’s Piano Roll. Once the transcription or composition is completed, encourage student to experiment with different instrumental arrangements.