STUDENT’S GUIDE | |
STOMP NOTATION PROJECT | |
NAME: | |
CLASS TIME: | |
PERIOD: | |
TEACHER: | |
CLASS: |
REQUIRED MATERIALS:
Computer with Mixcraft
Headphones or Monitors
Ingredients for a home made instruments
SUGGESTED MATERIALS:
Copy of STOMP on video
MIDI Keyboard
Headphones/ Monitors
Further Reading Materials
ACTIVITY
Making a STOMP Instrument
Ask your teacher whether you will be creating a homemade instrument or using an object from home or the classroom for your instrument. Below are several basic ideas if you do decide to make your own instrument:
Shakers made of rice or beans
Basketballs for bouncing
Cups filled with varying amounts of water
Chopsticks for drumming
Pillows for thumping
Create your instrument. However, each member of your group must make a different instrument – one of you can have the same instrument.
Begin imagining a part for your instrument. Consider: Is your instrument percussive or melodic? Try tapping out different rhythms (chop sticks on trash can) or melodies (spoon on glasses of water). Work with your fellow classmates to gain feedback.
WRITING A PART FOR THE STOMP INSTRUMENT
After your instrument is completed, it is time to develop and notate parts for your STOMP ensemble!
Begin by brainstorming. What parts of the arrangement will include your STOMP instrument? What role will your instrument have? For example, a bouncing ball might be an instrument that keeps an underlying pulse and carries momentum throughout the song. To illustrate: you could bounce the ball on beats 1 and 3 in a 4/4 time; a bean shaker instrument in the ensemble could play consistent 8th notes; while, of course, a melodic instrument player could tap out melodies on water glasses!
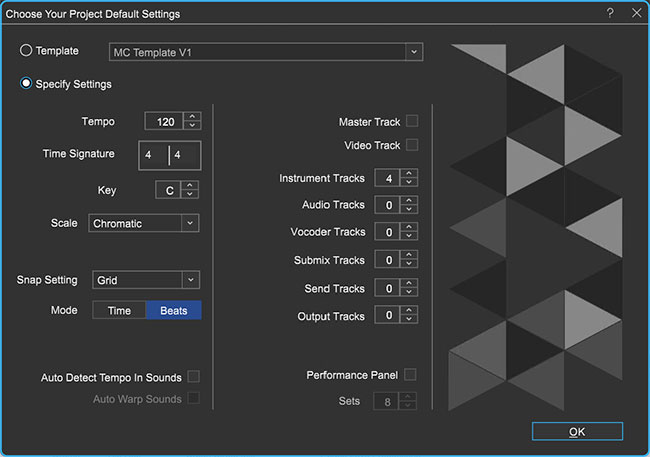
Launch Mixcraft and open File>Set Project Default Settings. Set the New Project window Instrument Tracks to 4 and click OK. Now click File>New Project.
 Ensure there are enough virtual instrument tracks for each instrument in a STOMP ensemble. If necessary, you can aways add a few more virtual instrument tracks to the Timeline (Ctrl + E).
To start writing, double-click the Timeline on the blank area for the first virtual instrument track. Click at measure one to place the blank MIDI region at the beginning of the Timeline.
 Double clicking on the Timeline places a blank MIDI region on the virtual instrument track.
Next, double-click on the blank MIDI region. The Sound Tab will launch and display the Piano Roll Editor. Change the “editor type” from Piano Roll to “Score.”
 Change the Editor Type to the Score setting. Now educators and students can use notation within Mixcraft!
The notation interface will appear. For simplicity’s sake, keep the meter in 4/4 time. To begin the notation:
Create a 4-measure loop. Drag the “loop end” flag on the notation window to the beginning of measure 5. The MIDI region on the Timeline will now extend to four measures.
 Drag the Loop End flag to measure 5. This will set a loop that consists of 4 measures.
Select the pencil tool and the desired note type. The quarter-note setting is a good place to start; this lets users “draw” quarter notes on the sheet music.
 The pencil tool and the quarter note settings are selected in this screen shot.
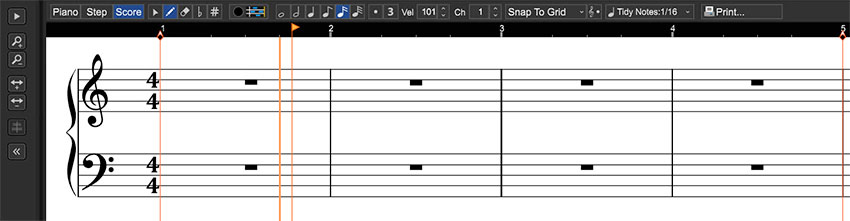
Begin composing by drawing notes to form a part. Small tick marks above the sheet music area denote where each beat falls. If you intended to place a note on a specific beat, try clicking in line with the tick marks.
 Small tick marks alert the user to where a beat falls. In this example the first quarter note in measure 2 falls on beat two and is aligned with the tick mark directly above the note.
For a percussive instrument, select a note (for example the “A” below middle “C” or A4) to denote a “hit” or “bounce.” In the example below, a part written for a bouncing ball calls for the performer to bounce the ball (which produces a “bouncing” sound) on beats 1 and 3.
 A completed 4-bar part for bouncing ball. The ball is to sound on beats 1 and 3 (using quarter notes).
Repeat steps 4 – 6 (up to section “c” of 6) and continue writing 4-bar parts for each homemade instrument. Rewind. It may help to activate the metronome. Play back the results by clicking the master play button. Listen carefully. Following are some sample rhythms that students can notate:
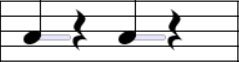 Sample Rhythm 1: Quarter note on beats 1 & 3
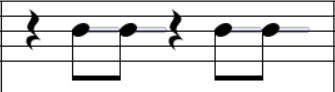 Sample Rhythm 2: Double eighth notes on beats 2 & 4
 Sample Rhythm 3: Single eighth note on beats 2 & 4
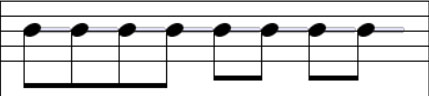 Sample Rhythm 4: Double eighth note on beats 1, 2, 3 & 4
TIP: If you draw an unintended note: simply delete it by selecting the eraser tool; or by clicking undo (Ctrl + Z): or by clicking the undo button (counter clockwise circled arrow) at the topof the workspace.
Arranging the parts. Once finished, users can arrange the 4-bar parts on the Timeline. Though not required, this might be a helpful workflow when arranging the parts for live performance. First, create an introduction in which one instrument starts playing.
Then slowly introduce more instruments and finally, slowly fade out each instrument until the starting instrument is left playing.
Loop the MIDI regions of each instrument on the Timeline by clicking the circle with a “+” icon on a region. Loop each instrument for the identical number of measures.
 Clicking the circle with a “+” icon, loops the MIDI region. Here the initial 4-bar region has been looped several times.
Next, trim the beginning regions of the instruments that will enter later in the performance: Place the cursor at the beginning line of a region to be shortened and wait for a double-sided arrow to appear. Now simply drag the line back until the region’s beginning is at the correct place in the performance.
Finally, trim the ending segments of the instruments that will exit the performance before the end: Place the cursor at the ending line of a region and wait for a double- sided arrow to appear. Now simply drag the ending line until the region is at the desired position for a fade out. One by one the instruments will drop off until only the single beginning instrument is left playing as the arrangement comes to a close.
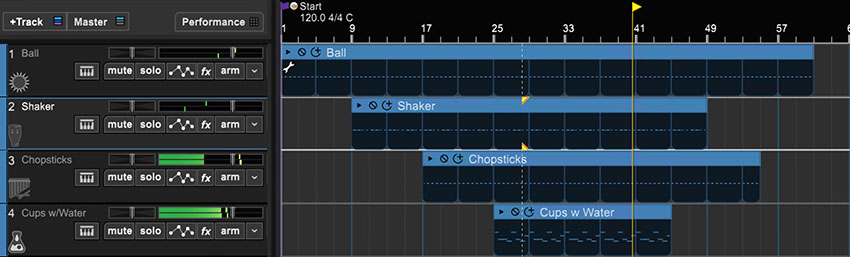 A sample arrangement. First, the 4-bars of each track were looped for 60 measures, then the regions for three instruments were trimmed to allow different instruments to enter or leave the arrangement.
Finally, print out the sheet music to each 4-bar loop. With the notation interface open, select the “print…” icon in the upper right hand corner.
 The print icon allows educators and students to print out notated parts.
PERFORMING
With the parts printed out, help the students learn to the play each part on their instrument. Once rehearsed, help choreograph each STOMP ensemble performance.
Thinking about the arrangement. If you previously arranged the MIDI regions of each instrument in Mixcraft, try to replicate that arrangement for the performance. If you skipped that step, one strategy for conducting the performance is to cue in each student. Have one student begin, then after a few measures add another and another until all the students are playing. Finally, slowly cue one student at a time to stop playing until the student who started is the only one left. A terrific applause will ensue.
Performance. Perform your STOMP song for the rest of the class!