TEACHER’S GUIDE | |
STOMP NOTATION PROJECT | |
NSME: | 2, 3, 4, 7 |
GRADE SCHOOL | GRADE SCHOOL – HIGH SCHOOL |
CLASS TIME | 3-4 ONE-HOUR PERIODS |
REQUIRED MATERIALS:
Computer with Mixcraft
Headphones or Monitors
Ingredients for a homemade instruments
SUGGESTED MATERIALS:
Copy of STOMP on video
MIDI Keyboard
Headphones/ Monitors
Further Reading Materials
SKILLS GAINED
Notation/ Editing Notation
MIDI Editing
Instrument Design/Creation
Group Instrumental Performance
OVERVIEW: In the mid-nineties a new British musical soared into popularity. Appropriately named STOMP, this hybrid music and theater act was driven by a rhythmically dense soundtrack outlandishly performed with household objects. Sticks, basketballs, brooms, metal sinks, fenders, hub caps, every kind of can, pail, container and trash can lid were banged, rattled, clashed together and scraped to create complex percussion rhythms. Using mundane objects for music performance is certainly not revolutionary (20th century composers have been tinkering with similar practices for over fifty years); nevertheless their use in STOMP gave a unique charm and a riveting excitement to the musical. Turn your classroom into a STOMP ensemble by using homemade instruments and similar performance tactics. This is not an assignment on sound collage (which is another lesson In this book). Sound collage is somewhat formless: STOMP is most certainly not. There must be a perceivable organization to the music. If possible, show the class a DVD of the STOMP performance or have them watch some of the many STOMP performance clips available on the internet.
LESSON: The STOMP Notation Project teaches rudimentary notation skills by providing students with the opportunity to create homemade instruments; write a percussive or melodic line for these instruments; and finally notate these parts using Mixcraft. Prior to instrument design and notation work, a class is divided into small groups of students (3-5 students) and each student is assigned a homemade instrument to play. Students can bring in household objects; use objects located in the classroom as an instrument; or construct their own instrument. For grade school classes, it may be best to have the educator write and notate the student parts: younger students can thus spend their time reading over and discussing the notation before attempting to actually “play” their individual parts. For middle school and high school classes, students should attempt to write and notate their own parts with Mixcraft. Students should focus on writing as a unit and collaborate with fellow group members to ensure each part is consistent with the overall vision of the piece. Those who want to teach musical principles during this course should focus specifically on rhythm. Perhaps giving an overview of different rhythms and metrical times will inspire the STOMP ensembles. Finally, once each student has written his/her part, each group should perform their STOMP song before the class.
Since their students will be producing rhythm-based compositions for the STOMP exercise, it would be useful for educators to have some background in music notation. Some of the more ambitious or capable students may even conjure up especially complex rhythms, which may prove challenging to notate. Because of this, teachers should consider practicing rhythmic notation in Mixcraft beforehand. The student exercise for this lesson, however, does contains a walkthrough section on how to notate parts in Mixcraft. In addition, located in the “Additional Materials Download” is a Mixcraft session that contains a demonstration of notation and includes arrangements for four homemade instruments.
ACTIVITY
Making a STOMP Instrument
First, research homemade instrument recipes and the STOMP musical. Several popular video hosting websites have clips of the STOMP musical. Watch several clips and notice how household objects were converted into musical instruments (even better if you can acquire a full version of the STOMP video). Additionally, there is a multitude of online resources that provide recipes and instructions on how to create homemade or do-it-yourself instruments. Below are several basic ideas:
Shakers made of rice or beans
Basketballs for bouncing
Cups filled with varying amounts of water
Chopsticks for drumming
Pillows for thumping
Assign the students to small groups. Generally groups consisting of 3-5 students are enough for small STOMP ensembles. Remember, each student is responsible for developing and creating one homemade instrument.
Next, students should create their instruments. Remind students to work with the rest of the group. To avoid having composition and performance duplication, have each student in an ensemble create a different instrument.
WRITING A PART FOR THE STOMP INSTRUMENT
After the instruments have been made, it is time to write and notate parts for the STOMP ensembles.
Begin by brainstorming about the parts for each STOMP instrument. For example, a bouncing ball might be an instrument that keeps an underlying pulse and carries momentum throughout the song. To illustrate, a student could bounce the ball on beats 1 and 3 in a 4/4 time; shakers could play consistent 8th notes; and of course melodic instruments could play melodies!
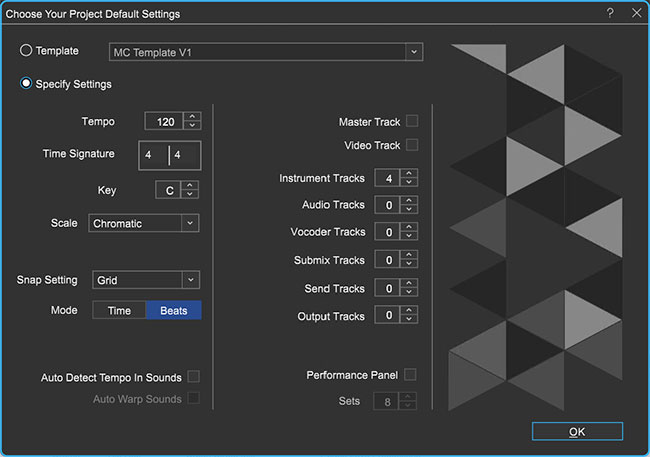
Launch Mixcraft and open File>Set Project Default Settings. Set the New Project window Instrument Tracks to 4 and click OK. Now click File>New Project.
 Ensure there are enough virtual instrument tracks for each instrument in a STOMP ensemble. If necessary, you can aways add a few more virtual instrument tracks to the Timeline (Ctrl + E).
To start writing, double-click the Timeline on the blank area for the first virtual instrument track. Click at measure one to place the blank MIDI region at the beginning of the Timeline.
 Double clicking on the Timeline places a blank MIDI region on the virtual instrument track.
Next, double-click on the blank MIDI region. The Sound Tab will launch and display the Piano Roll Editor. Change the “editor type” from Piano Roll to “Score.”
 Change the Editor Type to the Score setting. Now educators and students can use notation within Mixcraft!
The notation interface will appear. For simplicity’s sake, keep the meter in 4/4 time. To begin the notation:
Create a 4-measure loop. Drag the “loop end” flag on the notation window to the beginning of measure 5. The MIDI region on the Timeline will now extend to four measures.
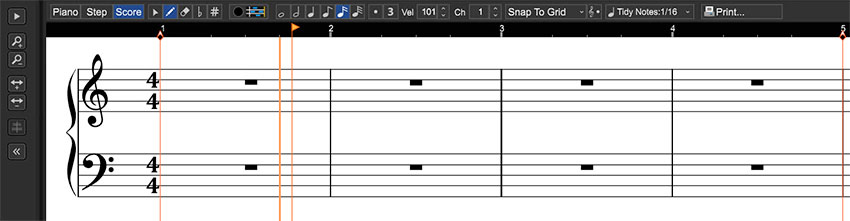 Drag the Loop End flag to measure 5. This will set a loop that consists of 4 measures.
Select the pencil tool and the desired note type. The quarter-note setting is a good place to start; this lets users “draw” quarter notes on the sheet music.
 The pencil tool and the quarter note settings are selected in this screen shot.
Begin composing by drawing notes to form a part. Small tick marks above the sheet music area denote where each beat falls. If you intended to place a note on a specific beat, try clicking in line with the tick marks.
 Small tick marks alert the user to where a beat falls. In this example the first quarter note in measure 2 falls on beat two and is aligned with the tick mark directly above the note.
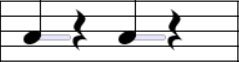
For a percussive instrument, select a note (for example the “A” below middle “C” or A4) to denote a “hit” or “bounce.” In the example below, a part written for a bouncing ball calls for the performer to bounce the ball (which produces a “bouncing” sound) on beats 1 and 3.
 A completed 4-bar part for bouncing ball. The ball is to sound on beats 1 and 3 (using quarter notes).
Repeat steps 4 – 6 (up to section “c” of 6) and continue writing 4-bar parts for each homemade instrument. Rewind. It may help to activate the metronome. Play back the results by clicking the master play button. Listen carefully. Following are some sample rhythms that students can notate:
 Sample Rhythm 1: Quarter note on beats 1 & 3
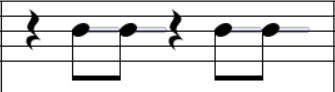 Sample Rhythm 2: Double eighth notes on beats 2 & 4
 Sample Rhythm 3: Single eighth note on beats 2 & 4
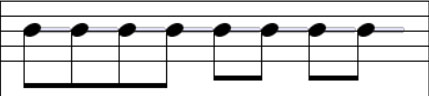 Sample Rhythm 4: Double eighth note on beats 1, 2, 3 & 4
TIP: If you draw an unintended note: simply delete it by selecting the eraser tool; or by clicking undo (Ctrl + Z): or by clicking the undo button (counter clockwise circled arrow) at the topof the workspace.
Arranging the parts. Once finished, users can arrange the 4-bar parts on the Timeline. Though not required, this might be a helpful workflow when arranging the parts for live performance. First, create an introduction in which one instrument starts playing.
Then slowly introduce more instruments and finally, slowly fade out each instrument until the starting instrument is left playing.
Loop the MIDI regions of each instrument on the Timeline by clicking the circle with a “+” icon on a region. Loop each instrument for the identical number of measures.
 Clicking the circle with a “+” icon, loops the MIDI region. Here the initial 4-bar region has been looped several times.
Next, trim the beginning regions of the instruments that will enter later in the performance: Place the cursor at the beginning line of a region to be shortened and wait for a double-sided arrow to appear. Now simply drag the line back until the region’s beginning is at the correct place in the performance.
Finally, trim the ending segments of the instruments that will exit the performance before the end: Place the cursor at the ending line of a region and wait for a double- sided arrow to appear. Now simply drag the ending line until the region is at the desired position for a fade out. One by one the instruments will drop off until only the single beginning instrument is left playing as the arrangement comes to a close.
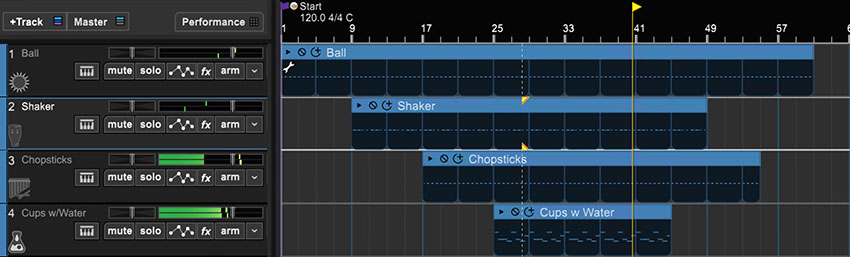 A sample arrangement. First, the 4-bars of each track were looped for 60 measures, then the regions for three instruments were trimmed to allow different instruments to enter or leave the arrangement.
Finally, print out the sheet music to each 4-bar loop. With the notation interface open, select the “print…” icon in the upper right hand corner.
 The print icon allows educators and students to print out notated parts.
PERFORMING
With the parts printed out, help the students learn to the play each part on their instrument. Once rehearsed, help choreograph each STOMP ensemble performance.
Thinking about the arrangement. If you previously arranged the MIDI regions of each instrument in Mixcraft, try to replicate that arrangement for the performance. If you skipped that step, one strategy for conducting the performance is to cue in each student. Have one student begin, then after a few measures add another and another until all the students are playing. Finally, slowly cue one student at a time to stop playing until the student who started is the only one left. A terrific applause will ensue.
Performance. Have each group perform their STOMP song to the class. The teacher may wish to compare in a positive way the student performances to some of the professional STOMP performances. The class might get valuable lessons from comparison to the pros!
ADDITIONAL LESSON PLANS
Cup Symphony: First, supply each student with five glass cups. Fill the cups up with varying amount of water. Next, students can play the cups with a pencil: tapping the glasses produces a note. What kind of pitch does a glass with a small amount of what produce? How about a glass with a full amount? Students can then compose short melodies on the cups.
FURTHER READING
Orr, M. Homemade Music Factory: The Ultimate Guide to Making Foot-Stompin’-Good Instruments