Chapter 6 examines Mixcraft's additional bundled features. These include effect plugins, loops, and a variety of virtual instruments. Effect plugins are smaller portions of software that are programmed to represent an audio effect. Educators can use these effect plugins in lessons on music production and sound design or to mix songs. Quite popular among students of all ages, loops are brief segments of audio (usually a few measures long) that are arranged on a track of Mixcraft Timeline or in Performance Panel grid. Over 7500 custom Mixcraft loops are accessible online. Finally, Mixcraft includes many virtual instruments – software emulations of popular musical instruments that students can use to compose or perform music.
In addition, this chapter provides suggestions on incorporating these various extra features into classroom plans, and also explores the creative possibilities involved. Though not essential to the majority of lesson plans, we suggest that educators become familiar with several common effect plugins and virtual instruments.
MIXCRAFT’S EFFECT PLUGINS
Mixcraft is packaged with many effect plugins. These Effect plugins are mini programs that represent an audio effect such as distortion, flanger, and chorus. Students can apply these effects to recordings to significantly change the character of the track(s). Certainly one could spend hours tweaking parameters and listening to all of the various Mixcraft’s plugins (which students are certainly encouraged to do privately). For the tutorial lesson plans, however, educators and students are required to become acquainted with at least the two main effect plugins:
Acoustica Reverb
Acoustica Delay
REVERB
What is it? Reverb is one of the most common effects used when mixing audio. Reverb effects are simulations of natural environments or creations of synthetic environments that add ambience to a “dry” recording. These effects are used either to add ambient sound texture that might not have been captured during the initial recording process or are used to create dramatic and lush effects not found in the natural world. Reverbs vary in size, length, and timbre and are often labeled with an appropriate title that describes the reverb sound; for instance, reverbs of a hall, room, canyon, church, and even a bathroom are standard presets in many reverb effect processors and are modeled after these real-world environments.
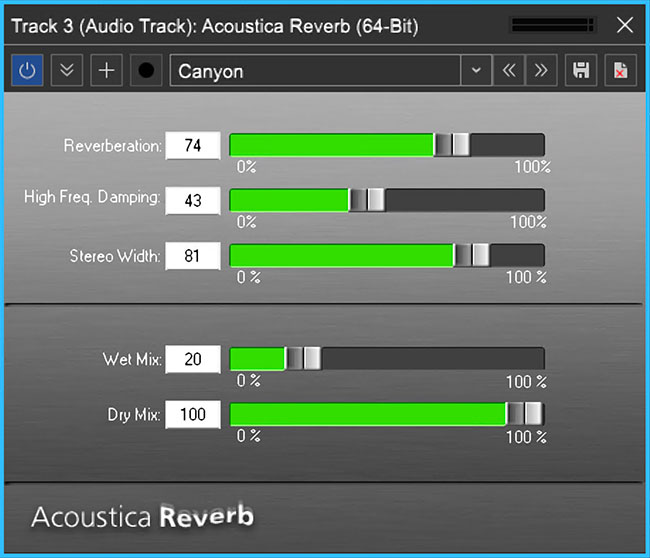
The Acoustica Reverb Adjustment Window is found by: “Effects” or “fx”>”Effect” column pull down >“Acoustica Reverb”> Preset” column pull down >“Canyon”>Edit. (Box in the Effect column must be checked to activate an effect.)
Mixcraft's basic included reverb is called Acoustica Reverb. The Acoustica Reverb can be activated on both audio and virtual instrument tracks (for advanced mixing, the reverb plugin can also be used on send and sub-mix tracks). The Acoustica Reverb consists of several editable parameters that significantly alter the sound and nature of the reverb effect. Educators should spend time learning the function of each parameter on the Acoustica Reverb interface. Below is a breakdown of these parameters:
Reverberation: This is used to adjust the intensity of the reverb. A shorter valueproduces a small, subtle reverb while a larger value creates a dramatic and sustained reverb.
High Freq. Damping: The high frequency damping parameter dulls the sound of thereverb by removing high-end frequencies. A lower percentage adjustment produces a more natural sounding reverb (less high-end frequencies); while a higher percentage gives a synthetic, sparkling ambience.
Stereo Width: Stereo width refers to the spatial orientation of the reverb. Larger widthsettings result in a reverb that spreads across the left and right areas of the listening environment that encompasses the listener. A narrower width results in a focused, centered reverb.
Wet Mix: The wet mix parameter allows users to raise or lower the volume of the reverb effect. Dialing in a higher value results in a more audible reverb. Be careful with this dial –too much reverb can ruin a recording with excessive ambience.
Dry Mix: The dry mix parameter raises or lowers the volume of dry input record. A careful balance between the dry and wet mix is needed to obtain a noticeable, but soft reverb effect.
Mixcraft Reverb Presets: Dialing in a reverb setting from scratch can be quite difficult for students. Using with the reverb presets that Acoustica has supplied is a fantastic strategy for teaching. Simply use the drop down menu on the reverb interface to load and sample the presets. The presets cover a wide pallet of sound environments from the natural (“Room” and “Gymnasium”) to the more experimental (“Train Station” and “John’s Verb”).
Creative Implications for Students: Students will most likely use reverb to make recordings sound “more natural.” Reverb can be applied to either instrumental recordings (guitars, strings, recorders, etc.) or to vocal tracks. Remind students to imagine the desired recording environment before selecting reverb presets; for example, a large and lush environment might be emulated by a canyon or outer space reverb, while a small or medium room reverb will add just the right amount of ambience to a dry recording without being overbearing. It is also important for students to be aware of how the reverb might influence the overall mix. If a recording has multiple instruments, using a large reverb might hide and cover the other instruments – certainly an undesirable effect. A solo performance, however, could greatly benefit from a large reverb that emulates a performance hall or stadium in order to compensate for the lack of a layered arrangement.
DELAY
What is it? Similar to reverb, a delay effect produces several copies of an incoming audio signal and plays them back at specific time intervals. The result is an “echoing” effect. Though delays can be used to create a dramatic ambience, they are commonly conceptualized as an effect to thicken instrumental recordings. There are a variety of delay types and settings that influence the nature of the delay effect. Mixcraft’s Acoustica Delay is a simple effect plugin that allows users to control delay time, feedback, and panning.
Delay: This parameter adjusts the time intervals between delays on a scale from 1ms to 2000 ms. A shorter delay time results in immediate playback of the delay which can be used for a slap-back effect or simple echo. A long delay places more time between the dry signal and delay effect. This creates a drastic, evolving echo effect.

Feedback: The feedback parameter creates a feedback loop that gradually cascades and sustains. Selecting lower values adds a tasteful amount of feedback that creates an interesting delay effect. Be careful with this parameter: too much feedback and your recording will get swallowed in a sea of noise.
Pan: The pan parameter orients the delay in the left, right, or center area of the listening environment. A value of zero means the pan is dead center. Shifting to the left or right slowly moves the delay to those respective areas.
Wet Mix: The wet mix parameter allows users to raise or lower the volume of the delay effect. Higher values result in more delay. Generally, the delay is mixed slightly lower in volume relative to the dry signal.
Dry Mix: The dry mix parameter raises or lowers the volume of the unprocessed (no delay) signal.
Mixcraft Delay Presets: Unlike reverb effects, dialing in a custom delay setting is standard practice when mixing audio. Acoustica, however, has supplied some great presets for their delayplugin. Simply use the drop down menu on the delay interface to load and sample the presets. For that classic echoing effect try the “Long Repeater” or “Echoes” presets.
Creative Implications for Students: Applying delays to instrumental recordings, such as guitars or wind instruments, is an excellent way to illustrate the effect to students. For example, tryplacing a long delay on a single piano chord or a guitar chord. Delays can also be used on vocal recordings: often, a delay is mixed in slightly to create an ambience in substitute of a reverb. Finally, students should experiment with using reverb and delay on the same recording. The result can be a surprisingly lush and evolving ambience.
MORE EFFECTS
In addition to the reverb and delay plugins, Acoustica has included several more effects plugins with Mixcraft. Though this manual avoids deconstructing each plugin down to its schematics, a survey of and suggestions on how to artistically apply these effects plugins is provided:
Chorus: A chorus effect creates a duplication of an audio signal or recording and slightly adjusts the duplicate’s tuning. The result is a thickening of the sound that lends itself to the distinct tone of popular music from the 1980s. Try applying the effect on instrumental recordings such as guitar, flute/recorder, or even vocal tracks. Do not, however, try Chorus on drum tracks.
Flanger: The flanger creates a “sweeping” filter effect, stimulating movement to an otherwise stagnant sound. Try applying a flanger to a sustained chord, string section,or synthesizer pad. A flanger will harness a more dramatic effect with sounds that contain a large range of spectral frequencies.
Distortion: Distortion plugins add extra harmonics and slight compression to a recording. The result is an identifiable “crunchy” tone. Although distortion is more often associated with electric guitar processing, applying the effect in unorthodox ways can encourage students to think outside the box; for example, how would a drum kick sound with extra distortion? Or an electric piano? Try adding distortion to a vocal track for an aggressive tinge.
Compression: Compression is a tool commonly used during the mixing process. Often, a track might fluctuate in volume or dynamics, making it difficult to place in the mix. Compression can help tame these variations.
EQ: An equalizer, or EQ, is used to boost or attenuate specific frequency bands of a recording. Remember, recordings are not objective replications of an audio source – any piece of hardware that an audio signal passes through consequently alters the sound(this includes microphones, preamps, amplifiers, and A/D converters). Often, recordings may have excessive bass frequencies or a diminished amount of high frequencies. Using EQ can help rectify these problems by balancing the tonal properties of a recording.
Amp Simulators: These plugins are virtual emulations of amplifiers, including legendary guitar and bass amplifiers. Mixcraft’s amp simulator, appropriately named “Shred,” packs 100 amp heads into a single effect plugin granting students access to an endless range of tones. Presumably, students will use “Shred” when recording with electronic instruments (such as an electric guitar). However, running drum, keyboard, and vocal recordings through the amp simulator can drastically change their timbre by adding grit and low levels of distortion.
MIXCRAFT LOOPS
Perhaps the most important feature of Mixcraft for the classroom is the Loop Library. This library is an extensive collection of ready-to-use samples. Students can browse through over 7500 prerecorded and edited loops that expand across dozens of instrumental families and were produced by some of the industry’s top musicians. Using loops, instead of recording, is ideal for younger students or for classroom exercises in which recording live performances is not an option. Loops also allow students to immediately engage with the software and thus are useful for lessons that involve songwriting and arranging. Finally, the high caliber and wide range of Mixcraft’s loops should inspire student composers.
Mixcraft’s Loop Library Interface
Mixcraft’s loops are organized in the Library tab of the Tab Area. Clicking the tab reveals the library browser and search bar. Users can sort through predetermined loop categories using the “Sort By” function. Categories such as instruments, key, tempo and date imported, will help students navigate and find a desired loop.
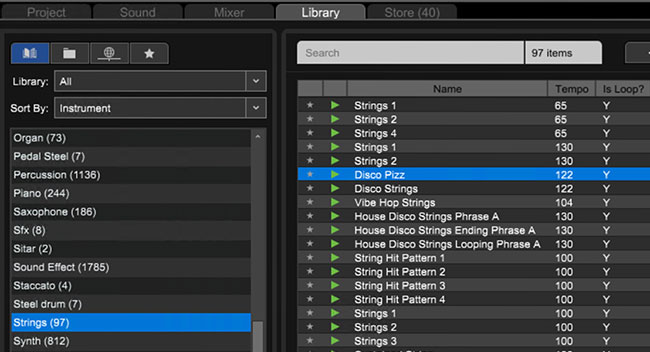
An example loop: Disco Pizz. The tempo, bars, key, instrument, style, song kit, and author are displayed.
Clicking the green arrow next to a loop initiates playback. The blue plus sign “+” downloads the loop onto the computer hard drive. Remember, an internet connection is required to download loops!
Once a loop is downloaded, users can begin to arrange loops in Mixcraft by simply dragging and dropping a loop onto an audio track on Mixcraft’s Timeline. Mixcraft will also automatically synchronize the loop’s tempo to the master tempo of the session. Additionally, the waveform(s) of the loop will be displayed. Users can split/merge, cut/copy, or shorten loops.

The Rhodes 2 Loop and its waveforms.
The play arrow located in the upper left corner allows users to play back the loop in isolation. Clicking the circle with a plus sign “+” activates the “loop” feature and automatically generates a duplicate of the loop on the Timeline.

The Rhodes 2 Loop is now doubled after clicking the “loop” icon.
CREATIVE IMPLICATIONS FOR STUDENTS
Educators should spend time learning how to incorporate the Loop Library into lesson plans. Many, if not all, of the lesson plans in this book could benefit by using Mixcraft’s loops.
MIXCRAFT INSTRUMENTS
In addition to loops, Mixcraft comes bundled with several high-quality virtual instruments. These virtual instruments are software replications of famous organs, synthesizers, and drum sounds. Virtual instruments are activated on Mixcraft’s virtual instrument tracks and can be played with a computer keyboard (“musical typing”) or MIDI controller. Additional programming can be done on Mixcraft’s Piano Roll making it easy to edit a performance or to program one in its entirety. Below is an overview of Mixcraft’s virtual instruments:
Acoustica Studio Drums: The studio drums collection is comprised of acoustic and electronic drum and percussion samples that are mapped onto to a virtual keyboard. Users can load specific presets and use Musical Typing or a MIDI controller to trigger the drum sounds. Students will find this instrument useful in programming custom drum parts during lessons that address rhythm in music, or when participating in discussions on conventional vs. unorthodox performance practices (Are the drum samples mightier than the drummer?).
Alien 303 Bass Synthesizer: Modelling the famous Roland TB-303 Bass Synthesizer, the Alien 303 is great for synthesizing deep, wobbly bass lines and rubbery lead sounds. This instrument is monophonic – only one note can be performed at a time. Nonetheless, the instrument is powerful and can be used as a teaching tool to convey basic music technology concepts (i.e. analog synthesis, the components of a synthesizer, and audio signal flow); to illustrate the history of particular electronic music genres; or to produce either electronic music or space rock.
Alpha Sampler: Alpha Sampler is a basic sampler that allows users to load an audio file, edit the file with a variety of controls, and instantly play the audio file with a keyboard interface. For instance, students could record themselves saying “Hey,” and then play that “Hey” at different pitches using the musical typing keyboard or an external MIDI keyboard. Hip-hop music was heavily influenced by the invention of the sampler, and the Alpha sampler could be incorporated into projects revolving around hip-hop music.
Combo Organ Model F, Combo Organ Model V, and VB3 Organ: This trifecta of instruments contains virtual replications of three influential organs from the 1960s and 1970s. Organs fit well into popular music genre productions, particularly productions that attempt to emulate the sound of classic rock and roll, gospel, or blues music.
Impulse: Impulse is a virtual polyphonic analog synthesizer. Modeled after popular synthesizers from the 1980s, Impulse is a fantastic comrade to the Alien 303 instrument. For a strong keyboard setup, try using one polyphonic synthesizer and one monophonic synthesizer.
Lounge Lizard Electric Piano: Modeled after the famous Rhodes and Wurlitzer electric pianos from the 1970s, the Lounge Lizard is a hybrid instrument that allows users to switch between emulations of three Rhodes pianos and one Wurlitzer piano. Students can control the subtleties of these vintage keyboards (for example, drive and the signature tremolo). For projects, try using the Lounge Lizard on Rock, Jazz, or R & B productions.
Messiah: The Messiah is a virtual version of Sequential Circuit’s Prophet 5 synthesizer. A complex and intricate instrument, this virtual emulation faithfully replicates the tone of the legendary synthesizer while adding several features missing from the original hardware such as onboard effects and additional polyphony.
Minimogue VA: Another analog synthesizer emulation, the Minimogue VA, is a tribute to one of the most treasured analog synthesizers – the Minimoog. This digital remake adds several features missing from its hardware counterpart, including a selection of onboard effects and an arpeggiator.
Omni Sampler: A beefed-up version of Mixcraft's Alpha Sampler, the Omni Sampler lets users load multiple samples, making it easy to create custom drum kits or play different instruments with a single sampler. Omni Sampler also includes a global feature, enabling users to simultaneously apply effects to multiple samples, resulting in a faster workflow and increased creative possibilities.
CREATIVE IMPLICATIONS FOR STUDENTS
Mixcraft’s virtual instruments are the most complex tools for composing music in Mixcraft. Virtual instruments can be used for lessons on composition, music performance, or music history. Understand that students might need class time to experiment with and learn how to use these.