STUDENT’S GUIDE | |
MIDI BEATS PROJECT | |
NAME: | |
CLASS TIME: | |
PERIOD: | |
TEACHER: | |
CLASS: |
REQUIRED MATERIALS
Computer with Mixcraft
Headphones or Monitors
Copies of the MIDI Beats Student Guide (Additional Materials Download)
SUGGESTED MATERIALS
MIDI keyboard
Further Reading Materials
ACTIVITY
Launch Mixcraft and open File>Set Project Default Settings. Set the New Project window Instrument Tracks to 1 and click OK. Now click File>New Project.
 Once the New Project window has loaded, remove any audio tracks, and set the Instrument Tracks field to 1.
Preparing for beat making: Ready to make your first beat? To prepare, ask your teacher if your computer, audio hardware, and Mixcraft software are set up properly:
Turn on any speakers or monitors. If you are using headphones instead, make sure they are connected to your computer or your audio/computer interface.
If you are using a MIDI controller make sure it is connected to your computer your audio/computer interface or to your computer.
Choosing your “beats”: Mixcraft comes with a range of virtual drum kits that cover studio, drum machine, and electronic drum sounds. Before selecting your virtual instrument, think about what kind of beat you would like to create. Do you want a rock beat? Or a dance beat? Or ask your teacher what you will be using the beat for. This decision will help narrow down your choice.
Choosing a kit. Select the “change instrument” feature (the keyboard icon) on the first virtual instrument track. This launches the Virtual Instrument Window.
 The keyboard icon launches the virtual instrument window.
In the “category” column, scroll down to find the Percussion – Drum Kits list. You will see a list of the available drum kits on the right.
To load a drum kit, simply double click on a selection. The virtual instrument track should now be renamed with the title of the selected drum kit.
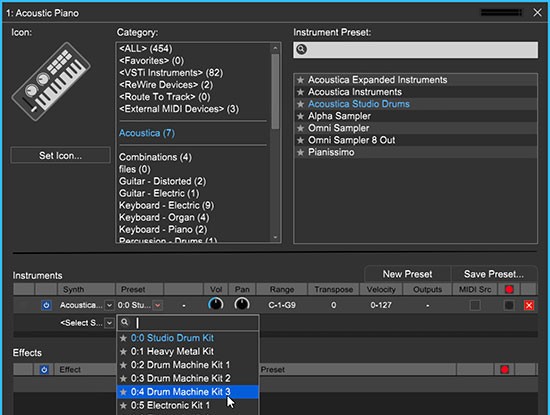 Selecting Mixcraft’s virtual drum kits. Double click on a drum kit to load it to a track.
To see how your kit sounds, use either Mixcraft’s Musical Typing or a MIDI Controller. Musical Typing allows you to use your computer keyboard to control the drum kit. Click the Musical Typing icon on the bottom of the drum kit window.

The Musical Typing window illustrates how your computer keyboard functions as a music keyboard: the letter keys correspond to different notes. Try tapping th and “F” letter keys on your keyboard. You should hear drum sounds.
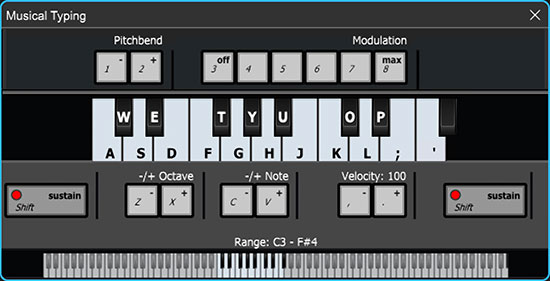 Mixcraft’s Musical Typing interface.
Preview different drum kits using Musical Typing. When you have found a drum kit you like, practice “playing” a drumbeat with your keyboard and get ready to record.
Recording Your Beat:
Enable the metronome. Click the metronome icon (outlined in red), select the Recording (Shift + M) and Recording Count-In Meausures boxes, and set Recording Count-In Meausures to 1.
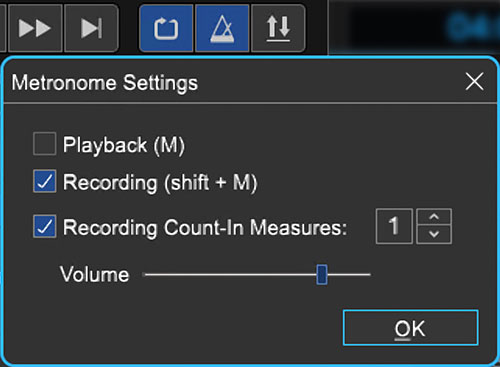 Enable the metronome during recording. The metronome will keep the beat and make it easier to record.
Before recording, hit the “rewind” icon (outlined in blue in the screenshot below) to rewind the cursor to the beginning of the timeline.
Arm the virtual instrument track for recording by clicking the “arm” icon.
Start recording by either clicking the master record button (outlined in red below) or “R” on your keyboard. After the one-bar countdown, play a drum beat on the computer keyboard. The cursor will begin moving down the timeline and MIDI graphics of the beat will appear. To edit, or re-record the beat, stop the recording by hitting “R” or the space bar. Select the area that needs to be recorded with your cursor and hit the master record button.
 The red dot begins master recording. The left-facing arrow (in blue) rewinds the Timeline to the beginning.
After you have finished recording, disarm your virtual instrument track and play back your beat from the beginning. The beat may not sound perfectly in time. Listen closely for parts that you may want to edit, rearrange, split or remove.
 An example of a MIDI region after a recorded drum “performance.”
Programming Your Beat: With Mixcraft’s MIDI, users can program drum beats with the pencil tool of the Piano Roll. Programming a beat offers more control over your drum beat and makes it easy to visualize the different parts of your virtual drum kit.
First, on the Timeline, double click on the MIDI regions created from performing a drum beat with the keyboard (or simply double click on the blank timeline region of a new Drum Kit track). This will launch the Sound Tab and Piano Roll window. The list of drum beat parts (hi-hat, cowbell, kick drum, etc.) runs down the left side of the Piano Roll. The small, horizontal lines/dashes in the tracks correspond to the MIDI data of each part.
Select the pencil tool in the left hand corner of the Piano Roll.

Now you can “draw” MIDI notes on your Piano Roll. Let’s try programming a typica drum beat (use the screenshot below for reference.)
Notice at the top of the Piano Roll that the beats are labeled with numbers. We can use this as a reference when programming our beat.
To start, find a hi-hat or cymbal track. With the pencil tool draw a pattern of straigh 8th notes (see the below image for reference). Next, choose a snare or clap track and pencil them in on beats two and four. Finally, add a kick drum on beats 1 and 3. Note: when drawing, the lines might not align with the Piano Roll grid. In the next section we will learn how to edit our programmed or recorded drum beat.
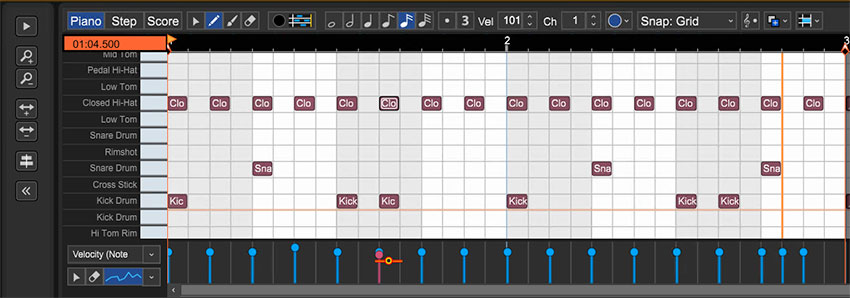 A programmed drum beat using the Drum Kit 3 virtual instrument: hi-hats (top row) on every 8th note, snare (middle row) on beats 2 & 4 and finally a kick drum (bottom row) on beats 1 & 3.
Editing MIDI: After recording or programming a drum beat, it may be necessary to tidy up and edit the MIDI data. Here are several common edits:
To tidy up the MIDI programming and recording, highlight all of the MIDI notes (Ctrl + A, or by dragging your cursor over the notes) and right click > MIDI Editing > Quantize. Make sure the Note Type is set to 1/8th notes. Click “ok.” Notice that the MIDI notes are now perfectly aligned to the Piano Roll Grid.
Trimming and deleting MIDI regions: To trim or extend MIDI regions, move the cursor to the end of a region – a double-sided arrow appears. Simply click, and drag left or right to trim the MIDI region to a desired length. To delete MIDI regions, you can highlight (drag + select regions) or split MIDI regions into parts and hit delete.
Finally, loop your drum beat to a desired length. On the timeline, click the loop button on the MIDI region (the half circle with a “+” sign) to finalize your beat! Try looping your beat four times.
 The circle and + sign icon quickly loops MIDI regions.
 Show your teacher your new beat! To mix down your beat to a file on your computer, go to the Menu and select File > Mix down to… > .MP3. Name and save your beat on the desktop.