TEACHER’S GUIDE | |
MIDI BEATS PROJECT | |
NSME: | 2, 4, 6, 7 |
GRADE SCHOOL | GRADE SCHOOL – HIGH SCHOOL |
CLASS TIME | 1-2 ONE-HOUR PERIODS |
REQUIRED MATERIALS:
Computer with Mixcraft
Headphones or Monitors
Copies of the MIDI Beats Student Guide (Additional Material Download)
SUGGESTED MATERIALS:
MIDI keyboard
Further Reading Materials
OVERVIEW: Developed in the 1980s, MIDI (Musical Instrument Digital Interface) is a protocol that allows certain instruments and audio devices to communicate to one another. It has become common, even standard, for MIDI to be used for music production in many recording environments. A few examples of the many MIDI uses: 1) To control virtual software instruments that host a wide range of sounds (from sampled acoustic instruments to synthesized electronic soundscapes); 2) To program a music performance that is “unplayable” or that has never occurred naturally; and 3) To quickly transpose keys and to assign instrumental parts to different instruments. In this lesson, students will learn to create computer music (i.e. a basic drum beat) without loops or recorded audio; instead, students will program virtual instrument “performances” with MIDI and Mixcraft’s virtual drum kits.
LESSON: The MIDI Beats Project at the grade school and middle school level enables students to quickly and easily create a drum beat. Younger novice students will be able to create music even if they lack music performance skills. For high school classes, exposure to advanced programming and MIDI techniques (humanizing, transposition, etc.) and a discussion of MIDI parameters (velocity, note values and durations) should fit seamlessly into this project. Through this process, older students will learn that MIDI is an essential part of understanding the use of contemporary music technology in the composition and production of music.
SKILLS GAINED
Understanding of MIDI
Music Performance using MIDI
MIDI Programming
MIDI Editing
ACTIVITY
Launch Mixcraft and open File>Set Project Default Settings. Set the New Project window Instrument Tracks to 1 and click OK. Now click File>New Project.
 Once the New Project window has loaded, remove any audio tracks, and set the Instrument Tracks field to 1.
Preparing for beat making: To prepare for producing a beat with MIDI, double check to see if the hardware and software are set up properly:
Turn on any speakers or monitors. If headphones are being used instead, connect them to the computer or to an audio/computer interface.
If a MIDI controller is being used, make sure it is directly connected to the computer or to an audio/computer interface.
Choosing the “beats:” Mixcraft comes with several virtual drum kits that cover studio, drum machine, and electronic drum sounds.
Choosing a kit: Select the “Change Instrument” feature (keyboard icon) on the first virtual instrument track. This launches the Virtual Instrument Window.
 The keyboard icon launches the virtual instrument window.
In the “category” column, scroll down and click the Percussion – Drum Kits list. A list of the available drum kits will appear on the right.
Before previewing the virtual drum kits, think about what kind of beat you would like to create. Do you want a rock beat? Or a dance beat? How about a jazz beat? Below are drum kit recommendations for different styles of music:
Rock: Studio Drum Kit, Spacious Studio Drum Kit, Heavy Metal Kit
Jazz: Jazz Kit, Brush Kit
Classical: Orchestral Kit
House/Techno/ Dub Step Music: Dance Kit, Electronic Kit 1-5
Electronic/Industrial Music: Drum Machine Kit, Nine Inch Nails Drum Kit
80s/90s pop music: 808-909 Kit
To load a drum kit, simply double click your selection. The virtual instrument track should now be renamed with the title of the selected drum kit.
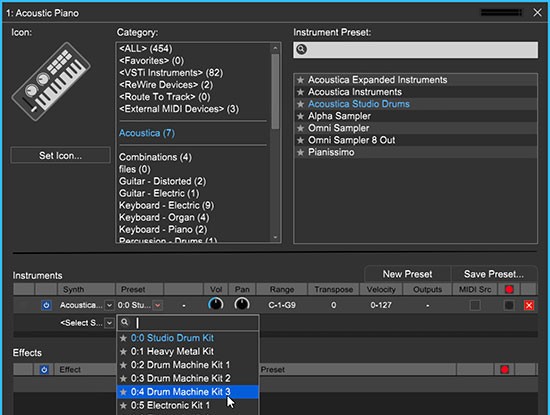 Selecting Mixcraft’s virtual drum kits. Double click on a drum kit to load the sounds.
To preview a kit, use either Mixcraft’s Musical Typing or a MIDI Controller. The Musical Typing allows users to type on a computer keyboard to control the drum kit. Click the Musical Typing icon in the drum kit window:
 The Musical Typing window illustrates how a computer keyboard functions as a music keyboard: the letter keys correspond to different notes. Try tapping the “D” and “F” letter keys on your keyboard. You should hear drum sounds.
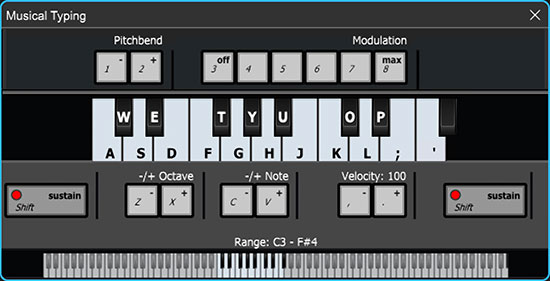 Mixcraft’s Musical Typing interface.
Preview different drum kits using Musical Typing. After previewing some kits, try practice “playing” a drumbeat on the computer keyboard and get ready to record!
Recording a beat:
Enable the metronome. Click the metronome icon (outlined in red), select the Recording (Shift + M) and Recording Count-In Meausures boxes, and set Recording Count-In Meausures to 1.
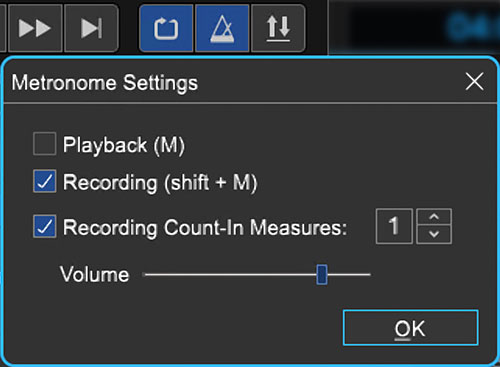 Enable the metronome during recording. The metronome will keep the beat and make it easier to record.
Before recording, rewind the cursor to the beginning of the timeline by hitting the “rewind” icon (outlined in blue in the screenshot below).
Arm the virtual instrument track for recording by clicking the “arm” icon.
Start recording by either clicking the master record button (outlined in red below) or “R” on your keyboard. After the one-bar countdown, play a drum beat on the computer keyboard. The cursor will begin moving down the timeline and MIDI graphics of the beat will appear. To edit, or re-record the beat, stop the recording by hitting “R” or the space bar. Select the area that needs to be recorded with your cursor and hit the master record button.
 The red dot begins master recording. The left-facing arrow (in blue) rewinds the Timeline to the beginning.
After recording, disarm the virtual instrument track and play back the beat from the beginning. The beat may not sound perfectly in time. Listen closely for parts to edit, rearrange, split or remove.
 An example of a MIDI region after a recorded drum “performance.”
Programming a beat: With Mixcraft’s MIDI, users program drum beats with a pencil tool rather than a keyboard. This offers more control over drum rhythms and makes it easy to visualize the different parts of a virtual drum kit.
Double click the MIDI regions created on the timeline from performing a drum beat with the keyboard (or simply double click on the blank timeline region of a new Drum Kit track). This launches the Sound Tab and Piano Roll window. The list of drum beat parts (hi-hat, cowbell, kick drum, etc.) runs down the left side of the Piano Roll. The small, horizontal lines/dashes in the tracks correspond to the MIDI data of each part.
Select the pencil tool in the left hand corner of the Piano Roll.

Now, “draw” MIDI notes on the Piano Roll to create drum patterns (below is an example of a programmed drum beat).
Notice at the top of the Piano Roll that the beats are labeled with numbers. Use this as a reference when programming a beat.
First, find a hi-hat or cymbal track. With the pencil tool draw a pattern of straight 8th notes. Next, choose a snare or clap track and pencil them in on beats two and four. Finally, add a kick drum on beats 1 and 3. Note: when drawing, the lines might not align with the Piano Roll grid (see the next image for reference).
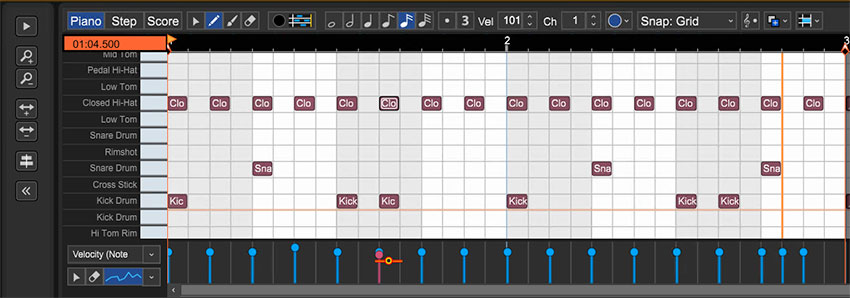 A programmed drum beat using the Drum Kit 3 virtual instrument: hi-hats (top row) on every 8th note, snare (middle row) on beats 2 & 4 and finally a kick drum (bottom row) on beats 1 & 3.
TIPS:
Quantizing is an excellent tool for tidying up MIDI notes. However, for drum beats, quantizing can often leave the beat feeling “mechanical” and “machine-like.” It might be more natural to leave some notes un-quantized or to use Mixcraft’s “humanize” feature.
Remember, you can zoom in and out of the workspace using the “+” and “-“ keys. A larger view will help the user make more precise edits
Editing MIDI. After recording or programming a drum beat, it may be necessary to tidy up and edit the MIDI data. Here are several common edits:
Quantizing MIDI: “Quantizing” MIDI allows users to align MIDI notes to the Piano Roll grid. This edit fixes any performance or programming errors that might occur when working with MIDI. First, select the arrow cursor and drag to highlight all MIDI notes. Right click on the selection and choose MIDI Editing > Quantize (try the 1/8th note setting). Notice how the MIDI notes are aligned perfectly to the Piano Roll grid.
Trimming and deleting MIDI regions: To trim or extend MIDI regions, move the cursor to the end of a region – a double-sided arrow appears. Simply click, and drag left or right to trim the MIDI region to the desired length. To delete MIDI regions, you can highlight (drag + select regions) or split MIDI regions into parts and hit delete.
Looping MIDI regions: As is possible with audio, Mixcraft can loop MIDI regions. Loop the drum beat by clicking the loop button on the MIDI region (the half circle with a “+” sign). Try looping the beat four or eight times.
 The circle and + sign icon quickly loops MIDI regions.
Mixing Down: To mix down the MIDI drum beat into an audio file, go to the Menu and select File > Mix down to… > and select .MP3 or .WAV
ADDITIONAL LESSON PLANS
MIDI Drums: In this lesson, we programmed a typical rock drum beat in 4/4 time. However, the ability to program complex drum beats with MIDI and Mixcraft is also a possibility. Search online for common drum patterns of different music genres. For example, what is a common dance or techno beat? Try programming beats in different time signatures such as 3/4 or 5/4. Additionally, brainstorm ways to incorporate the drum beat from this lesson into other lessons. Perhaps, the beats programmed by students could be used for a class improvisation or as a backdrop for a slide show presentation.
MIDI Instruments/MIDI Parameters: Controlling a virtual drum kit with MIDI is just the tip of the world of software instruments. After learning the basics of MIDI recording and editing, try
FURTHER READING:
Huber, D.M. The MIDI Manual: A Practical Guide to MIDI in the Project Studio
Vines, R.D. Composing Digital Music for Dummies
Pejrolo, A. & DeRosa, R. Acoustic and MIDI Orchestration for the Contemporary Composer