Audio is the main component of Mixcraft. Prior to supporting MIDI and virtual instruments, Mixcraft was primarily used to record either solo performers or groups of musicians. As a result, the audio components of the software are incredibly lucid and well thought-out. For educators and students, audio will be the driving force behind both the music and non-music lesson plans found in this book: learning to record a music performance or capturing a non-music recording (such as a speech) are objectives that run throughout the student projects. Chapter 3 provides instructions for recording, editing, and looping audio. First, an overview of Mixcraft’s audio functions is given: beginning with the audio track, users will learn how to operate not only these pieces of software but also their respective components as well. Next, a tutorial on recording audio is provided. Educators are encouraged to go over this tutorial, step-by-step, prior to teaching the lesson plans. Finally, several editing techniques are described. Educators and students will find these techniques useful during post-production.
ON AUDIO TRACKS
Back in the early days of recording, music was recorded directly to and captured on analog tape. With the introduction of computers to the modern recording studio, software engineers have simulated the functionality of these early tape machines and analog tracks by creating audio software with virtual tracks. Audio Tracks in Mixcraft are pieces of software specialized for recording and editing audio. Users can capture their own recordings or can import audio directly onto Mixcraft’s audio tracks. Generally, each audio track is reserved for a specific instrument.
Mixcraft, however, has no limits on the number of audio tracks users can add (at least as many as your computer’s processor can handle!). Audio tracks also display certain acoustic properties of a recording or audio sample – audio “waveforms,” for example. The waveform “height” (easily spotted as peaks or transients) is correlated with loudness: taller parts of the waveform are perceived to be louder than shorter parts. These graphic representations are useful for editing or for finding certain sections of a recording.

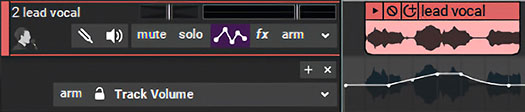
Mixcraft’s Audio Track
Since Mixcraft’s audio track is a compilation of several important audio functions, a user should understand each function prior to recording. Below is a breakdown of the audio track:
Tuner: The Tuner monitors and displays the pitch of incoming audio signals. Users can tune instruments without the need for an external tuner or a superfluous effect plugin. To activate the build-in tuner, click the tuning fork icon in the track header. Tracks do not need to be armed to use the tuner.

An audio track with the tuner activated.
Monitor Signal: Before recording, it is important to monitor the level of an incoming audio signal. The volume meter contains two horizontal rectangles (one for the left and one for the right speaker) and a volume slider. The volume meter contains a color spectrum – as the volume of a sound increases the hues of the meter change from green to red. Ask the performer to perform at the intended volume level and track where the loudest peak reaches on the volume meter. Recording should be done in the green and/or yellow zone. In this way, recordings will be loud and clear, but not so loud that added artifacts (accidental or unwanted sounds) will “dirty” the recording with, for example, clipping or distortion.

An example of the green or “safe” zone to record in.
If the meter is reaching the red area, try dialing back the gain on the audio/computer interface, turning down the volume on the instrument, or moving the performer away from the microphone

An example of the red or “unsafe” zone. This area could damage your ears and recordings.
Mute/Solo: The Mute and Solo buttons control the playing or recording of audio tracks. A track is silenced completely with the mute button. Muting may be useful when deciding on arrangements or when comparing different audio track combinations. The solo button allows only the selected track to play or record, while the remaining tracks are muted. Soloing is useful when users only want to monitor one track. Remember, however, that tracks can be either muted or soloed in any combination. Two examples: With eight tracks, two could be soloed which would mute the other six; or two could be muted which would allow the other six to play or be recorded.
Automation Toggle: Automation is an advanced technique which makes it possible to program changes for particular parameters (pan and volume) in Mixcraft that automatically adjust over time. For example, users can program volume (such as volume shifts during a chorus section) and pan (such as moving an instrument audio to the left, center or right of the listening environment) with changes that will then automate during playback/recording. To toggle the automation interface, select the icon with three dots connected by two lines. A subtrack will appear below the audio track. To change the values of volume or of panning, left click and hold on the line running across the middle of the subtrack, then drag the point created up or down. Each click on the line will create a point which can be moved up or down for multiple volume or pan changes to the track.
Sample automation of volume levels. In this example, the highest dot increases the volume of the track by 3 dB while the lowest dot decreases the volume by 2 dB. The volume amplification or reductions follows the contour of the automation.
Pan: Panning is the placement of a sound in the left, right, or center of the listening environment. The pan slider, located alongside the volume meter, moves the track along this continuum. The default pan placement is in the center. Certain instruments are placed in this default position. For example, a kick drum or bass guitar is likely to be panned dead center. Rhythm guitars, tom toms, or orchestral instruments might be pushed to the left or right side of the listening environment. There is no correct way to pan instruments but many mixing engineers try to replicate how a live orchestra or band might sound to the audience. Thus, many pan the instruments according to the setup of music stages or orchestra pits.
FX: The FX icon launches the FX window in which users can select and apply effect plugins to the instrument track. These effects range from reverb and delay to equalization and compression. An overview of Mixcraft’s built-in effects is covered in Chapter 6.
Arm for recording: The Arm icon activates the audio track for recording. Once armed, the audio track will turn red and the volume meter will now display the level of any incoming audio.
To start recording on the Timeline, hit the round, red master record button or press ctrl-r on the computer keyboard.
TUTORIAL
RECORDING WITH MIXCRAFT
This section examines basic audio recording. Educators will learn how to prepare software and hardware prior to recording, workflows for recording, and finally techniques for editing audio.
SETTING UP FOR RECORDING
At this stage, educators should have an idea of what hardware and software is required for their curriculum. Ideas on how to set up a music lab can be found in Chapter 1.
Before beginning to record, have on hand everything required for the session. Brainstorm beforehand to facilitate this process. Make lists. For instance, microphones are usually needed to record acoustic instruments and vocals; while electronic instruments, like guitars or synthesizers, require different hardware such as instrument cables (usually TRS cable) and an audio/computer interface. Be prepared. Finally, it is vital to properly set up and configure the audio hardware with the Mixcraft software beforehand.
Below are common recording scenarios that educators may face:
Scenario one: I am recording a solo instrumental or vocal performance.
Scenario two: I am recording a large group a cappella performance.
Scenario three: I am recording a jazz trio or string quartet.
Each of these recording scenarios requires a different setup. For instance, recording a solo performer only requires one microphone or one instrument cable. However, when recording multiple instruments or voices simultaneously, several microphones or instrument cables might be needed.
SETTING UP RECORDING ENVIRONMENTS WITH A MICROPHONE
Turn off monitors (and use headphones): To prevent feedback during set up, turn offany speakers or monitors attached to the computer’s audio output. Have performers record with headphones on because this will allow them to hear the recording session without creating a feedback loop. Connect headphones to the headphone jack on the audio/computer interface or on the computer.
Next, connect the microphone(s) to the audio/computer interface with a microphone cord. Some microphones may require external power (usually in the form of 48v). Check your microphone’s manual before activating the 48v option on your preamp or audio/computer interface. If using a microphone pop filter for vocal recordings, place the filter in front of the microphone.
Position the microphone near the performer or instrument. It is important to correctly position the microphone at an optimal distance from the performer. For tips on recording with microphones, refer to the appendix.
SETTING UP RECORDING ENVIRONMENTS WITH ELECTRONIC INSTRUMENTS
Turn off monitors (and use headphones): To prevent feedback during set up, turn offany speakers or monitors attached to the computer’s audio output. Have performers record with headphones on because this will allow them to hear the recording session without creating a feedback loop. Connect headphones to the headphone jack on the audio/ computer interface or on the computer.
First, connect an instrument cable to the instrument. Next, connect the instrument cable to the audio/computer interface or to a preamp. Arm an audio track in Mixcraft to test whether sound from the instrument is reaching the software.
Troubleshooting: At times, an audio track is armed in Mixcraft but no sound is heard when the performer plays! An excellent strategy for trouble shooting an audio signal is to conceptualize and then investigate the audio signal path: audio will first be generated by a vocalist or instrument then will travel through a microphone or instrument cable. These cables might be attached to a direct box, preamp, or computer/audio interface before reaching a computer. Scrutinizing eachof the “stops” an audio signal makes is an effective methodology for validating the signal path. (For example, is the instrument’s volume knob turned on? Is the preamp’s gain set at an optimal level?Is the audio track in Mixcraft armed?). Once a working signal path is established, it is time to record.
RECORDING WORK FLOW
In this tutorial, either test record by speaking/singing into a microphone or record a musician playing an instrument. To begin recording, open Mixcraft and use the New Project window to load a template with one audio track.
Select File>Set Project Default

Remove any instrument or video tracks, set the audio-track field to one, and click OK.
Select File>New Project.
Recording Equipment. Ensure that the microphone(s) or cable(s) and audio/computer interface are set up properly and that the gain or volume is turned up on all devices.
Now that the equipment is set up, it is time to record!
Arm the audio track in the Workspace by clicking “arm.” The downward arrow next to the arm button will enable users to select the source of incoming audio. Make sure the correct interface is selected. To check the configuration, try speaking into the microphone or playing a note on the instrument – the volume meter should jump.
For clean recordings users will want to monitor the incoming audio on the audio track’s volume meter. Remember to record in the “green” or “yellow” zone for the best results.Select the metronome and activate the “recording” and “recording count-in measures”settings.
Enable the metronome. Clicking the metronome icon brings up the metronome settings window. Activate the metronome to play during “recording” and “recording count-in measures.”
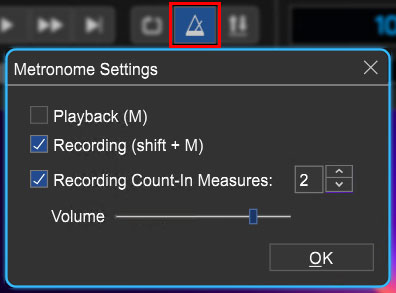 Select the metronome and activate the “recording” and “recording count-in measures” settings.
Rewind the cursor to the beginning of the timeline before recording by selecting the rewind button (outlined in blue) on the master bar.

Start recording by either selecting the master record button (outlined in red in the image above) or the “R” key on the computer keyboard. The cursor will begin moving down the timeline and the waveforms of the recorded speech or instrument will appear. To edit, or re-record audio, stop the recording by hitting “R” or the space bar. Select the area that needs to be re-recorded with your cursor and hit the master record button.
Don’t forget to wear headphones to hear what is being recorded!
Once the recording is completed, disarm the audio track and playback the audio from the beginning. Listen closely for parts that may need editing (rearrange, split or remove) or to be re-recorded.
Importing Pre-Recorded Audio. In addition to recording live audio, Mixcraft also supports many audio file formats. For educators this means students can use audio samples, audio prepared by the educator, or recordings from a different class with Mixcraft.
To import pre-recorded audio, simply drag and drop the audio files onto an audio track in Mixcraft. Alternatively, go to the top menu and select Sound > Add Sound File > Select file.
EDITING AUDIO WITH MIXCRAFT
After recording or importing an audio file into Mixcraft, users can edit the piece via the audio regions on the Timeline. The following technical audio editing skills are essential for all students who want to produce polished and professional sounding tracks:
Arranging Audio Regions: Users can arrange audio on Mixcraft’s Timeline by dragging and dropping audio regions onto an audio track. Once a region is attached to a track, users can select the region and move it along the Timeline.
Splitting Audio Regions: With the splitting function users can chop a large audio region into smaller regions. This clever edit is useful for either cropping out a desired part of a recording or for removing an unwanted section. To split a region, right click an area on the audio region and select “split” (Ctrl + T). The region will now be cut into two pieces. Grab and move the regions on the Workspace to rearrange the recording. Splitting audio regions is easy. Simply right-click and select “Split.”
 Splitting audio regions is easy. Simply right-click and select “Split.”
Merging Audio Regions: Users can also merge, or combine, separate audio regions into one. Highlight the relative regions (Shift + Click) and right click to find the option “merge” (Ctrl + W).
Make sure to place the two regions next to each other on the Timeline. If there is any space between the regions, silence will be added to the merged region in place of this space.
Trimming Audio Regions: The trimming function makes it possible either to extend or to shorten an audio region. This might be helpful when creating loops or organizing audio regions on the Timeline. To trim an audio region, move the cursor near the ends of an audio region until a double-sided arrow appears. Simply click, and drag the cursor left or right to trim or extend the audio region.
Deleting Audio Regions: Deleting audio regions from the Timeline is simple. Highlight or select the region(s) intended for deletion and click “delete” on the computer keyboard. Additionally, right clicking on a region and selecting “delete” will also remove it.
LOOPING AUDIO
At times users may want to have a certain audio region repeat over a few bars or repeat throughout an entire song. This process, referred to as “looping,” can be conducted in several ways in Mixcraft:
Loop Button on an audio region: The loop function is located in the upper left hand cornerof every audio region. Clicking the circle with the “+” doubles the audio region on the Timeline.

The circle with the “+” icon loops the audio region.
Doubling a region manually: Users can quickly copy one section of an audio region by selecting the region, holding the Alt key down on the computer keyboard, and dragging the region onto an empty space of the Timeline. (Note: To drag the section, the pointer must be in dark green upper bar.)
 Selecting an audio region while holding Alt on the keyboard enables users to quickly create a copy of the selected region.
Copy + Paste Audio Regions: Of course, as with other software, users can use copy and paste functions to duplicate audio regions. Select an audio region or highlight a broader area on the Timeline. Next, browse the pulldown Edit menu from the top menu bar to find the copy and paste options.
SNAPPING AUDIO REGIONS TO THE TIMELINE
Audio regions can be time-locked or “snapped” to the Timeline. A grid in the background of the Timeline displays the beat intervals or rhythmic values which the grid is set to. The grid divisions can be changed using the drop down snap menu located above the Timeline. A standard setting is generally the 1/8 or 1/16 note value.
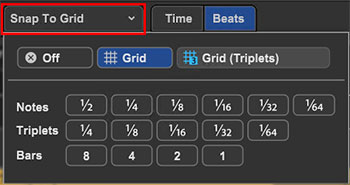
The snap menu changes how the Timeline grid is divided, thus changing which rhythmic positions an audio region can be snapped to.