STUDENT’S GUIDE | |
DEBATE PODCAST PROJECT | |
NAME: | |
CLASS TIME: | |
PERIOD: | |
TEACHER: | |
CLASS: |
REQUIRED MATERIALS:
Computer with Mixcraft
Headphones or Monitors
Microphone
Copies of the Debate Podcast Student Guide (“Additional Materials Download”)
SUGGESTED MATERIALS:
Audio/Computer Interface
Sources to research for the debate
Further Reading Materials
ACTIVITY
Preparing For the Podcast
Debate topic. Ask your teacher which debate topic you will be using for the podcast recording.
Research the topic at hand and construct an argument that defends your position on the subject.
Division of labor. Remember, your podcast should be 5-10 minutes long. If multiple students are in your group, consider dividing speaking time between them. More specifically, since debates usually cover multiple lines of attack, have each student cover a different point of the debate argument.
Write out a script of your podcast that highlights the main points of the argument. Once the script is finished, and prior to recording, read it aloud and rehearse your delivery.
RECORDING THE PODCAST
Launch Mixcraft and open File>Set Project Default Settings. Set the New Project window Audio Tracks to 1 and click OK. Now click File>New Project.
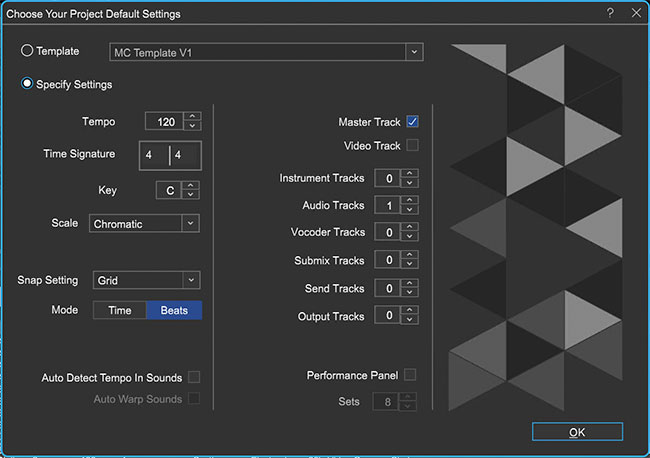 Once the New Project window has loaded, remove any instrument tracks, and set the Audio track field to 1.
Recording Audio. To prepare for the recording of audio, ensure that the microphone and audio /computer interface are properly set up. Ask your teacher for help if necessary.
First, to prevent feedback, turn off any speakers or monitors. Record with headphones. This will allow you to hear what you are recording without creating a feedback loop.
Connect headphones to the headphone jack on your audio/computer interface, or to your computer.
Next, connect the microphone to the audio/computer interface with a microphone cord. To make sure Mixcraft is monitoring the audio/computer interface, click the File > Preferences > Sound Device tab and check to confirm that the interface is selected. If you are using a microphone pop filter, place the filter in front of the microphone. This will help create clean vocal recordings.
Now that the equipment is set up, it is time to record your debate!
Arm the audio track in the workspace by clicking “arm.” The downward arrow next to the arm button will enable users to select the source of the “incoming audio signal” (usually a microphone). Make sure the correct interface is selected. To check the configuration, try speaking into the microphone – the volume meter should jump. Also confirm the headphones are working.
For clean recordings monitor the incoming audio on the audio track’s volume meter. Record in the “yellow” zone. In this zone, recordings will be audible but not so loud that added artifacts (unwanted, accidental sounds) will “dirty” the recording.
 An example of the yellow or “safe” zone to record in.
If the meter is reaching the “red” area, try dialing back the gain on the audio/ computer interface or move farther away from the microphone. Careful! Recording in the “red” zone could be harmful to your equipment or ears and could distort the recorded audio!
 An example of the “red” or “unsafe” zone. This area could damage your ears and recordings.
Disarm the metronome. Since we do not need to record our vocals “in time” to instrument tracks, the metronome might be a distraction to students. Click on the metronome icon in the transport section, deselect all three checkboxes, and click OK.
 Disarming the metronome.
 Rewind the cursor to the beginning of the timeline before recording.
 The rewind to beginning transport button, highlighted in blue.
 Start recording by hitting the “master record button” (or “R” key). highlighted in red in the transport image above. The first speaker should begin speaking. The cursor will move down the timeline and waveforms of the recorded speech will appear. To edit, re-record, or finish the audio, stop the recording by hitting “R” or the “space bar.” If a mistake has been made, select the area that needs to be rerecorded with your cursor and hit the master record button. Don’t forget to wear headphones to hear what is being recorded!
 An example of recorded speech, illustrated as an audio region on the Timeline.
After finishing the recording, disarm the audio track from record mode and playback the audio from the beginning. Listen closely for parts that may need editing (rearrange, split or remove) or rerecording.
Edit the debate if necessary by splitting/merging, deleting, or rearranging audio regions on the Timeline.
Arranging audio: To arrange audio regions of your podcast on the Timeline, cut a large audio region into smaller segments. Right click an area on your waveform that you would like to rearrange and select “split” (Ctrl + T). The audio region will now be cut into two pieces. Cut as many sections as you need. Grab and move the regions on your workspace to rearrange the recording.
 Selecting the “split” option splices the audio region into two audio regions.
Separate audio segments can be merged into one segment. Simply highlight the relative segments (Shift + Click with a sweep over the segments) and right click to find the option “merge” (Ctrl +W).
Trimming audio: To trim, shorten, or extend the audio regions of your podcast, move your cursor near the ends of your waveform until you see a double-sided arrow. Simply click, and drag left or right to trim your audio region to the desired length. This edit is useful for quickly cropping out sections of your podcast that are undesired. If there are parts of the audio recording you want to remove, try splitting and then trimming the regions.
Deleting audio: To remove audio from your podcast, you can highlight (drag + select regions) then delete; or split your waveform into parts, highlight unwanted segments and then hit delete. Make a mistake? The “undo” button (curved arrow icon) can be found on the top left menu bar next to the “floppy disk – Save” icon.
Once the podcast sounds satisfactory it is time to mix the recording down into a file. Mix down the recording into a .WAV or .MP3 file. Go to menu > Mix Down To > and select the correct file format. Ask your teacher which file format is compatible with the blog. Once your podcast is completed and mixed down, notify your teacher.