TEACHER’S GUIDE | |
VOCAL FX PROJECT | |
NSME: | 1, 4, 6, 8 |
GRADE SCHOOL | HIGH SCHOOL |
CLASS TIME | 2 ONE-HOUR PERIODS |
REQUIRED MATERIALS:
Vocal Recordings (Pre-recorded or Recorded in the classroom)
Computer with Mixcraft
Mixcraft’s Built In Effect Plugins
Copies of the Student Guide (“Additional Materials Download”)
SUGGESTED MATERIALS:
Text to record (poem, story, or improvised speech)
Headphones
Microphone
Microphone Cable
Microphone Pop Filter
Audio/Computer Interface
Further Reading Materials
OVERVIEW: Learning to record and edit audio is a fundamental step when working with audio software. It is essential that students learn early on how to record and edit recordings and audio samples. After audio is recorded, it often goes through various stages of production such as effects processing, mixing and mastering. Digital Signal Processing (DSP) is concept coined to describe any digital transformation of audio (in this case, the audio recordings of students). In a computer music context, DSP refers to adding specific “effects” to audio (such as reverb being used to simulate an ambience that was not captured in the original recording). Other effects, such as delay or chorus, allow students to alter their recordings to create new sounds and textures. Though a myriad of DSP effects is available to students, it is important that the curriculum focuses on a few, universally recognized effects. Thus, the objective of this lesson is two-fold:
To familiarize students with basic audio recording and editing in Mixcraft; and
to creatively apply Mixcraft’s built in plugin effects to recorded audio.
LESSON: For grade school, middle school and high school classes, the Vocal FX Project walks students through a basic session of audio recording, editing, and effects processing. This project is designed to teach students how to record a vocal track (song, story, or poetry) using Mixcraft’s interface and external audio equipment (microphone and audio/computer interface). If the suggested equipment is unavailable, pre-recorded audio is provided in the “Additional Material Downloads.” The latter half of the lesson builds upon audio recording by demonstrating how Mixcraft can modify audio files with effect plugins. An overview of several common audio effects, such as delay and reverb, will encourage students to approach audio production creatively (for example, how would we make our vocal track sound like it comes from a cave?). For high school classes a discussion on additional effects, particularly EQ and compression, would compliment higher-level courses on music and technology. The skills learned in this lesson are applicable to all lessons and projects in this book.
SKILLS GAINED:
Audio Recording
Audio Editing
Audio Effects Processing
Understanding Common Audio Effects
ACTIVITY
Launch Mixcraft and open File>Set Project Default Settings. Set the New Project window Audio Tracks to 1 and click OK. Now click File>New Project.
 Once the New Project window has loaded, remove any instrument tracks, and set the Audio Tracks field to one.
Recording Audio. Prior to recording vocals, ensure that the microphone and audio/computer interface are properly set up.
First, to prevent feedback, turn off any speakers or monitors. Recording with headphones is recommended because this allows students to hear the recording session without creating a feedback loop. Connect headphones to the headphone jack either on your audio/computer interface or on your computer itself. To activate the headphones click Monitoring Incoming Audio in the pull-down menu to the right of the “arm” button on the audio track workspace.
Next, connect the microphone to the audio/computer interface with a microphone cord. To make sure Mixcraft is monitoring the audio/computer interface, click File > Preferences > Sound Device and check if the interface is selected. If a microphone pop filter is being used, place the filter in front of the microphone. This will help create clean vocal recordings.
Now that the equipment is set up, it is time to record!
Arm the audio track in the workspace by clicking “arm.” The downward arrow next to the arm button will enable users to select the source of the incoming audio signal. Make sure the correct interface is selected. Check the configuration by speaking into the microphone. The volume meter should jump as it registers the incoming voice signal.
Remember to activate the microphone. When “armed” the track workspace menu will display a microphone icon (see screenshot below). Clicking turns the button “green.” This is an alternate way to turn on the Monitor Incoming Audio function.
For clean recordings users will want to monitor the incoming audio on the audio track volume meter. Record in the “yellow” to keep the recording audible but not so loud that it will clip or become distorted.
 Example: Yellow or “safe” zone to record in.
 If the meter has reached the “red” area, try dialing back the gain on the audio/computer interface or try moving the student farther away from the microphone.
 Example: “Red” or “unsafe” zone. This area could damage both your ears and your recordings.
Disarm the metronome. Since vocals are not required to be recorded “in time” to instrument tracks, the metronome might be a distraction to students.
Rewind the cursor to the beginning of the timeline before recording.
Start recording by either clicking the master record button or by selecting the “R” key on the computer keyboard. The cursor will begin moving down the Timeline and waveforms of the recorded speech will appear. To edit, or re-record audio, stop the recording by hitting “R” or the space bar. Select the area that needs to be redone with your cursor and hit the master record button. Don’t forget to wear headphones to hear what is being recorded!
 An example of recorded speech, illustrated as an audio region on the Timeline.
After finishing the recording, disarm the audio track and playback the audio from the beginning. Listen closely for parts that may need editing (rearrange, split or remove).
Importing Pre-Recorded Audio. In addition to live audio recording, users can also import audio files (such as WAV or MP3) directly into Mixcraft. For educators this means students can use samples with Mixcraft or save and import recordings from a different class into Mixcraft:
To import pre-recorded audio, simply drag and drop the audio files onto an audio track or go to the Menu and select Sound > Add Sound File > Select file.
Remember, the imported audio will automatically be synced to Mixcraft’s tempo and key. To undo these changes, select the “Sound” tab in the Tabs Area to view your audio file’s properties. Unselect the “Adjust to project tempo” feature.
Editing Audio: After recording the vocals or importing pre-recorded vocals, it may be necessary to tidy up the audio with an edit. Here are three common edits:
Arranging audio: To arrange pieces of audio, it is best to cut up the recording into smaller sections. Highlight the recording and select “split” (Ctrl + T). The region will now be cut into two pieces. Grab and move the regions on the Workspace to rearrange the recording.
 Splitting audio regions is easy. Simply right click and select “split.”
 Students can also merge separate audio segments into one segment. Simply highlight the relative segments (Shift + Click) and right click to find the option “merge” (Ctrl + W).
Trimming audio: To trim audio or to shorten/extend recordings, move the cursor near the ends of an audio region until a double-sided arrow appears. Simply click, and drag left or right to trim the audio region to the desired length.
Deleting audio: To remove audio, users can highlight large areas (drag + select regions)
TIPS:
Remember, try zooming in and out of the workspace using the “+” and“-“ keys. The plus zoom lengthens the piece for easier and more precise edits.
Try splitting the audio regions of your vocal recording. Rearrange the recording to create a nonsensical story.
For educators who do not have access to recording equipment, included in the “Additional Materials Download” folder is pre- recorded audio.
EFFECTS PLUG-INS
Audio Effects. After learning to record and edit audio, the next step in audio production is adding audio effects to recordings. Mixcraft includes a unique selection of adjustable presets for each particular effect; these are handy for fine tuning the effect the user is trying to create. For educators, the most important effects (and effects presets) reviewed in this lesson are Reverb, Delay, Pitch Correction, Pitch Shifting and the Telephonic (Phone-Filter) Effect.
Adding Effects: Adding Effects: Adding effects to recorded audio is easy in Mixcraft. On an audio track, click the “FX” button. This will launch the Effect List window. From there, select an individual effect with the “Select An Effect” menu or an effect chain with the “Select Effect Chain” menu. To help students understand common audio FXs, start by looking at some of Mixcraft’s built in effects:
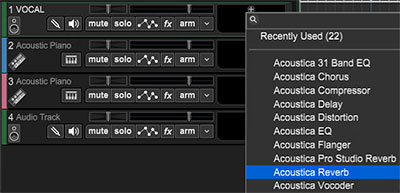 To become familiar with the Effects List Window, try browsing through the many choices.
Acoustica Reverb: Reverb is an effect that adds space or ambience to recordings. The Acoustica Reverb contains many “presets” that emulate a range of real-world environments. This allows a user to create a project that gives the illusion that it was recorded somewhere besides in an actual studio or classroom – perhaps, for example, the piece aims to create the illusion that the performance took place in a canyon or a train station. Some of the presets can be used to create synthetic spaces and other strange or ethereal effects.
Adding Reverb. To add reverb to the vocal track, click on the + sign at the right of the track. (If the Track Effects field isn't visible, go to the top View menu and select Show Effects On Tracks) The Effects List window will appear. Select “Acoustica Reverb” from the drop down menu.
Reverb Presets. Users can select predetermined reverb settings, or “presets” from the “Select Preset” drop down menu. Feel free to dial in a few presets and listen to the changes created in the recording. Try comparing bigger and more spacious presets like “Train Station” to smaller sounding reverbs like “Lite Verb.” For more control, click the “edit” button to tweak individual parameters for Acoustica’s reverb.
STUDENT ASSIGNMENTS
How would you make your recording sound like its coming from a large stadium?
Educator recommendation: Try a big, long reverb preset like “Canyon.” Or edit the “Reverberation” or “Wet” parameters of a different reverb setting.
How would you make your recording sound like its coming from a small closet or even a bathroom?
Educator recommendation: Try a smaller reverb setting like the “Room (small)” or “Studio 1 Dub” presets.
Acoustica Delay: Delay is an effect that creates and plays back copies of an audio recording. Often, this produces an “echo” effect that adds a distinct atmosphere to the mix.
Adding Delay: To add delay to the vocal track, click the “FX” button on the audio track. The Effects List window will appear. Select “Acoustica Delay” from the drop down menu.
Delay Presets. Select a delay preset from the drop down menu. Dial in a few presets. Try the “Long Repeater” and “Slap Back Echo” to hear different delay effects. For more control, click the “edit” button to tweak individual parameters for Acoustica’s Delay. Try adjusting the “feedback” parameter.
STUDENT ASSIGNMENTS
How would you make your recording sound like it’s echoing in a cave or valley?
Educator recommendation: A delay with multiple repetitions will do this. Experiment with the “Echoes” or “Long Repeater” presets – try adjusting the feedback parameter of delay.
How would you make your recording sound metallic or robotic?
Educator recommendation: The “Metal Detector” and “Robotico” presets add a tint of metallic feedback to recordings. Use them to produce futuristic sounds.
Gsnap Pitch Correction: A popular effect to add on vocals, pitch correction automatically tunes audio recordings to their intended pitch. Since no vocalist can sing absolutely “on key,” Gsnap gives a unique robotic effect to vocal recordings.
Selecting Pitch Correction: To add pitch correction to the vocal track, click the “FX” button on the audio track. The Effects List window will appear. Select “Gsnap Pitch Correction” from the drop down menu.
Reverb Presets. The presets for Gsnap vary from subtle pitch correction to drastic pitch glides. Sample a few and listen to how the contour of the recorded speech changes with each choice. The “Tea-Pane” presets are a great starting point for producing a robotic sound.
STUDENT ASSIGNMENTS
How would you correct an out-of-tune instrumental performance or an off-key singer?
Educator recommendation: Try a transparent setting on Gsnap like “Subtle Pitch Correction.” If you know the key of your music performance, in the edit window you can assign a key signature which will significantly enhance the effectiveness of the plugin.
How would you make your recording sound like a singer from a hit Hip Hop or Top 40 Track?
Educator recommendation: To acquire that synthetic effect, commonly heard on popular music tracks, select the “Tea Pane Chromatic” preset. Explore this series of presets for more pronounced versions of the effect.
Adjust Pitch By/Adjust Project Key: Although not technically a plugin at all, this built-in feature of Mixcraft (accessed in the Sound window) has been added to the plug-in section because, in addition having a key transposing function, it also shows another way – called “pitch shifting” – to control pitch. This makes it a good companion to the plug-in approach outlined in the previous section. With this alternative feature users can shift or adjust the pitch of a recording in unique ways or can transpose a piece into another key. For example, with Adjust Project Key, a guitar part recorded in the wrong key can be adjusted to match the intended key. To produce unique effects for vocals, use Adjust Pitch By. This allows pitch shifting by semitones: high pitch shifting creates a “chipmunk” squeak, while low pitch shifting creates a deep and boomy voice.
Selecting. To access pitch shifting, select an audio segment on the timeline and click “Sound” on the Tab Menu. The pitch pull-down menu has three choices; “Adjust Pitch By,” “Adjust to Project Key,” and “Do Not Fix Pitch.” The “Adjust To Project Key” activates a “key” selector box. Select “Adjust Pitch by.” Below the pitch pull-down, an area will appear where you can adjust pitch by semitones.![]() Audio adjusted by 5 semitones.
Audio adjusted by 5 semitones.
STUDENT ASSIGNMENTS
How would you make your recording sound like a Chip and Dale rendition?
Educator recommendation: Try boosting your recording up by 4 or 5 semitones.
How would you make your recording sound deep, like a monster’s voice?
Educator recommendation: Try decreasing the pitch of your recording by 4 or 5 semitones.
Acoustica EQ Effect: EQ has many presets. One of the more popular is the “Telephonic” which produces what is widely known as a “phone-filter” effect. With this preset, the recording sounds like it is coming from a telephone.
Selecting Acoustica EQ: Add Acoustica’s EQ to the vocal recording. Click the “FX” button on the audio track and select “Acoustica EQ” from the Effects List window.
EQ Presets. First try the “Telephonic” preset for the phone-filter effect. Now select “AM Radio,” or “1 K Notch.” Notice how each preset uniquely shapes the tone of the recording. For more results, change the parameters of the EQ to create alternate tones. EQ settings window. Experiment with the adjustment sliders.
STUDENT ASSIGNMENT
How would you make your recording sound muffled?
Educator recommendation: Slide the faders, 500 and above, down to -18 db.
This will remove the higher frequencies of the recording and create a muffled effect.
How would you add sparkle and presence to your recording?
Educator recommendation: For sparkle, slightly boost the 8K and 16K faders. To add presence, try boosting the 2K fader.
ADDITIONAL LESSON PLANS
Beyond Reverb & Delay: Besides the audio effects covered in this lesson, Acoustica includes the Distortion, Flanger, and Chorus audio plugins. This wide range of effects (and presets) gives
students tremendous power for controlling and for shaping the sound of recordings as well as for expanding the mixing techniques used. If class time allows, try experimenting on the recorded vocals by using the Distortion, Flanger or Chorus effects.
Using Buses: Applying individual effects are on multiple tracks can be very demanding on a computer’s CPU processing power. By bussing multiple tracks to a submix track, a user can still apply the same FX to multiple tracks, but with a single use of a plugin. This reduces the CPU load for effects processing. Learning to use busses is a moderate to advanced mixing technique.
Other instruments: This lesson showcased Mixcraft’s effect plugins on vocal tracks. Try using these plugins on other recordings such as traditional instruments, percussive sounds (clapping and tapping), or virtual instruments.
Further Reading
Senior, M. Mixing Secrets for the Small Studio Sonnenschein, D. Sound Design