TEACHER’S GUIDE | |
NEURAL SYMPHONY | |
NSME: | 4, 6, 8 |
GRADE SCHOOL | HIGH SCHOOL |
CLASS TIME | 1-3 ONE-HOUR PERIODS |
REQUIRED MATERIALS:
Computer with Mixcraft
Headphones or Monitors
Neural Symphony Project File (Download Folder)
Copies of Neural Symphony Student Guide
SUGGESTED MATERIALS:
MIDI keyboard
Further Reading Materials
OVERVIEW: Auditory neuroscience is the scientific field that studies how the human brain helps us hear and understand sounds in our environment, like speech and music. How does the brain enable us to hear the basic elements of music, sound as pitch and rhythm? How does the brain enable us to understand speech (i.e., why do we understand speech as language, and not just hear speech as meaningless sound)? Do the brains of humans and other animals understand sounds similarly or differently?
The human brain is one of the most important and complex organs in the human body. When we listen to sound, such as speech and music, massive networks of tiny cells called neurons respond to the sound by producing electrical activity—think of the brain as dense webs of lightning—and somehow enable us to hear the sound as speech or music! Scientists can, then, record this electrical activity by placing electrodes, small detectors connected to wires, directly on the scalp of a listener. These electrodes act as tiny microphones, enabling scientists to record the electrical activity produced by the brain when a listener is presented with sound. Incredibly, the human brain will produce electrical activity that mimics the characteristics of the sound used to evoke the response. For instance, when human brain activity is recorded to a speech sound, such as the syllable /ba/, the brain response sounds similar to the /ba/! Freaky! As we will see, in this project, the neural recordings we will use to create music sounds like the notes on a piano!
To listen to brain activity, scientists use a process called “sonification,” a technique for transforming scientific data into a format that can be played back and listened to. For instance, in this lesson plan, recordings of brain responses were transformed to an audio file that can be used for music performance, composition, and sound design in Mixcraft. While sonification can be a creative technique employed by artists and musicians, the process also enables scientists to listen to their data, instead of just look at it. In fact, sonification has been applied in many other areas outside of auditory neuroscience, such as studying the dynamics of earthquakes, handwriting, and more!
LESSON: This lesson will provide a basic overview of auditory neuroscience concepts and then ask students to make music using real recordings of brain activity called “neural sonifications.” Given the interdisciplinary theme of this project, educators could collaborate with a biology, neuroscience, or physiology class, to review the basic components of the human brain (e.g., neurons) and the methodologies scientists use to study the brain (e.g., electroencephalography). Over the course of the lesson, students will learn how to manipulate audio samples in Mixcraft, such as learning to filter or loop a sample, using one of several built-in samplers. Then, students will create their own brand of “neuromusic” by composing short melodies or ambient pieces using sounds produced by a real, human brain.
SKILLS GAINED
MIDI Recording
Audio Processing
Sampling
Sequencing
Sound Design
ACTIVITY
Preparing For The Lesson
First, research the basics of brain science. Introductory lesson topics include the lobes of the brain, the anatomy of neurons, neural activity, and techniques scientists use to record brain activity (e.g., electroencephalography). More advanced topics include neural plasticity (i.e., how the brain changes from experience), neural spike trains, and neural oscillations. Many free, online sources and videos cover these topics in an approachable way.
Learn more about the science behind neural sonifications: The neural sonifications included in this Mixcraft project were created by recording brain activity while an adult listened to each note of the piano. Consequently, the brain activity sounds like the pitch of each piano note! (Please note that sometimes the “pitch” is difficult to hear in the neural recordings, especially for higher notes. There is a scientific reason for this, so encourage students to compose melodies or music with the lower notes in the bass range.) To learn more about how these neural sonifications were made, please visit: http://skoelab.uconn.edu/neural-symphony/
LESSON
Creating Neuromusic
Setting up Mixcraft project files and the neural sonifications: In this lesson, students will create their own music using neural sonifications, audio recordings of electrical activity produced by the human brain.
Blank Template: For setup, drag the “NS_Template.mx10” file from the Neural Symphony Project folder in the Additional Materials Download to your desktop. Then, open the Mixcraft project. (The Additional Materials Download folder also includes audio files of the neural sonifications.) This project contains a single virtual instrument track loaded with the Omni Sampler. Additionally, the neural sonifications have already been loaded into the Omni Sampler, so students can begin using the sonifications to create music immediately. Each sonification has been mapped to the appropriate note on the piano keyboard. If students have access to a MIDI keyboard, they can use the Omni Sampler to “play the brain.” Students can program music using the pencil tool, Musical Typing, or by using Mixcraft’s sequencer to create musical sequences.
Demo Songs: Several demo songs are also included in the Additional Material Downloads folder that illustrate how creative students can get with sounds of the brain. Try loading in the demo sounds and listening to how the neural sonifications sound with drum loops, effects, and even as a MIDI rendition of Bach!
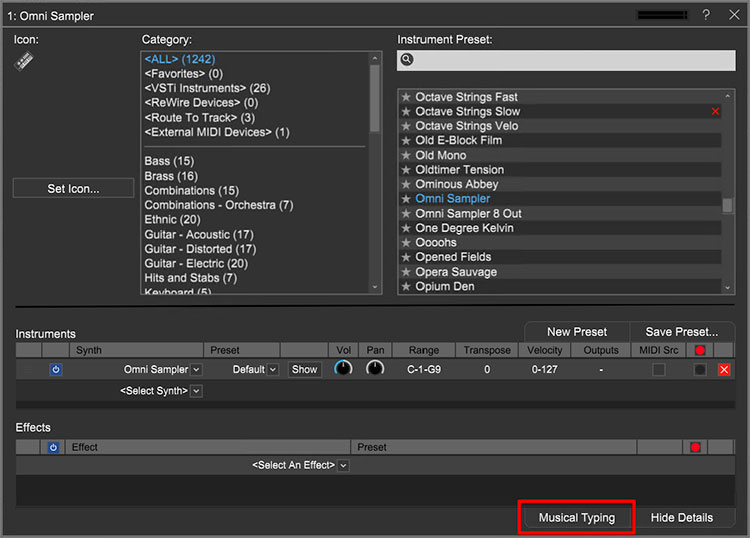
Audio Processing. First, let’s learn how to edit samples in Mixcraft using the NS_Template.mx10 session. With the session already open with Mixcraft, launch the Omni Sampler by right-clicking the musical instrument icon on the “Omni Sampler” virtual instrument track.

 This is the interface of the Omni Sampler, a virtual instrument that allows users to make music using pre-recorded sounds. In this project, the neural sonifications have already been loaded into the sampler, as shown in the center grid area. Clicking the triangle-shaped play button on any of the spaces in the center grid will preview the sample that has been loaded into that space. On the far left is a column that shows all of the available grid spaces. Clicking on the column will change which samples are shown on the center grid. This lesson will focus on manipulating the sound of the neural sonifications to make them more musical by using three key sections of the Omni Sampler: the loop section (in red), the filter section (in blue), and the envelope section (in green).
Enable global mode. Omni Sampler allows changes to be made to an individual sample or to all the samples at once (global mode). Since we will want our changes to affect every sample, enable global mode by clicking “global,” right under the “loop” button. Clicking “global” will change the background color of filer and envelope sections to yellow.
The filter: The brain is always producing unwanted electrical activity that can make recordings of the brain seem very noisy. Listen carefully to some of the neural sonifications by clicking the triangle-shaped play button on the center grid; you may notice that the sonifications sound noisy, almost like radio static. To help reduce this noise, we can use Omni Sampler’s filter to draw out the “notes” in our brain recordings while reducing some of the noise. In the filter section, try turning down the “cutoff ” dial to ~75. Now, preview a sonification again. Do you notice how the sample sounds less harsh? Feel free to explore various settings on the cutoff dial.
The envelope. Next, try changing the “attack” knob in the envelope section to make the neural sounds swell up, like a violin string. Try a setting between 10 – 15 and notice how the onset of the sonifications are less punchy and immediate. You can also change the “release” knob to make the sonifications shorter in duration.
Looping the sound. These neural sonifications are very short in duration, which might make it difficult to play longer, sustained notes. Omni Sampler’s “loop” function allows samples to be looped to create a sustained effect. First, ensure that global mode is enabled. (The background of the filter and envelope sections should be yellow.) Next, select “loop” to turn on the loop option for all the neural sonifications. Now, if you click and hold down the triangle-shaped play button on any of the sonifications, the sample will repeat and create a loop. This is useful for playing longer, sustained notes when using shorter samples, like the sonifications included in this project.
Making music with neural sonifications.
Recording a MIDI performance with Musical Typing: To record music with the neural sonifications, use either Mixcraft’s Musical Typing or a MIDI Controller. Musical Typing allows you to use your computer keyboard to control Omni Sampler. Click the Musical Typing icon on the bottom of the Omni Sampler edit window.
The Musical Typing window illustrates how your computer keyboard functions as a music keyboard: the letter keys correspond to different notes. Try tapping the “D” and “F” letter keys on your keyboard. You should hear the neural sonifications.
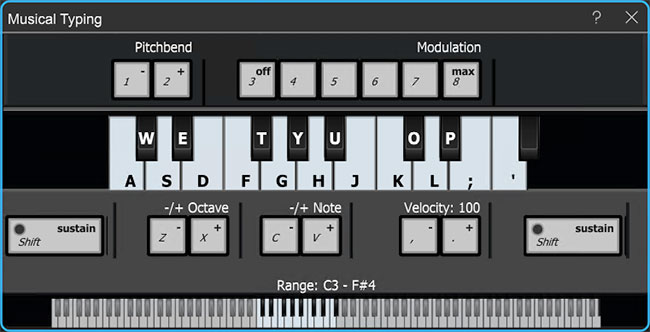 Mixcraft’s Musical Typing interface.
Recording Your NeuroMusic: First, enable the metronome. Click the metronome icon (outlined in red) and select the recording (Shift + M) box.
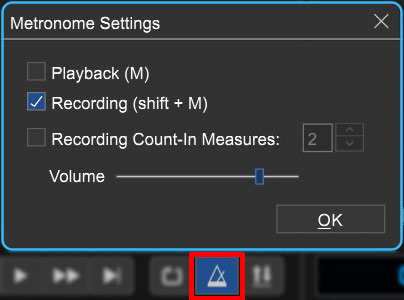 Enable the metronome during recording. The metronome will keep the beat and make it easier to record in time.
Before recording, hit the “rewind” icon (outlined in blue in the screenshot below) to rewind the cursor to the beginning of the timeline.
Arm the virtual instrument track for recording by clicking the “arm” icon.
Start recording by clicking either the master record button (outlined in red) or “R” on the keyboard. Begin playing a song on your keyboard. The cursor will begin moving down the timeline and the MIDI graphics of your melody will appear. To edit, or re-record your melody, stop the recording by hitting “R” or the space bar. Select the area that needs to be the re-recorded with your cursor and hit the master record button.
 The red dot begins master recording. The left-facing arrow (in blue) rewinds the Timeline to beginning.
After you have finished recording, disarm your virtual instrument track and play back your song from the beginning. The song may not sound perfectly in time. Listen closely for parts that you may want to edit, rearrange, split or remove.
 An example of a MIDI region after a performance using the neural sonifications.
Programming Your NeuroMusic: With Mixcraft’s MIDI capabilities, users can program melodies with the pencil tool and the Piano Roll.
First, on the Timeline, double click on the MIDI regions created from recording with Musical Typing (or simply double click on an area of the virtual instrument track that is blank). This will launch the Sound Tab and Piano Roll window. The list of piano notes runs down the left side of the Piano Roll. The small, horizontal lines/dashes in the tracks correspond to the MIDI data of each part.
Select the pencil tool in the left hand corner of the Piano Roll.

Now you can “draw” MIDI notes on the Piano Roll. Let’s try programming a melody using the pencil tool.
To start, navigate the Piano Roll to display the lower notes (~C2). With the pencil tool draw a pattern for a bassline (see the below image for an example). Note: when drawing, the lines might not align with the Piano Roll grid. In the next section we will learn how to edit our programmed or recorded melody.
 A programmed bassline using the neural sonifications.
Editing MIDI: After recording or programming a melody, it may be necessary to tidy up and edit the MIDI data. Here are several common edits:
To tidy up the MIDI programming and recording, highlight all of the MIDI notes (Ctrl+ A, or by dragging your cursor over the notes) and right click > MIDI Editing > Quantize. Make sure the Note Type is set to 1/8th notes. Click “ok.” Notice that the MIDI notes are now perfectly aligned to the Piano Roll Grid.
Trimming and deleting MIDI regions: To trim or extend MIDI regions, move the cursor to the end of a region – a double-sided arrow appears. Simply click, and drag left or right to trim the MIDI region to a desired length. To delete MIDI regions, you can highlight (drag + select regions) or split MIDI regions into parts and hit delete.
Finally, loop your melody to a desired length. On the timeline, click the loop button on the MIDI region (the half circle with a “+” sign) to finalize your song! Try looping your melody four times.
To mix down your first piece of “neuromusic” to a file on your computer, go to the Menu and select File > Mix down to… > .MP3. Name and save your song on the desktop.
ADDITIONAL LESSON PLANS
Biological Sounds: In this lesson, we programmed a short, musical melody using sounds from a real human brain. What other bodily sound might sound musical? The beating of a heart beat? Whistling? The sound of someone’s footsteps? Create an entire musical work using just sounds produced by the human body.
Further Reading:
Levitin, D. This Is Your Brain On Music.