APPENDIX
CONFIGURING MIXCRAFT
In most cases, educators will have no need to make adjustments to Mixcraft’s preferences for the lesson plans. However, if multiple pieces of audio hard ware are being used, several adjustments might help. From the top menu select File > Preferences. The Mixcraft preference window will open. Here, users can make general tweaks to the interface. Most importantly however, educators and students can control the sound devices, MIDI devices, and loop library.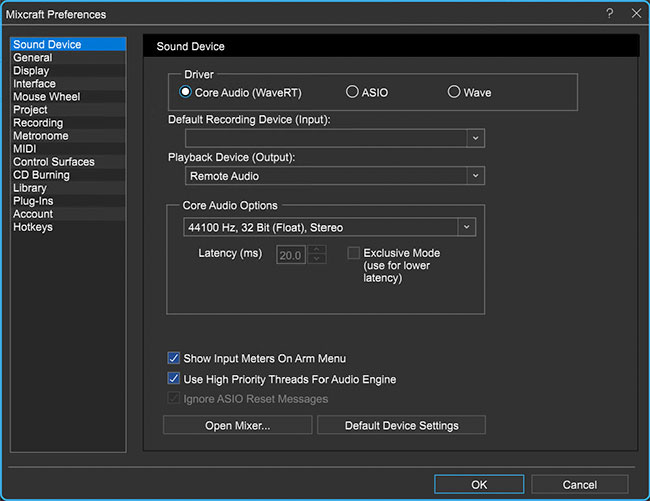 Mixcraft’s Preferences.
Sound Device: The driver setting changes how Mixcraft receives and plays back audio. “Wave” is the default setting on all PC computers. It is recommended however, to use the ASIO driver (this driver must be downloaded online). This driver is more stable and generally has lower latency than Wave. Additionally, users can direct where audio is inputted from and outputted to. This is useful if educators or students are using various pieces of audio hard ware. For example, you may want to switch the input to an audio/computer interface and the output to a pair of monitors connected to the audio/computer interface.
MIDI: From the MIDI tab, users can assign MIDI inputs and outputs. This might be necessary if educators or students are using multiple pieces of MIDI hard ware. Users can also change the default MIDI settings from this menu. Upon startup, the “Default Virtual Instrument” and the “Default General MIDI (GM) Instrument” are the “Acoustica Instruments.”
Library: The Library tab displays the directory to which all Mixcraft’s loops are stored. Here, users can change the directory to another folder. Loops can be imported using the “+ Import” button at the top right of the Library window.
A window will open with a small “Import From” window. Next to this widow is a “Browse” button. Find the loop and import it.
RECORDING TECHNIQUES
Vocal Recording: A good condenser microphone with a wide diaphragm will suffice for recording vocalists. Condenser microphones can vary in price but educators should be able to purchase a solid microphone for around $100 – 150. For a cleaner vocal recording, a pop filter is recommended. The filter has a nylon screen that removes plosives. They may be relatively inexpensive but are quite valuable during recording.
SOLO VOCAL RECORDINGS
Posture: Students should stand up straight and speak or sing into the microphone without swaying.
Position: Students should stand a few inches away from the microphone. Standing too close can distort a recording; while standing far away will create a quiet recording. Touching or tapping the microphone is not recommended. If plosives or pops are being recorded, use a pop filter or have the vocalist sing at an off-centered angle to the microphone.
GROUP RECORDINGS
Posture: Students should stand up straight and speak or sing into the microphone without swaying.
Position: Students can form a semicircle around the microphone and sing in its direction. Listen to a test recording and note whether the recording sounds balanced: are there any voices that are popping out? If so, try arranging the students so that each voice blends.
Instrumental Recording: For the recording of instruments, three types of microphones are used - dynamic, condenser, and ribbon microphones. Dynamic microphones can withstand high volumes during recording. Thus, for loud instruments such as amplifiers or drums, a dynamic microphone is an excellent choice. For delicate and intimate instruments, such as an acoustic guitar or solo violin, a condenser or ribbon microphone is the ideal piece of recording equipment.
SOLO INSTRUMENT RECORDINGS
There are two main approaches to miking an instrument - spot miking and distant miking. In spot miking, the microphone is placed a few inches away from the instrument. With this technique, the transients of a sound are more pronounced; lower frequencies are easily picked up (creating bass- heavy recordings); and the room ambience is not printed on to the recording. With distant miking, the microphone is placed a few feet away from the instrument. This method dulls the transients of an instrument and captures the ambience of the room. Depending on the desired effect, educators and students can use both techniques when recording.
GROUP RECORDINGS
When recording small or large ensembles, educators can either mike each instrument separately or record with several overhead microphones to capture the whole ensemble. Miking each instrument individually offers more control over the mix: if each instrument is being recorded to a separate track in Mixcraft, educators can adjust the volume and panning of each instrument during post- production. If recording with overhead microphones, the panning and relative volume levels are printed to the recording and are difficult to modify (though this can be done with the use of compression and equalization). Additionally, when recording multiple instruments, educators should be aware of microphone placement. Misplacement might cause bleeding – the result of a microphone picking up and recording an untargeted instrument.
IDEAS FOR STUDENT PROJECTS
The semester has come to an end and now you are left with all of these completed student projects. What to do with them? Here are some suggestions to help clear your desk and to showcase the students’ hard work:
School Theater Productions (e.g. Plays or Musicals)
Morning Assembly or Morning Announcements
Sports Games Intermission
School’s Website or Blog
Fundraising Events
Student Portfolios
Host a “listening night” for parents and showcase the student work
School open house
ACKNOWLEDGEMENTS
About the author: Parker Tichko, PhD., is a cognitive scientist, neuroscientist, musician, and composer, who studies how the brain enables us to perceive and create music. He received his PhD. in the Psychological Sciences from the University of Connecticut, where he researched the developmental origins of music cognition and language. In addition to studying music cognition, he is an active composer and musician, and, in his spare time, hunts down old or unique synthesizers.
Parker would like to thank the Acoustica team, particularly Dan Goldstein and Mitchell Sigman, for their help in creating this teaching guide, Sky Sabin for supplying the video materials for the lesson plans, and to all those individuals who helped him discover what music “the kids” listen to these days.
About the contributors: Sky Sabin is a musician, filmmaker, and photographer. He holds a B.A. in music with a concentration in music composition. He has performed his original songs in Boston, Providence, New York and Cork, Ireland. His first short film, “At The Heart Is The Guitar,” debuted at the Woods Hole Film Festival in 2010. Since then, Sky has made a variety of short films about local agriculture for Buy Fresh Buy Local Cape Cod, filmed the Boston GuitarFest 2010, created a how-to video about backyard chickens, and has been making surf and skate videos for local shops in New Port, RI.