STUDENT’S GUIDE | |
BEATBOXING PROJECT | |
NAME: | |
CLASS TIME: | |
PERIOD: | |
TEACHER: | |
CLASS: |
REQUIRED MATERIALS:
Computer with Mixcraft
Headphones or Monitors
Microphone / USB Microphone
Copies of Beat Boxing Student Guide
SUGGESTED MATERIALS:
Audio/Computer Interface
Further Reading Materials
ACTIVITY
Brainstorm different ways of creating drum and percussion sounds with your body. Think of the components of a drum kit: what would make a good kick drum sound? How about a hi-hat sound? A snare sound?
You will need to record your beatboxing sounds into Mixcraft and then sequence them using Mixcraft’s built-in step sequencer.
Launch Mixcraft and open File>Set Project Default Settings. Set the New Project window Instrument Tracks to 4, Audio Tracks to 4, then click OK. Now click File>New Project.
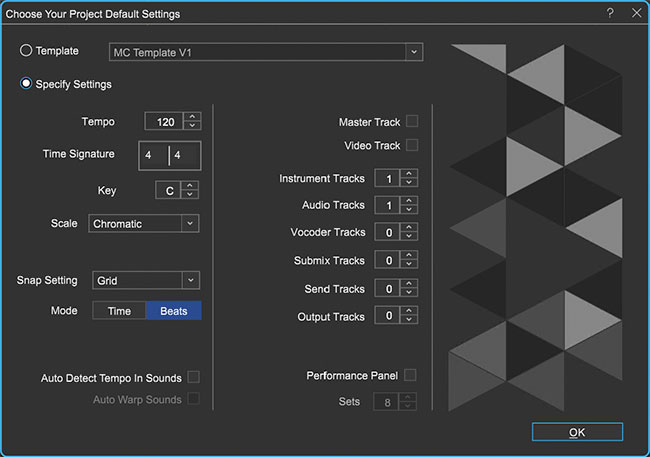 Once the New Project window has loaded, set the Instrument Tracks field to 4 and the Audio Tracks field to 4.
 Recording Audio. Before recording your beatbox sounds, it is necessary to prepare for the recording of these sounds by ensuring that the microphone and audio/computer interface are set up properly. Check with your instructor to see if your equipment is set up properly:
To prevent feedback, turn off any speakers or monitors. If possible, students should use headphones to follow the live recording without creating a feedback loop. Connect headphones to the headphone jack on your audio/computer interface or computer.
Next, connect the microphone to the audio/computer interface with a microphone cord. To make sure Mixcraft is monitoring the audio/computer interface, check the File> Preferences > Sound Device tab and check to confirm that the interface is selected.
Now that the equipment is set up, it is time to record some sounds!
Arm the first audio track in the workspace by clicking “arm.” The downward arrow next to the arm button will enable users to select the source of the “incoming audio signal” (often a microphone). Make sure the correct interface is selected. To check the configuration, try speaking into the microphone – the volume meter should jump. Also check that the headphones are working.
For clean recordings, you will want to monitor the incoming audio on the audio track’s volume meter. Record in the “yellow” zone. In this zone, recordings will be audible but not so loud that added artifacts (unwanted, accidental sounds) will “dirty” the recording.
 If the meter reaches the “red” area, try dialing back the gain on your audio/computer interface or move farther away from the microphone.
 Careful! Recording in the “red” zone could be harmful to your equipment or ears and could distort the recorded audio.
When you have finished recording your beatbox sounds, edit the recording into individual audio regions by right-clicking on the audio region and select “split”. It’s best to edit down larger audio into single hits, or “one-shots.”
 Right-click the audio region the beatbox sounds to split the recording into smaller regions.
Next, launch the Omni Sampler by clicking the musical instrument icon on the free virtual instrument track that we originally loaded when creating our template and selecting the Omni Sampler from the VSTi Instrument category. The Omni Sampler will help compile our audio regions into a custom beat-boxing drum kit!
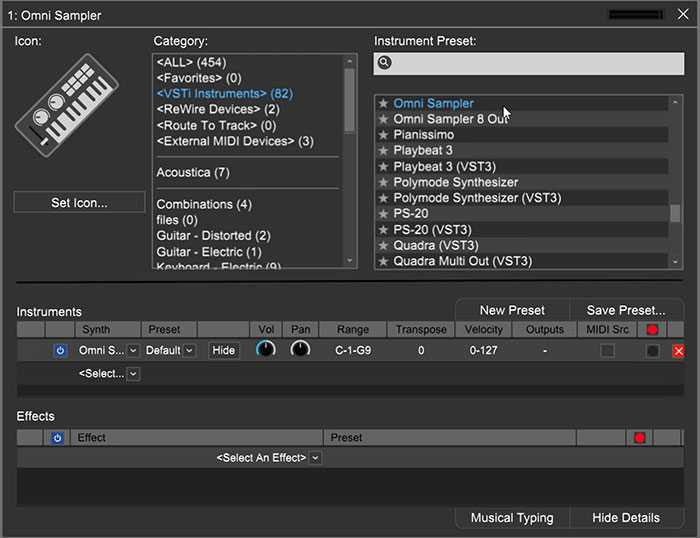
With the Omni Sampler loaded, click the “edit” button on the instrument-selection screen to bring up the Omni Sampler interface. Next, drag and drop one-shots from the Timeline onto the available pads. You can play the audio regions by clicking on the pads, or using musical typing / a MIDI keyboard.
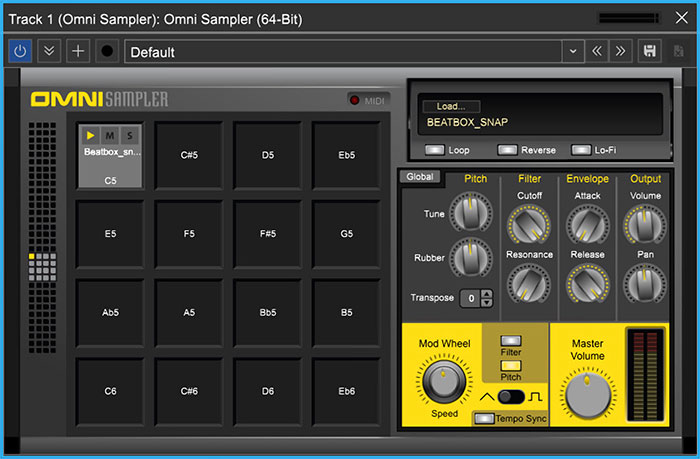 A one-shot sound from the beatbox recording was dragged onto the C4 panel. Pressing C4 on the musical typing or a MIDI keyboard plays the sample. Try to fill at least three or four panels with individual beatbox sounds.
Next, double-click on the virtual instrument track’s Timeline area to create a new MIDI region. Double-click the MIDI region, and select “Step” in the top-left hand corner. This will bring up the sequencer which will enable us to quickly sequence a drum beat!

Click the “Add/Edit” drop down button and add the rest of your one-shots that were loaded into the Omni Sampler.
 Clicking the “Add/Edit” menu brings down a menu where you can add samples from the Omni Sampler or specific notes if you were to sequence a melody (e.g. a bass line using a virtual bass synth plugin).
Change the step setting to a 16th note. This will make it easy to program our beatbox beat.
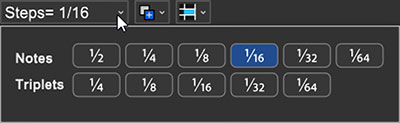 Click the Step setting on the step sequencer and select “1/16.”
Use the pencil tool, located in the upper left-hand corner of the step sequencer, to program a beat. Each row corresponds to a specific sound that’s loaded into the Omni Sampler. The sampler is divided into “steps” across a beat. Try drawing different patterns and hit play to hear the beat.
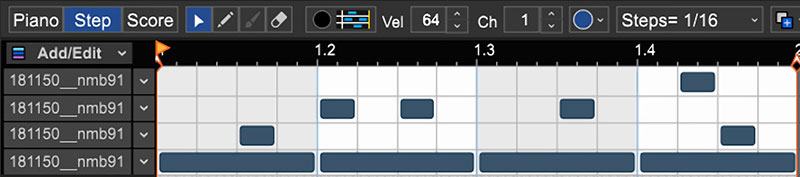 In this example, different patterns were used to emulate a kick drum, snare, hi-hat, and tambourine part. Try experimenting with different patterns.
When you are finished sequencer your beatbox beat, mix down the performance to a file on the computer. Go to the Menu and select File > Mix down to… > .MP3. Name and save your beatbox on the desktop!