TEACHER’S GUIDE | |
DEBATE PODCAST PROJECT | |
NSME: | 1, 8, 9 |
GRADE SCHOOL | MIDDLE SCHOOL – HIGH SCHOOL |
CLASS TIME | 2-3 ONE-HOUR PERIODS |
REQUIRED MATERIALS:
Computer with Mixcraft
Headphones or Monitors
Microphone
Copies of the Debate Podcast Student Guide (“Additional Materials Download’)
SUGGESTED MATERIALS:
Audio/Computer Interface
Sources to research for the debate
Further Reading Materials
OVERVIEW: A debate is an organized argument held between two parties in an attempt to persuade an audience to agree with or to dissuade an audience from a particular view. In a classroom environment, a group of students is first randomly divided into point and counter-point groups. One side holds the “pro” views while the other asserts the “con” views. Usually a classroom debate is governed by a mediator (e.g. an educator). Topics of debates include politics, science and religion, and the arts. Bringing up a contemporary or current issue is a great way to start a heated debate. Options for this project might include educators and their students forming a debate club or perhaps the school might already have one as an extracurricular activity. Collaborating with such a group might be a convenient way to do this lesson plan: educators could record and curate a blog for the debate club.
LESSON: Consider this lesson plan an invitation to use Mixcraft outside the arts. Audio software is often used by educators solely for teaching music or audio arts lesson plans. Here, however, we offer an interdisciplinary lesson that besides music education, includes a teaching focus on the practical communication skills of debating and internet blogging. For middle school & high school classes, then, this lesson plan includes three areas of study: debating, audio software, and internet technology (e.g. blogging). First, the educator selects several debate topics. The classroom is divided into smaller groups of students. A blog is then created and opened. The debate and blog is curated by the educator. Each separate group of students subsequently researches the subject and develops an argument for defining the group’s position. Each argument is then recorded and posted on the blog. Students from opposing groups read the blog and comment on the posts
(or defend their group’s position) in an attempt to create an online discussion or debate. Older students might benefit if this lesson plan included a brief talk on debating tactics or, perhaps, on the philosophy of logical fallacies.
SKILLS GAINED
Debating
Recording Audio
Editing Audio
Understanding Podcasts and Internet Blogs
ACTIVITY
Preparing For the Podcast
Select a debate topic. Online sources (such as procon.org/debate-topics/) are an excellent choice for finding debate topic. Below are several suggestions:
Local current event.
Political issue.
Current trends in science.
A review of a performing art.
Podcast diary.
Create a blog specifically for the debate. Students will use this blog to post the podcasts of the debate and to respond with comments or links to additional articles. Wordpress (wordpress.com/) and Blogspot (blogspot.com/) are common blogging platforms that are user friendly and free.
Divide students into small groups. Generally, debates are demarcated into point and counter-point sections. For example, a debate topic such as the impact of human society on global warming would have two sides (e.g. human society does not influence global warming vs. human society does influence global warming).
Podcasts vary in length, but for this class debate, each side should have 5-10 minutes to give opposing arguments. If more than one student will be giving arguments for a group’s position, limit each presenter to several minutes of podcast time.
Once debate groups have been created, debate topics distributed and positions decided upon, require students to write out a script of their part of the podcast. Do this before beginning the actual recording. This will help most students (especially nervous ones) be more relaxed. Because the arguments will have been written down beforehand, they can now be delivered more articulately. With a script in hand, it is time for to record the podcast!
RECORDING THE PODCAST
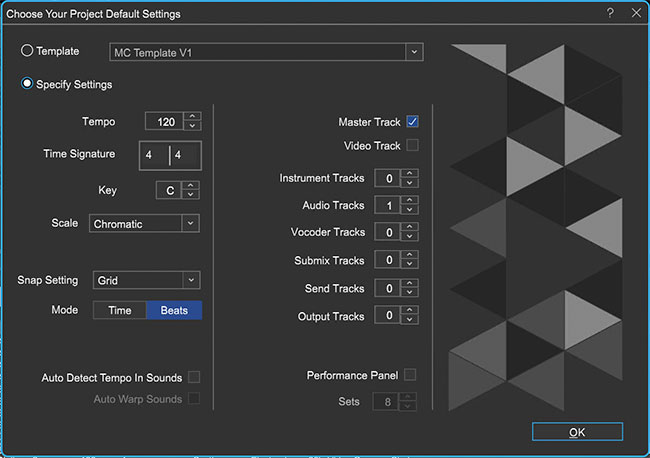
Launch Mixcraft and open File>Set Project Default Settings. Set the New Project window Audio Tracks to 1 and click OK. Now click File>New Project.
 Once the New Project window has loaded, remove any instrument tracks, and set the Audio track field to 1.
Recording Audio. To prepare for the recording of audio, ensure that the microphone and audio/computer interface are properly set up.
First, to prevent feedback, turn off any speakers or monitors. Record with headphones. This will allow students to hear what they are recording without creating a feedback loop. Connect headphones to the headphone jack on your audio/computer interface, or on your computer.
Next, connect the microphone to the audio/computer interface with a microphone cord. To make sure Mixcraft is monitoring the audio/computer interface, check the File > Preferences > Sound Device tab and check to confirm that the interface is selected. If you are using a microphone pop filter, place the filter in front of the microphone. This will help create clean vocal recordings.
Now that the equipment is set up, it is time to record your debate!
Arm the audio track in the workspace by clicking “arm.” The downward arrow next to the arm button will enable users to select the source of the “incoming audio signal” (usually a microphone). Make sure the correct interface is selected. To check the configuration, try speaking into the microphone – the volume meter should jump. Also confirm the headphones are working.
For clean recordings monitor the incoming audio on the audio track’s volume meter. Record in the “yellow” zone. In this zone, recordings will be audible but not so loud that added artifacts (unwanted, accidental sounds) will “dirty” the recording.
 An example of the yellow or “safe” zone to record in.
If the meter is reaching the “red” area, try dialing back the gain on the audio/ computer interface or move farther away from the microphone. Careful! Recording in the “red” zone could be harmful to your equipment or ears and could distort the recorded audio!
 An example of the “red” or “unsafe” zone. This area could damage your ears and recordings.
Disarm the metronome. Since we do not need to record our vocals “in time” to instrument tracks, the metronome might be a distraction to students. Click on the metronome icon in the transport section, deselect all three checkboxes, and click OK.
 Disarming the metronome.
 Rewind the cursor to the beginning of the timeline before recording.
 The rewind to beginning transport button, highlighted in blue.
 Start recording by hitting the “master record button” (or “R” key). highlighted in red in the transport image above. The first speaker should begin speaking. The cursor will move down the timeline and waveforms of the recorded speech will appear. To edit, re-record, or finish the audio, stop the recording by hitting “R” or the “space bar.” If a mistake has been made, select the area that needs to be rerecorded with your cursor and hit the master record button. Don’t forget to wear headphones to hear what is being recorded!
 An example of recorded speech, illustrated as an audio region on the Timeline.
After finishing the recording, disarm the audio track from record mode and playback the audio from the beginning. Listen closely for parts that may need editing (rearrange, split or remove) or rerecording.
Edit the debate if necessary by splitting/merging, deleting, or rearranging audio regions on the Timeline.
Arranging audio: To arrange audio regions of your podcast on the Timeline, cut a large audio region into smaller segments. Right click an area on your waveform that you would like to rearrange and select “split” (Ctrl + T). The audio region will now be cut into two pieces. Cut as many sections as you need. Grab and move the regions on your workspace to rearrange the recording.
 Selecting the “split” option splices the audio region into two audio regions.
Separate audio segments can be merged into one segment. Simply highlight the relative segments (Shift + Click with a sweep over the segments) and right click to find the option “merge” (Ctrl +W).
Trimming audio: To trim, shorten, or extend the audio regions of your podcast, move your cursor near the ends of your waveform until you see a double-sided arrow. Simply click, and drag left or right to trim your audio region to the desired length. This edit is useful for quickly cropping out sections of your podcast that are undesired. If there are parts of the audio recording you want to remove, try splitting and then trimming the regions.
Deleting audio: To remove audio from your podcast, you can highlight (drag + select regions) then delete; or split your waveform into parts, highlight unwanted segments and then hit delete. Make a mistake? The “undo” button (curved arrow icon) can be found on the top left menu bar next to the “floppy disk – Save” icon.
Mix down the recording into a .WAV or .MP3 file (File > Mix Down To > and select the desired file format). Remember, blogs and websites host specific audio files – if the blogging platform does not directly host audio files, look into third-party websites that do. These sites are generally free and allow bloggers to embed audio files directly into blog posts.
Upload the podcast to the class blog. It might help to organize podcast uploads and blog posts by debate topic and to include both sides of the debate in one post.
Assign students the task of listening to the blog and commenting on the post with additional questions, remarks, or links to relevant articles.
Once a group has finished offer the spotlight to the next group. One small group per week is a time-efficient pace to work at.
ADDITIONAL LESSON PLANS
Storytelling: An alternative to the debate lesson plan is a project on story telling. The storytelling project can include a curriculum from an English or theater class. Either choose a short story for the students or have students write their own short stories. Students should then “perform” their stories by reading and recording them into Mixcraft. Create a blog in which the stories can be posted.
FURTHER READING
Shuster, K. Speak Out! Debate and Public Speaking in the Middle Grades.
Pirie, M. How to Win Every Argument: The Use and Abuse of Logic