TEACHER’S GUIDE | |
MIXLIBS PROJECT | |
NSME: | 1, 4, 6, 8 |
GRADE SCHOOL | GRADE SCHOOL – HIGH SCHOOL |
CLASS TIME | 2 ONE-HOUR PERIODS |
REQUIRED MATERIALS:
Mixcraft Mixlib Session Files (“Additional Materials Download”)
Computer with Mixcraft
Student Guides (“Additional Materials Download”)
Microphone (Built-in or External)
SUGGESTED MATERIALS:
Headphones
External Microphone
Microphone Cable
Microphone Pop Filter
Audio/Computer Interface
Blank CDs for burning Mixlibs
Further Reading Materials
OVERVIEW: An alternative to the Vocal FX project, the Mixlibs project reinforces basic audio recording and editing skills. The Mixlibs project is a contemporary twist on a classic literary game: the game begins with a story that is constructed with missing words or gaps. Players must complete these gaps by using their own vocabulary. Clues are given as to which type of word should be used (nouns, verbs, or adjectives) and players are encouraged to get creative with their word choice. Once all the blanks are filled in, the story is read out loud back to the players. The result is usually a nonsensical, silly tale that both younger and older students will find humorous. Additionally, this game-like tutorial will cover many areas: using pre-saved Mixcraft sessions or templates; working with audio tracks; recording audio; exploring the ins and outs of the Timeline interface; and other essentials to Mixcraft’s interface.
LESSON: For grade school, middle school & high school classes, Mixcraft’s Mixlibs Project walks students through basic audio recording and editing by using pre-made sessions located in the “Additional Materials Download” folder. The project is designed to teach students how to record, edit, and arrange vocals (i.e. words to complete the Mixlib) using Mixcraft’s interface and external audio equipment (microphone and audio/computer interface). First, students will load a Mixcraft Mixlib session. Next, students will record words by following the markers (or flags) to complete the Mixlib. Finally, educators will export and play back the Mixlibs to the rest of the class.
SKILLS GAINED:
Audio Recording
Audio Editing
Familiarity with Mixcraft’s Interface
ACTIVITY
Prepare the Mixlib lesson by moving the Mixlib session files from the “Additional Materials Download” onto student computers.
Open Mixcraft and select the appropriate Mixlib session file or double-click on the session files moved to the desktop. Mixcraft will load the Mixlib project. Users should see two audio tracks on the Timeline – one with recorded audio and one with no audio.
 The Mixlib session file, Mixlib_Journey, is now loaded.
Recording Audio Setup. To prepare for the recording of audio, ensure that the microphone and audio/computer interface are properly set up.
First, to prevent feedback, turn off any speakers or monitors. Recording with headphones is suggested, because this allows students to hear what they are recording without creating a feedback loop. Connect headphones to the headphone jack either on your audio/computer interface or on your computer.
Next, connect the microphone to the audio/computer interface with a microphone cord. To make sure Mixcraft is monitoring the audio/computer interface, check the File > Preferences > Sound Device tab and make sure the proper interface is selected. If using a microphone pop filter, place the filter in front of the microphone. This will help create clean vocal recordings.
Testing the audio signal chain!
Arm the second audio track in the workspace (right below the audio track named “story”) by clicking “arm.” The downward arrow next to the arm button will enable us to select the source of your recorded audio. Make sure your interface is selected. To check, speak into the microphone – you should see the volume meter jump.
Remember: For clean recordings, monitor the incoming audio on the audio track’s volume meter. You want to record in the “yellow” zone. In this zone, your recordings will be audible, but not so loud that you will add junk to your recording!
 The yellow zone is the best area to record in.
If the meter is reaching the “red” area, try dialing back the gain on your audio/computer interface or move farther away from the microphone.
 Careful! Recording in the “red” zone can distort the recorded audio!
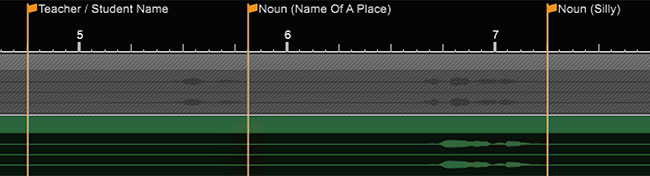
The markers (flags) denote the gaps in the Mixlib. Each flag offers a clue as to the category and type of word a student should record in the blank area of the track.
 The orange flags demarcate the Mixlib into sections. Students should start recording at the flag and stop before the waveform that follows.
Common words include nouns (objects, animals, names of places, etc.), adjectives, and verbs. Student or teacher names may be requested to create a personalized Mixlib.
Make sure that the first audio track (the story track) is muted (mute button) before beginning the recording. Remember students are not supposed to hear the story until fill-in words have been added!
Selecting a marker (flag) aligns the play back cursor with that section of the Mixlib.
Record. With the second audio track armed, click the master record button (outlined in red) or the “R” key and immediately record a word right after one of the marker flags.
 The red circle is the master record button. The blue circle is the rewind or return button.
Stop recording by hitting the space bar or the stop master record button again. Rewind and play back the recorded word and check for artifacts (unwanted sound), distortion, or other unpleasant sounds that may have been recorded.
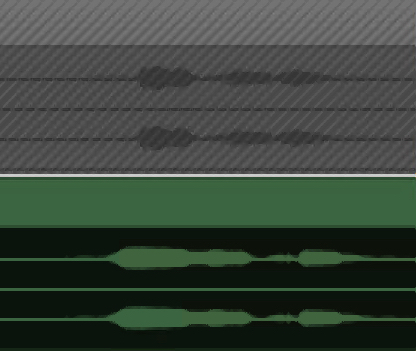
 Recording a Mixlib: The top track (containing the story) is muted so the story will remain silent while the bottom track is being used for recording. Each student added word must be recorded right after the flag markers and before the wave form that follows.
Continue recording a word after each marker flag. The recording is finished when all the Mixlib gaps have been filled in with a word. Hit the space bar or the master record button to stop the recording.
Rewind. Deselect the mute button. The “story” track will now be audible. Play back the Mixlib story. Listen for parts that may need editing: are some words too isolated? Does the story sound like a continuous narrative?
TIP: In order to accurately select the beginning spot for recording, try to Zoom in using the magnifying glass icons or by hitting the “+” key. This will give a closer look at marker placement on the track.
If the Mixlib needs editing, trimming and splitting the recorded audio into individual regions is a useful strategy for changing the arrangement of the Mixlib on the Timeline:
Trimming audio: To trim audio or to shorten/extend recordings, move the cursor near the end of an audio region until a double-sided arrow appears. Simply click, and drag left or right to trim the audio region to the desired length.
 An audio region with excessive silence.
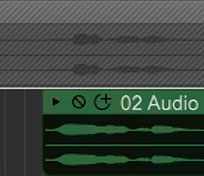 The beginning of the audio has been trimmed closer to the attack (beginning tone) of the waveform, making it easier to line up this region with the rest of the story.
Splitting audio: To move audio regions, it is best to cut the recording into segments. Right click an appropriate area of the audio region and select “split” (Ctrl + T).
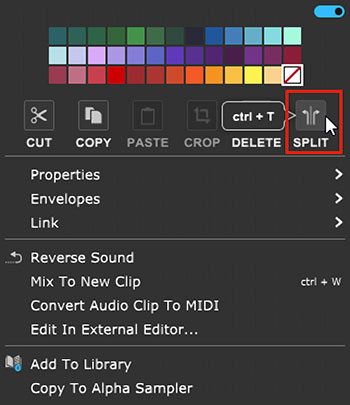 Splitting audio regions is easy. Simply right click and select “split.”
The region will now be cut into two pieces. Grab Workspace to rearrange the recording. and move the regions on the Splitting audio regions is easy. Simply right click and select “split.”
Once the recorded audio regions have been tidied up, arrange the regions to match the rest of the story.
When the Mixlib is finished, mix down the story to a file on the computer. Go to the Menu and select File > Mix down to… > .MP3. Name and save your Mixlib on the desktop!
After the students have mixed down their Mixlibs to .MP3s, educators can gather them and burn the collection to an audio CD. Additionally, educators can create a playlist with a media player and share the Mixlibs during any remaining class time.
ADDITIONAL LESSON PLANS
More Mixlibs: Forgo the templates from the “Additional Materials” download and let students create their own Mixlibs. First, encourage students to write a Mixlib on paper. The Mixlib should tell a story. Next, have students record the story into Mixcraft. Arrange each story with markers and gaps. Have students fill in the blanks to complete the Mixlib assignment. Play back. Edit.
Mix down. Share the results.
Further Reading:
Price, R. & Stern, L. Kid Libs.
Price, R. & Stern, L. Best of Mad Libs.