TEACHER’S GUIDE | |
FILM SCORING PROJECT | |
NSME: | 2, 3, 4, 6, 7, 8, 9 |
GRADE SCHOOL | MIDDLE SCHOOL – HIGH SCHOOL |
CLASS TIME | 3-6 ONE-HOUR PERIODS |
REQUIRED MATERIALS:
Computer with Mixcraft
Video to be set to music
Music Video Student Guides (Additional Materials Download)
SUGGESTED MATERIALS:
Mixcraft Loops & Virtual Instruments
Samples Movies (Additional Materials Download)
Further Reading Materials
OVERVIEW: A film score is a collection of music written specifically for film. It is used to convey the mood of a scene (if a character is feeling sad the music tends to reflect this); to accent dramatic events (a car crashing could be accompanied by loud, orchestral bangs and clattering); or to provide transitions between scenes (an idyllic scene is about to disappear in an explosion of violence). Traditionally a composer’s job is to write the music for a film. The composer or arranger prepares the score based on the needs of the film as defined by the director. After it has been recorded (using digital samples, live musicians or a combination of both), the score is time-stamped to synchronize it with the video.
Conventionally, film music is orchestral. However, many modern film scores contain a hybrid of music styles: they combine western classical music elements with the electronic sounds created by contemporary music technology. In this vein, directors will often choose electronic musicians or indie rock artists to score their film with popular music that is reminiscent of the music of a particular era.
LESSON: In this lesson, high school students will write a short or long film; perform and shoot the film; and complete post-production by adding a score in Mixcraft. The videos can then be scored with loop-based music or with recorded instrumental music. Particular videos can be also selected for the lesson plan. For example, as an alternative to a feature film, students can shoot and produce a music video or Lip-Dub. Lip-Dubs (a live singing overdub of a song) have grown in popularity among middle and high school students. Simply search popular video-hosting sites to find a few examples. As this project incorporates a variety of technical skills, it is recommended that students should have prior experience working with Mixcraft and understand several basic functions – adding /deleting tracks, using Mixcraft’s loops and virtual instruments, editing techniques and perhaps basic recording skills. Additionally, this lesson plan is looser and allows a greater degree of freedom and flexibility. Step-by-step instructions are less structured than they have been for other lessons. Instead of exact how-tos, the lesson offers concepts and approaches for the composition of music for film (and for the filming itself).
SKILLS GAINED
Video Editing
Audio Editing
MIDI Editing
ACTIVITY
Shooting the Film
First, if possible, collaborate with a film class or the school’s video department. Perhaps the school has a video club. Video equipment and software will be needed to shoot and edit the film. Prior to shooting, decide on the length of the proposed film. Short films will inherently require less music and consequently can be scored quickly. Longervideos, however, are usually complex projects that require longer pieces of music and have multiple scenes to score. If a larger project is called for, the lesson can be tailored to have an interdisciplinary approach. This can lighten the burden of the project and broaden the areas of learning. Assume that a music class is usually the core of the project. Below are a number of possible film projects
Short Film: Students write, film, and edit a five minute film. The topic can be anything, from a current event to a toothpaste commercial. Link with other classes if available (e.g. drama, history, English, political science courses):
Create a political advertisement for an upcoming election.
Pretend to be a news anchor and report a current event.
Direct and shoot a short silent film. Silent films lacked dialogue but often required music.
Create a fictitious, “day in the life” documentary pertaining to a character from a book.
Create a music video (lip-dub) of a student composition or production.
Feature Film: Students write, film, and edit a 20-30 minute film. Obvious connections to humanities classes might be: English, theater, or dance. (It might be instructive to have the class watch the movie Super 8 (2011) to get ideas about collaborative efforts.)
First, select a film genre such as mystery, western, or film noir. Then write, direct, and shoot a feature length film.
Create an extended video mashup (a video created by combining clips mined from multiple videos).
Ensure that students have completed all pre-filming technical preparation (equipment checks, script completion, costuming, etc.) and have rehearsed adequately for all the scenes.
In collaboration with the film department or a film class, if possible, film each scene individually.
Rip the recorded video onto a computer. Digital cameras use SD cards, a memory storage device that makes video ripping easy. If possible, rip the video into .AVI or .WMV format.
Edit the film if needed. For advanced edits, use film-editing software. For standard edits, Mixcraft’s video functions can be used.
TIP: Films shot with VCR cameras or with old style film stock will need to be converted to a digital recording. This requires special equipment and will usually require technical assistance. It would be best if students recorded with digital equipment.
SCORING THE FILM
Launch Mixcraft and open File>Set Project Default Settings. In the New Project window, enable the Video Track checkbox and set the Audio Tracks to 4, then click OK. Now click File>New Project.
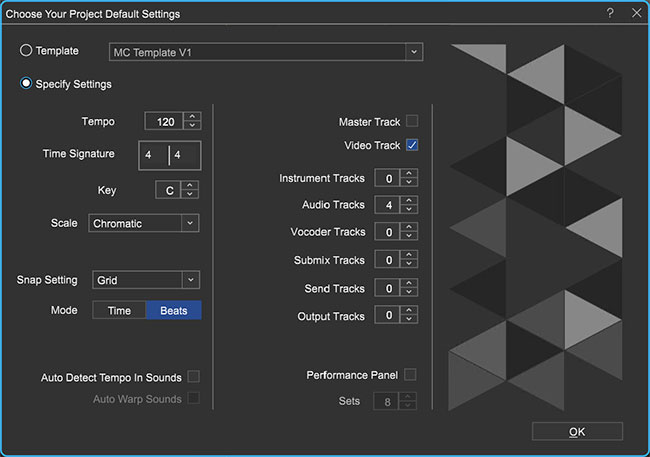 Once the New Project window has loaded, remove any instrument tracks, check the Video Track field and set the Audio Tracks field to 4.
TIP: Several sample videos are supplied on Mixcraft’s Additional Materials Download for classes that are unable to film.
Import the video file. From the top menu select Video > Add A Video File > Select the target video file. Currently, Mixcraft only supports .AVI, WMV, and MP4 file types.
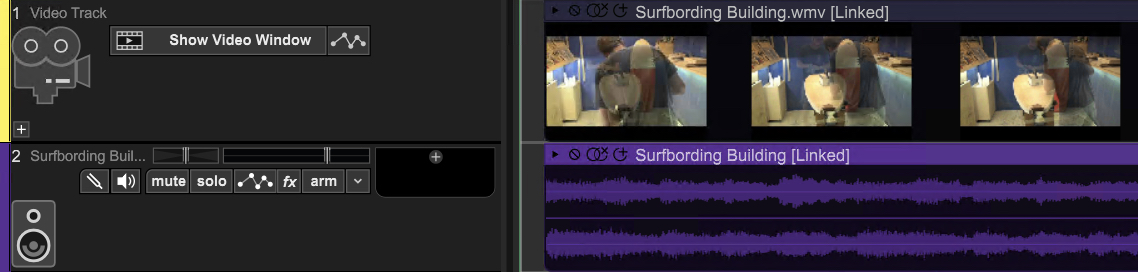 A video imported into Mixcraft. Both the video frames and audio is imported.
Delete any unnecessary music or sound effects that might accompany the video. To do this, first you have to unlink the audio and video tracks. Left-click-hold and sweep-select the video and audio tracks. Release. Now, on either of the tracks: right click > Link > Unlink Selected Tracks. The tracks will now be unlinked. You can now right-click on the unwanted audio track and select “delete.” Be careful not to delete any dialogue or audio sounds that need to be retained!
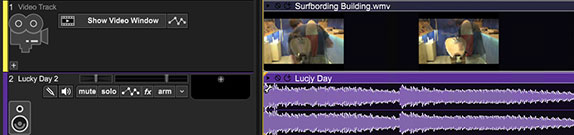 The imported audio track was deleted and a new audio track was loaded in its place.
Play and watch the video in Mixcraft. Encourage students to note important events or sequences that might benefit from the addition of music. Below are suggestions:
Contemplate the mood of the video. Is the scene happy, sad, or suspenseful?
Note any scene changes or transitions.
Note places in which characters exchange dialogue.
Be on the lookout for certain actions or events that take place (i.e. a plate being dropped, a knife chopping a head of lettuce).
Setting a master tempo. After watching the video and taking notes, decide whether the musical accompaniment should be fast or slow: Slow and sustained music for an intimate or dreary scene; or fast paced, suspenseful music for an action-packed scene. Should the music change tempo: bad guys suddenly crash a romantic, candle-lit dinner. Adjust the master tempo to fit the mood of the video (for a fast tempo try setting 140 – 160 BPM, for a slow tempo try setting 75 – 90 BPM).
Begin Composing. Depending upon the flexibility of the lesson plan, students can employ three strategies when composing music for film. Below are suggested workflows:
Use Mixcraft’s Loops
Mixcraft’s loop library is an excellent starting place and a quick way to build a score. First, select a drum or percussion loop and loop it throughout the duration of the video. Next, begin to introduce instrumental parts. A bass line or a loop of chords makes an excellent starting place. Finish the score off by adding sound effects.
Use Mixcraft’s Virtual Instruments
Students can compose original melodies by using Mixcraft’s virtual instruments. Such an approach might be used to capture specific moods: compose in a minor key for bleak or tense scenes or a major key for happy and joyful scenes. First, add a virtual instrument track to Mixcraft. Select the keyboard icon to launch the virtual instrument browser. Students can select from a number of virtual instruments and record a part using a MIDI controller, musical typing, or by programming MIDI with the pencil tool.
 An “A Minor” scale, often used by composers to portray sadness or suspense.
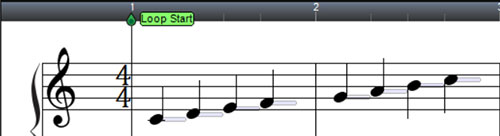 A “C Major” scale often used by composers to portray joyful or carefree moods.
Create personal recordings of music or sound effects
Students can compose and perform original music for the score. Depending on the subject of the film, of course, acoustic instrumental music or a capella parts could certainly be considered. Additionally, recorded sound effects or noises from the environment can give an earthy or mundane reality to the film. Freesound.org is a rich source of thousands of searchable sound effects, directly accessible via Mixcraft’s integrated Freesound.org browser.
To access the Freesound.org library, click the Library tab at the bottom of Mixcraft’s Main Window (note that the computer must be online).
 Once the Library tab is selected, click the Freesound.org button to view and search sounds.
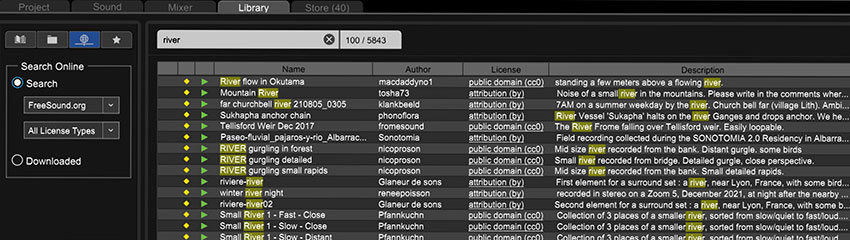 Mixcraft’s Freesound.org online sample browsing window.
Instruct students to experiment with different arrangements of sound effects, recorded audio, or loops on the various tracks. It is important to appropriately align the music and sound effects segments with the appropriate areas of the film track. For example, a properly placed “crash” sound will serve to heighten the emotional impact of a shot where a plate shatters.
FINISHING THE FILM
Adding text: When the music is completed and the film is edited, students can polish off their film with a movie title and credits section:
Adding a movie title: To add a title to the film, select the text feature from the top menu > Video > Add text…
 Selecting the text option in Mixcraft allows users to add text to films.
Next, type the movie title in the text box.
Adding credits: Credits will need to use scrolling text. First, select the “add scrolling text…” feature from the top menu > Video > Add Scrolling text…
Type the credits into the text box.
Finally, arrange the text regions on Timeline. Place the movie title region near the beginning of the film. Place the credit regions near the end of the film.
 Here, the text region for the title is moved to the beginning of the video.
When the music is completed, walk students through mixing down their video. From the top menu select File > Mix Down To > AVI, WMV, or MP4 video format.
ADDITIONAL LESSON PLANS
Lip-Dub: Host a school wide lip dub. For ideas, visit popular video-hosting websites and search for “lip dub.” (Olympic swimmers singing “Call Me Maybe” is a good one). You must have access to video equipment. The cameraman will be recording the overdub in real time. First, select a song to choreograph. Chart a course through the school and have designated locations where different individuals and groups (of students, staff, and faculty) will sing particular parts of the song. The cameraman then moves through the course filming as the various school groups sing their assigned parts. Finish with some special visual. (Perhaps the Principal gets the last line – call me maybe?) Rip the video and align it with the original recorded version of the song.
Film Sound Design: Part of the film production process is the creation of sound effects (the practice which is commonly called “sound design”). Audio engineers are contracted to design sound effects that are novel and memorable (for example, think of the distinct beeps from R2D2, the robot character in Star Wars). Create a lesson plan in which students design sound effects for a general sound library. Encourage students to get creative with how they make and record the songs.
FURTHER READING
Davis, R. Complete Guide to Film Scoring.