TEACHER’S GUIDE | |
RADIO JINGLE PROJECT | |
NSME: | 1, 2, 3, 4 |
GRADE SCHOOL | MIDDLE SCHOOL – HIGH SCHOOL |
CLASS TIME | 1-3 ONE-HOUR PERIODS |
REQUIRED MATERIALS:
Computer with Mixcraft
Mixcraft Loops
Microphone
Radio Jingle Student Guides (Additional Materials Download)
SUGGESTED MATERIALS:
Internet Connection
Headphones/ Monitors
Audio/Computer Interface
Further Reading Materials
OVERVIEW: Music and advertising have a long history together. From the very beginnings of both radio and television, advertisers have used music to create timely, playful, and, most importantly, memorable commercials to sell their products and instill “branding”. Radio advertisers commonly use the “jingle” (a short, catchy tune with a “hook”) to bring products (and the companies that make them) to the attention of the listening audience. The exact origin of radio jingle use is unknown; however, early radio advertisements from the 1920s contained musical elements. Almost anyone today can easily bring to mind examples of contemporary jingles.
LESSON: This project will teach students about basic advertising, loop-based music, and audio recording through the construction of an original radio jingle. Students will choose (or design) a product to be advertised; write a jingle that captures something special about their product; and then use Mixcraft loops to create a simple music piece to go with the jingle. Finally, students will record the jingle over the music and polish the new advertisement by mixing it down into an audio file. For middle and high school students the exercise can become a truly interdisciplinary lesson if the project is partnered with a lesson from a business or marketing course. As part of the lesson, students can study the effects of music on advertising and examine creative marketing strategies that might be applicable to the corporate world.
SKILLS GAINED:
Product Design
Music Production
Audio Recording
ACTIVITY
Writing a Jingle
Have students brainstorm a jingle idea: Research radio jingles or music-based TV advertisements. Many TV and radio networks and TV and radio advertisements use characteristically short melodies or songs to connect to their audience. Name some popular jingles that are currently being aired. How is music being used in these advertisements Encourage students to listen to radio commercials played on the internet or on analog stations.
Instruct students to select a popular product that they would like to compose a jingle for (alternately, students could create their own product or service). If applicable, coordinate with a business course and market a product as part of an extended lesson plan. Here are a few marketing ideas:
A local Pizza shop.
Bus tours for a major city.
Vacation getaways.
A new basketball shoe.
Brainstorm: What is the best way to use a jingle to advertise or showcase this particular product? What effect should the jingle try to achieve? How should it sound? Remember: Jingles make people want the product; and jingles make people remember the product. Here are the three main components of a jingle:
The “hook”: A short, supremely memorable melody or motif that introduces, runs through, or ends the advertisement. The hook is designed to capture the attention of the audience.
Accompanying music: Music that is played in the background while the narrator presents the product. Sometimes it has a catchy, memorable part.
The advertisement: The narration that describes the product to the audience. The narration can be formal, casual, or humorous.
ASK: Will the selected beat compliment the message of the advertisement and help sell the product?
MAKING A BEAT IN MIXCRAFT
Launch Mixcraft and open File>Set Project Default Settings. Set the New Project window Audio Tracks to 4 and click OK. Now click File>New Project.
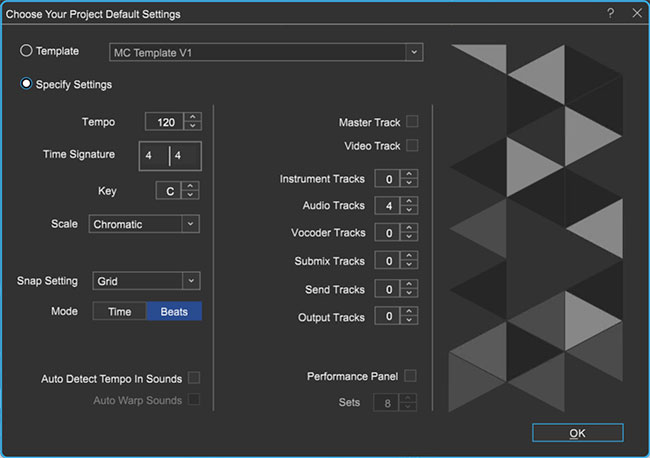 Once the New Project window has loaded, remove any instrument tracks, and set the Audio Tracks field to 4.
Start with the beat. Use Mixcraft’s loop library and select a simple drum loop that will be played throughout the jingle. Again, remind students that the product of the advertisement dictates the nature of the music: should the music be happy and upbeat (amusement park ad)? Or sophisticated and relaxing (bath oil)? Or wild and crazy (beverage commercial)?
First, click the “Library” tab in the Tab Area (located in bottom left hand corner of the screen). Now select “Loops” in the small “Library” pulldown window (selecting “All” in the pulldown will include “sound effects” loops in the list). Mixcraft’s loop library will appear. Here, you can sort the library by instrument.
In the small, “Sort By” pulldown window select “Instrument.”
Select the “Drum” category from the list in the window below the “Sort By” pulldown.
Browse the library for a drum loop. Keep in mind the tempo of the jingle: for slow, soothing jingles try a tempo around 85 – 90 BPM. For upbeat jingles try a tempo around 125 – 135 BPM.
Preview and download loops by clicking the green play arrow next to a loop’s title
Once you have selected a drum loop to use, simply drag and drop the loop onto a free audio track in Mixcraft’s Timeline.
Loop the drum beat out to 60 seconds of play time. Repeatedly click the “circle” with a “+” sign icon on the loop’s audio region until you have lengthened the looped section to a playing time of 60 seconds.
Preview other instrument loops. Try piano, keys, or synthesizer (a loop that is rich in harmony). Pay attention to the key of the loop: whether you choose a major or minor key loop will depend on the scale you chose for your jingle and on the intended mood of the piece.
Drag the selected keyboard loop onto a new audio track in Mixcraft’s Timeline. Again, loop the keyboard track out to 60 seconds of play time.
Expand with more loops if necessary. Try adding one more instrumental loop to the jingle – perhaps a short melody or riff. Remember to leave space in the mix for the vocal message part of the advertisement.
RECORDING THE JINGLE IN MIXCRAFT
Recording the jingle. Before recording The jingle:
Prevent feedback by turning off any speakers or monitors. Record with headphones. This will allow students to hear what they are recording without creating a feedback loop. Connect headphones to the headphone jack on your audio/computer interface, or to your computer.
Connect the microphone to the audio/computer interface with a microphone cord. To make sure Mixcraft is monitoring the audio/computer interface, check File > Preferences > Sound Device tab and confirm that the interface is selected. If using a microphone pop filter, place the filter in front of the microphone. This will help create a clean recording for the jingle.
Testing the audio signal chain before recording:
Add and then arm (click the arm icon) a blank audio track in the workspace. The downward arrow next to the arm button allows users to select the source of the incoming audio. Make sure the computer/audio interface is selected. Check your configuration by speaking into the microphone – the volume meter should jump.
Remember, for clean recordings it best to monitor the incoming audio on the audio track’s volume meter. Record in the “yellow” zone. In this zone, the recordings will be audible, but not so loud that the recording is distorted.
 An example of recording in the “yellow zone.”
If the meter is reaching the “red” area, try dialing back the gain on the audio/computer interface or move the student farther from the microphone.
 An example of recording in the “red zone.” Careful! Recording in the “red” zone could be harmful to your equipment or ears and could distort the recorded audio!
With Mixcraft and the recording equipment configured, help students record their jingles.
If necessary, prompt students for the entry points of their vocal parts. To start, press the master record button on the Master Bar or press “R” on the keyboard.
 The master record button located on the Master Bar.
Once the recording is finished, mix the jingle using the “Mixer” tab in the Tab Area. Adjust the volume or pan settings. When mixing, try to keep the vocals audible and clear – they need to be heard by the audience! Play back the results. Is the “hook” working? Is the jingle catchy? Any need to re-record or edit?
When the mix is satisfactory, mix down the song into a .WAV or .MP3 file. Go to the top left of the workspace and select File > Mix Down To…> and select the file ”type.”
ADDITIONAL LESSON PLANS
Movie Preview: There are, of course, several other mediums which use music to attract its audience. Movie previews short teasers that use music, dialogue, and other sound effects to bring the film to life and hook the audience into wanting to see it. Design a lesson plan in which students create a 1-2 minute movie preview. Supply video footage to the students. Students can then edit the audio and add music where necessary.
FURTHER READING
Karmen, S. Who Killed the Jingle? How A Unique American Art Form Disappeared