TEACHER’S GUIDE | |
RAP IMPROVISATION PROJECT | |
NSME: | 1, 2, 3, 7, 9 |
GRADE SCHOOL | MIDDLE SCHOOL – HIGH SCHOOL |
CLASS TIME | 2-3 ONE-HOUR PERIODS |
REQUIRED MATERIALS:
Computer with Mixcraft
Headphones or Monitors
Microphone
Copies of Rap Improvisation Student Guide (Download Folder)
SUGGESTED MATERIALS:
Audio/Computer Interface
Internet Connection
Further Reading Materials
OVERVIEW: Improvisation refers to the spontaneous creation of music, and is a skill that is often used either during a music performance or as an approach to music composition. Its use varies with the type of music: some specific music genres, such as jazz, Indian classical music, or modern Hip-hop rely heavily on improvisation. Hip-hop, however, is stylistically distinct from many of the other music styles, both contemporary and classic, because of its use of vocal (as opposed to instrumental) improvisation. A vocalist commonly referred to as the “MC” or “master of ceremony” improvises lyrics and rhymes over a repetitious musical background (i.e. “the beat”). Dexterous MCs are masters of wordplay, rhyme, and delivery and are able to produce witty rhymes on the spot. In this lesson plan, the students become the MC through the transformation of the class into a huge, improvising ensemble.
LESSON: Students or the teacher will produce a simple hip-hop beat using Mixcraft’s loops. This beat will serve as the foundation for the student improvisations. Next, each students will, one-after-another, improvise a few lines centered on a theme decided upon beforehand. Recorded the entire performance live and then mix down the recording for later play back. For grade school students, it is often helpful to write down a rhyme before recording. Though this is not true improvisation, younger students might benefit from having a reference. Middle and high school students, however, should try to improvise for the assignment. Jotting down a few lines or ideas might facilitate the rap, but students should not use notes as a crutch. Consider concluding the lesson with a discussion on the practice of improvisation; its relationship to multiple music genres; and its application in music performance.
SKILLS GAINED
Vocal Improvisation
An understanding of loop-based music
Audio Recording /Editing
ACTIVITY
Making a Beat in Mixcraft
Educators can create a beat or have students produce their own beats before recording the improvisation. Or use a beat from a previous lesson.
Launch Mixcraft and open File>Set Project Default Settings. Set the New Project window Audio Tracks to 8 and click OK. Now click File>New Project.
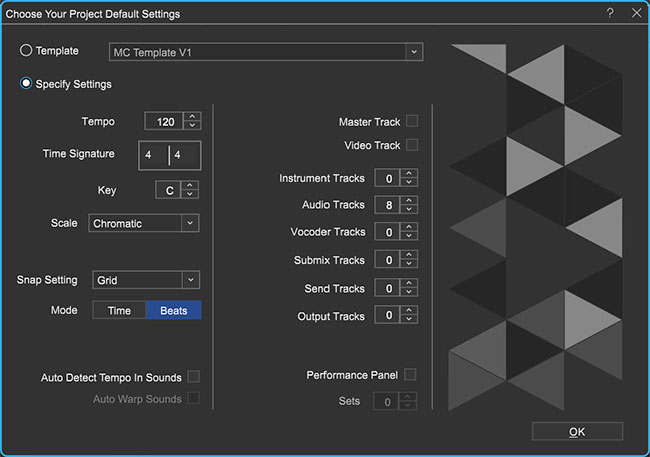 Once the New Project window has loaded, remove any instrument tracks, and set the Audio Tracks
field to 8.TIP: To download loops your computer must be connected to the internet.
Finding Loops. Use Mixcraft’s loop library to create a simple hip hop beat:
First, click the “Library” tab in the Tab Area (located in bottom left hand corner). Mixcraft’s loop library will appear.
Change the “Sort by” option to “Style.”

Select the “Hip Hop” category.
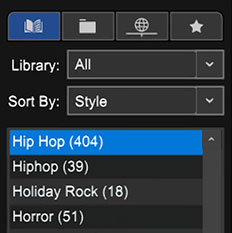
Begin browsing the Hip Hop category for a drum loop. Keep in mind the tempo of the loop.
TIP: A Hip Hop song is usually played at a tempo of 90 – 100 BPM. Look for loops that are close to this BPM range.
Preview and download loops by selecting the green play arrow next to loop’s title.Mixcraft will begin to play the loop.
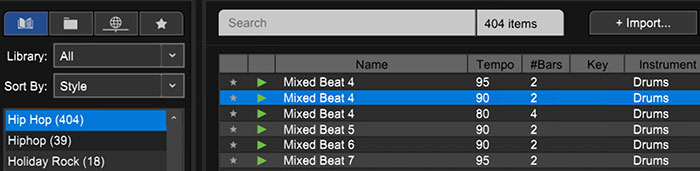 The Mixed Beat 4 in the Urban Street Mix kit is a great Hip Hop drum loop.
TIP: Included on the “Additional Materials Download” is a pre-made beat from a Mixcraft session. If educators are pressed for time, simply use this session and immediately start improvising!
Select a drum loop. The Mixed Beat 4 from the Urban Street Mix kit is a fantastic hip hop drum loop. Once a drum loop has been selected, simply drag and drop it onto a free audio track in Mixcraft’s Timeline.
Loop the drum beat for several measures by clicking the circle with a “+” sign icon the on the loop’s audio region.
 The drum beat has now been looped for several measures by clicking the circle and plus sign icon.
Next, select a piano, keys, or synthesizer loop. The Rhodes 3 piano loop in the Urban Street Mix kit fits well in many hip-hop songs.
 Browse through keyboard loops that might compliment a hip hop beat. Here the Rhodes 3 loop is selected.
Drag the selected keyboard loop onto a new audio track in Mixcraft’s Timeline. If desired, loop the keyboard part for multiple measures.
A single drum loop with a groovy keyboard is adequate for a hip-hop beat. However, you might want to spice up interest in the beat by adding more instrumental loops.
For example, in the sample beat from the “Additional Materials Download,” several parts were added to the drum beat and keyboard loops: a synth lead, scratching sounds, and an electric bass line. This helped vary the mix and arrangement. Remember that you will be improvising over the beat – so be sure to leave space in the mix for these vocal parts.
Finish the beat by looping the drums and keyboards to provide several minutes of play time. Depending on the class size and the allocated measures for each student improvisation, you may need to loop your beat beyond the number duration of a popular song. Even ten minutes may be too short.
IMPROVISING WITH MIXCRAFT
Choose a topic for the rap improvisation. For younger students, daily narratives (such as a weekend expedition or an event that took place during summer vacation) are easy topics to rap about. The improvised rap relays a story. Older students can improvise about more complex topics. Suggestions are listed below:
Rap about your favorite food
Rap about a pet, a friend, or your favorite teacher
Rap about your favorite holiday
Rap about one of your hobbies
If necessary, encourage students to write out a script or even a few lines. Though a predetermined rap is a deviation from a lesson on improvisation, a script may help younger student deliver the rap into the microphone during recording.
Recording the improvisation. There will be only one set up, since this lesson is a group effort. First, ensure that the microphone and audio/computer interface are set up properly. Here is a typical setup practice:
Turn on monitors but move the microphone away from the speakers. Students will need to hear the music while improvising. However, if the microphone starts to pick up the audio coming from the monitors a feedback loop will be created.
Next, connect the microphone to the audio/computer interface with a microphone cord. Use a long microphone cord if possible. This will make it easy to pass the microphone around the room. To make sure Mixcraft is monitoring the audio/ computer interface, click File > Preferences > Sound Device tab and confirm that the interface is selected.
Insert a new audio track (Top Menu > Track > Add Track > Audio Track). This track will be used to record the rap improvisation.
Arm the new audio track in the workspace by clicking “arm.” The downward arrow next to the arm button will enable users to select the source of the “incoming audio signal” (the microphone). Make sure the correct interface is selected. To check the configuration, speak into the microphone – the volume meter should jump.
For clean recordings educators will want to monitor the incoming audio of the student’s improvisation by checking the audio track’s volume meter. Record in the “yellow” zone. In this zone, recordings will be audible but not so loud that added artifacts (unwanted or accidental sounds) will “dirty” the recording.
 An example of the yellow or “safe” zone to record in.
If the meter is reaching the “red” area, try dialing back the gain on the audio/computer interface or tell the student to move farther away from the microphone. Careful!
Recording in the “red” zone could be harmful to your equipment or ears and could distort the recorded audio!
 An example of the “red” or “unsafe” zone. This area could damage your ears and recordings.
Begin recording by hitting the “master record button” or by pushing “R” on the computer keyboard.
Start the improvisation by recording an introduction over the beat. Identify the class, the period, and what the rap improvisation will be about.
Pass the microphone around to each student and let him/her improvise. Assign an amount of improvisation time: two measures should be enough for each student to improvise a few lines. Continuing passing the microphone until all the students have improvised.
Stop recording by clicking the master stop button.
Select the “mixer” tab in the Tabs Area. If need be, adjust the volume of the vocal improvisation track or of the other instrument tracks so the vocal improvisation sits “on top” of the mix and can easily be heard.
Finally, mixdown the improvisation. Go to Menu > Mix Down To > and select the correct file format (.MP3 or .WAV).
ADDITIONAL LESSON PLANS
Spoken word: Spoken word is a type of performance poetry that focuses on dramatic interpretations of written text. Create a project in which a class participates in a grand performance of a poem. Have each student write a verse and then string all the verses together to form a complete poem. Spoken word is generally not performed with music. Encourage students to focus on their unaccompanied, solo delivery. Record the performance, as the students, one after the other, recites a verse of the poem.
FURTHER READING
Edwards, P. How to Rap: The Art and Science of the Hip-Hop MC
Brewster, B. & Broughton, F. Last Night a DJ Saved My Life.